


CGKB News and events In vitro bank for banana
Establishment of aseptic cultures of banana


|
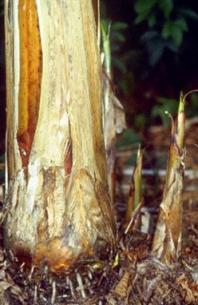
Mother plant and young shoots – source of material (photo: IITA)
|
Contributors to this page: Bioversity International, Belgium (Ines Van den Houwe); IITA, Nigeria (Dominique Dumet, Badara Gueye).
New accessions can be received as small samples of in vitro cultures from other collections, seeds of wild types or as classical vegetative propagation materials (apex-containing parts of the banana plant). When materials come from the field, a series of procedures are required and are described below:
Initiation of shoot tip cultures from suckers
In Musa, explants can be obtained from all plant parts that contain a shoot meristem: the parental pseudo stem, its suckers, peepers, sword suckers, lateral buds or very small eyes.
- Explants should preferably be isolated from young, vigorous and healthy looking suckers of 40-100 cm in height with a corm diameter of about 10 cm.
- These should be collected from acharacterized flowering mother plant to guarantee trueness-to-type.
Usually only the apical meristem is available from a trimmed sucker. Eventually, smaller buds (sleeping eyes) on the corm can also be used as explants for tissue culture initiation.
Explant isolation and disinfection
- Excise from the sucker a cubical block of tissue (2x2x2 cm) containing the apical meristem.
- If there are buds on the corm surface present, excise the buds surrounded by 0.5 cm of corm tissue.
Surface sterilization of explants
- Transfer each cube of tissue to a different Erlenmeyer flask.
- Soak each individual cube of tissue in ethanol (96%) and shake gently.
- Immediately decant and rinse for 30 seconds in sterile deionised water.
- Transfer the Erlenmeyer flask to a laminar air flow cabinet.
- Emerse each plant tissue cube for 20 minutes in a 2% hypochlorite solution or diluted commercial bleach solution supplemented with a few drops of Tween 20 (surfactans). Liquid dish-washing detergent can be used if no Tween is available.
- Cover the Erlenmeyer flasks with a glass petri dish lid and swirl the solution frequently.
- Decant the hypochlorite solution.
- Then rinse three times in the space of ten minutes with sterile deionised water and decant.
Excision of explants
Shoot apices of bananas are enclosed in many tightly overlapping leaf initials. The shoot tip is about 2-5 mm in size and consists of the meristem covered with several leaf primordia supported on a small base of corm tissue.
- Remove the outer tissue that was exposed to the disinfectant solution from all sides of the cube.
- Sterilize dissection instruments repeatedly during manipulation by flame of glass bead sterilizer.
- Remove stepwise the covering leaf primordia, cut away as much corm tissue as possible, as this causes blackening of the culture during initiation.
In case of high risk of bacterial contamination, i.e. when suckers are harvested during the wet season, it is recommended to excise a smaller explant consisting of the meristem covered with 1-2 leaf primordia (1 mm).
- To excise the meristem tip, place the excised shoot tip under a dissecting microscope (working in a laminar flow cabinet) and further reduce the size by removing leaf primordia and some corm tissue at the base of the explant.
Tissue culture initiation
- Immediately place the excised explant onto culture initiation medium.
- Push the explant slightly into the culture medium to ensure good contact.
- Keep the cultures in complete darkness for one week to reduce blackening (photo-oxidation of polyphenols).
- Growth of the tissue should start about two weeks after inoculation, accompanied by a swelling of the leaf sheet tissue and corm tissue, a change of colour from white to green, and abundant oxidation of polyphenolic compounds that are released from the corm tissue (blackening of the tissue and surrounding growth medium).
- Transfer the explants to fresh medium every two weeks during the first eight weeks in culture.
- Trim the blackened and/or swollen corm tissue, if necessary, leaving the viable leaf primordia tissue of the explant intact.
- After 10-12 weeks the explant will develop into a shoot.
- Record the survival rate and visible contamination at each transfer for each replicate.
The size of the explant is an important factor in the successful culturing of shoot tips of bananas. Very small explants increase the chance of producing bacteria-free and virus-free cultures, but the mortality rate is high. Intermediate sized explants produce clean vigorous cultures that multiply rapidly whereas very large explants tend to show more blackening and contamination, and thus lower rates of successful tissue culturing.
Initiation of tissue cultures from seeds
For wild banana species, seeds can also be used to initiate tissue cultures, if no vegetative propagation material is available. However germination of banana seeds is known to be low and erratic, therefore preference is given to direct culturing of the axenic embryo isolated from the seed (= embryo rescue).
Surface disinfection of banana seeds
- Soak the seeds for 2-3 days in tap water, without stirring, in an Erlenmeyer flask. Refresh the water daily in order to avoid fungal contamination or growth.
- Soak the seeds for two minutes in EtOH (95 % v/v) in an Erlenmeyer flask and cover the flasks with a lid.
- Decant and transfer the flasks to a laminar air flow cabinet. Disinfect the seeds in a 1.5% hypochlorite solution and 1-2 drops of Tween for 20 minutes and shake gently. Wash the sterilized seeds with sterile deionised water rinsing twice in 15 minutes.
Embryo isolation
- Use forceps to fix the seed on a sterile cutting pad.
- Cut the seed lengthwise next to the micropyle.
- Remove the plug and pick up the embryo.
- Place the embryos on embryo germination medium in glass test tubes.
- Incubate the embryos under normal conditions for banana shoot tip cultures.
Germination can start about two days after inoculation, accompanied by a colour change from white to yellow and abundant formation of root hairs. Once cultures are successfully initiated, regular testing of the plant material for asepsis should start.
Contamination indexing (bacteria)
A primary requirement in the establishment and permanent maintenance of an in vitro collection is the asepsis of the tissue cultures. Sterility of the cultures is also of paramount importance for their intercontinental exchange and whenever cultures are used for various research purposes.
To safeguard the in vitro cultures against microbial contamination, and to prevent the spread of contaminants in the tissue culture system, monitoring of the material for asepsis should be performed at crucial steps (see Tissue culture testing below) and at regular intervals during the processing of material in the genebank.
Visual examination
- Bacterial contamination can be detected as faint ‘clouds’ in the medium around the basal part of the explants or culture. Therefore, the use of a clear gelling agent (Gelrite) in tissue culture will facilitate the detection of contamination.
- Sometimes even colony growth is detected around the tissue on the surface of the growth medium.
Most of the time however the contaminants remain deep seated inside the plant tissue and only appear in the growth medium under favourable conditions (increased sucrose concentration, change of pH of the medium, increase of the ambient temperature, deterioration of the plant tissue etc.).
Tissue culture testing
Tissue culture testing should usually be done upon introduction of new material, during storage and at annual subculturing. The screening test is simple and non-destructive. Testing involves streaking of the basal part of the shoot tip onto a semi-solid bacteriological medium.
- The test should be done at subculturing just before transferring the explant to the growth medium.
- A single shoot tip should be isolated from the culture and trimmed to a suitable size for transfer to fresh culture medium.
- The corm basis of this shoot tip should be streaked three times onto bacteriological medium and immediately placed onto plant growth medium.
- The petri dishes should be sealed with parafilm and incubated at 28°C.
- The standard testing medium is a broad spectrum bacteriological medium, which allows growth of a wide range of bacteria. The medium includes nutrient agar (8%), enriched with yeast extract (5 g/l) and glucose (10 g/l).
- Most bacteria are fast growing and will appear on the medium after two or three days, but slow growing contaminants may require up to eight weeks to appear on the medium. It is thus important to observe the medium for at least two months after testing.
-
In case of inconclusive results, alternative and complementary detection methods can be applied:
- Using specific/selective growth medium.
- Macerating the tissue and incubating in liquid the bacterial growth medium.
- Using polymerase chain reaction (PCR) methods.
Decontamination treatment
Contaminated cultures should be eliminated by autoclaving. However, when all replicates of one accession at initiation or in storage are tested positive, contaminated material cannot simply be discarded as the accessions may be unique and difficult to replace. They should then be subjected to a decontamination treatment.
- Before applying a decontamination treatment it is recommended to characterize the isolated bacteria in order to determine the most effective method of eradication.
- For routine application, meristem culture, for which only a rough characterization of the contaminant is required, is preferred over treatments with antibiotics of which the therapeutic success depends on the identification of the contaminant, bacterial sensitivity and phytotoxicity. Moreover, the application of antibiotic agents may involve the risk of developing resistant bacterial strains.
Elimination of bacteria through meristem culture
This technique involves the isolation of aseptic meristems from the contaminated in vitro cultures. Depending on the type of contaminating bacteria, the eradication method is further refined by subjecting either contaminated in vitro or greenhouse grown contaminated plants to meristem culture.
- Culturing 1 mm sized meristems, directly isolated from contaminated in vitro plants, is found most effective to eliminate bacteria like Bacillus sp.
- The shoot tip must be isolated from the contaminated culture and further reduced to 1 mm in length under a dissecting microscope. Young leaves must be removed until the dome covered by two to three leaf primordial remains.
- It is important that the corm tissue is carefully and maximally removed, as bacteria often reside in this tissue.
- The excision of the meristem tip should be done under stringent aseptic conditions in order to minimize the risk of transferring bacteria to the aseptic inner meristematic zone of the explant.
- It is essential that the explant material only comes into contact with sterile instruments and surfaces. Between use, forceps and scalpels should be sterilized (in a glass bead sterilizer or flame) and the cutting pad should be sterilized before the surface comes into contact with a freshly cut tip.
Elimination of bacteria from greenhouse plants
In some cases, for instance when the tissue cultures are contaminated with very small sized bacteria, the method described above is less effective. For a successful elimination of these bacteria, the explant size might need to be further reduced. These smaller sized explants, however, often fail to establish in vitro. Therefore, an alternative approach to eliminate bacteria is to isolate explants from greenhouse plants, acclimatizing the in vitro plants.
- The contaminated in vitro plants should be transferred to potting soil in PET pots in a greenhouse and grown for a period of 3-6 months or until the stems reach a diameter of at least 5 cm.
- The plants should be kept dry for 2-3 weeks and then explants of 1-3 mm tips can be isolated to re-initiate in vitro cultures.
- The newly established cultures should be re-tested for at least five subculture cycles in order to confirm their bacteria-free status.
Antibiotic treatments
An antibiotic treatment involves exposure of the contaminated shoot tip material to a bactericidal concentration of an antibiotic agent without affecting the growth of the shoot tip.
The antibiotic most often used is rifampicin. This antibiotic is able to kill Gram+ and Gram- bacteria without affecting the growth of the banana shoot tip (the MBC of rifampicin does not exceed the phytotoxic concentration). Other antibiotic agents tested seemed to be ineffective on most of the bacterial isolates and/or had a toxic effect on the plant tissue.
- Prepare liquid MS-based regeneration medium containing rifampicin HCl (100 mg/l) in Erlenmeyer flasks. Place one contaminated tip of 0.5 mm in 10 ml medium in an Erlenmeyer flask and incubate for 30 days at 28°C in light on a rotary shaker (60 rpm) and light intensity of at least 25 mµ m² s-1.
- After one month, the treated plant material should be taken out of culture. The aseptic shoot tip should be excised and cultured on a fresh antibiotic-free medium.
- The newly established cultures should be re-indexed for at least 5 subculture cycles in order to confirm their bacteria-free status.
References and further reading
Van den Houwe I, Panis B, 2000. In vitro conservation of banana: medium term storage and prospects for cryopreservation. Razdan MK, Cocking E, editors. Conservation of Plant Genetic Resources in vitro. Vol. 2. M/S Science Publishers, USA. pp. 225-257.
Van den Houwe I, Guns J, Swennen R. 1998. Bacterial contamination in Musa shoot tip cultures. Acta Horticulturae 490: 485-492.
Rejuvenation of banana tissue culture
Contributors to this page: Bioversity International, Belgium (Ines Van den Houwe); IITA, Nigeria (Dominique Dumet, Badara Gueye).
|
Greenhouse regeneration |
Why regeneration/rejuvenation of stored tissue cultures
Regeneration and rejuvenation of an accession involves the transfer of the accessions to the greenhouse and field in order to check their trueness-to-type (identity and conformity). Rejuvenation is the replacement of the tissue cultures in storage by a set of quality material derived from the verified material. Often both activities are combined.
Using field established plants for harvesting shoot tips to rejuvenate the accession in storage would require re-indexation for viruses, as the plants could have been exposed to viruses.
In order to rejuvenate an accession without having to go through re-indexation of the material, in vitro plants from the accession should first be established in the greenhouse.
It is recommended that this standard procedure involving regeneration and rejuvenation of accessions should be carried out for any accession being maintained continuously in vitro for more than ten subculture cycles (or ten years in MTS):
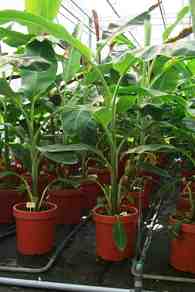
Regeneration of plants in the greenhouse
- From the set of cultures in storage, a representative sample of five cultures should be randomly selected and regenerated into five rooted plantlets. These plants should be planted out in the greenhouse.
Decapitation of suckers
- Approximately nine months after the planting date, when the sucker diameter is at least 4.5 cm, greenhouse plants should be decapitated in order to stimulate the outgrowth of new shoots.
- The corms should be taken out of the pots and the adhering soil must be gently removed, without damaging the sleeping buds on the corm.
- The roots should be cut back to about 5 cm from the corm surface, leaving the corm tissue and dormant buds intact.
- Leaf sheaths should be cut back to about 5cm above the corm leaving all lateral buds covered.
- The apical shoot tip should be removed by excising a cube of tissue of 2x2x6 cm³ from the upper centre of the corm.
- The disinfection, shoot tip culture initiation and bacterial indexing procedures that must be applied next are described in sample procedures.
- In order to avoid fungal deterioration of the prepared corms, the basal part must be sprayed with a fungicide and the upper part must be protected at the cut surfaces with a thin layer of a Vaseline-fungicide mixture.
- Corms should be ‘replanted’ in five litre pots filled with a mixture of peat and soil, and topped up with a 10 cm layer of vermiculite.
- The decapitated corms should be kept in a greenhouse at an ambient temperature ranging between 18°C (night) and 26°C (day) and a RH of 70-90%.
- Four months after decapitation, one single sucker per accession, producing the highest number of new and normal looking shoots must be selected.
- Shoots of at least one centimetre are suitable for shoot tip isolation and tissue culture initiation.
- All shoot tips should be harvested and re-initiated in vitro following the protocols described for sample procedures.
In vitro plants derived from two shoot tips must be sent to the field for verification. If these plants are confirmed true-to-type (after two growing cycles), the remaining shoot-tips from the same sucker can be further multiplied in vitro and replace the old set of replicates in cold storage.
The whole regeneration/rejuvenation cycle takes about 20-22 months.
Field verification and characterization of accessions
- Accessions must be verified for their trueness-to-type in the field. Ideally, they are grown in a field collection next to the original mother plant and observed for their morphological characteristics (using a minimal set of descriptors) during two subsequent growth cycles.
- Accessions that are confirmed to possess the same characteristics as the original genotype can be declared true-to-type and they are renewed in MTS following the rejuvenation process described above.
- Accessions identified as off-types with no value, or accessions which are found to be mislabelled (ML), must be discarded and replaced with the original true-to-type material from the donor source.
References and further reading
Van den Houwe I, Panis B, Arnaud E, Markham R, Swennen R. 2006. The management of banana (Musa spp.) genetic resources at the IPGRI/INIBAP gene bank: The conservation and documentation status. In: Segers H, Desmet P, Baus E, editors. Tropical Biodiversity: Science, Data, Conservation. Proceedings of the 3rd GBIF Science Symposium. Brussels, Belgium, 18-19 April 2005. pp.141-150.
In vitro conservation of banana genetic resources
Contributors to this page: Bioversity International, Belgium (Ines Van den Houwe); IITA, Nigeria (Dominique Dumet, Badara Gueye).
What is in vitro conservation
During the last 40-50 years in vitro techniques have been increasingly used for plant propagation. They consist in growing and multiplying parts of plants in flasks or tubes in artificial media, under controlled environments and sterile conditions.
Common banana in vitro techniques used in conservation are listed below:
- Slow growth storage – using tissue culture techniques and growth retardant conditions (temperature, light, chemicals).
- Cryopreservation.
Where is it used
An increasing number of countries has invested in tissue culture facilities for the propagation of clonal crops, including banana.
Initially, traditional tissue culture techniques (shoot tip and meristem culture) were used as a tool for the elimination of pests and diseases, rapid plant propagation and for the exchange of clean germplasm. As institutes became more experienced with these techniques, and the number of accessions in collections steadily increased, the available techniques were optimized and extensively adopted for slow growth conservation of germplasm. Until now however very few genebanks have initiated banana conservation activities using cryopreservation techniques.
When should it be used
In vitro conservation techniques should be used whenever technical expertise and facilities are available. They are generally more economic and less risky in a long-term perspective.
- To conserve plant parts of banana germplasm that can mostly be propagated vegetatively
- As a viable alternative to complement and reduce the large space required for field banks.
- In vitro conservation has low space requirements and minimal possibility of losses due to edaphic factors.
- To duplicate material contained in field banks.
- To replace field banks.
- To allow international germplasm exchange.
- To ensure a more secure conservation of germplasm for future generations.
- Costs (qualified labour, energy, supplies and infrastructure) are highly dependent on location and ecomomies of scale should be considered when taking in vitro conservation into consideration.
How should it be done
- It requires specialized laboratories and equipment with very skilled technicians and researchers.
- It also requires adaptive technologies for some more reluctant species.
- It requires sterile conditions and very well controlled artificial growth environments.
- It requires high initial investments but relatively low maintenance costs in a long-term perspective.
- In vitro conservation should only be considered if the laboratory forms part of a conservation strategy involving also other crops.
References and further reading
Benson E, Harding K, Debouck D, Dumet D, Escobar R, Mafla G, Panis B, Panta A, Tay D, Van denhouwe I, Roux N 2011. Refinement and standardization of storage procedures for clonal crops - Global Public Goods Phase 2: Part III. Multi-crop guidelines for developing in vitro conservation best practices for clonal crops. Rome, Italy: System-wide Genetic Resources Programme. Available here.
Benson E, Harding K, Debouck D, Dumet D, Escobar R, Mafla G, Panis B, Panta A, Tay D, Van denhouwe I, Roux N 2011. Refinement and standardization of storage procedures for clonal crops - Global Public Goods Phase 2: Part II. Status of in vitro conservation technologies for: Andean root and tuber crops, cassava, Musa, potato, sweetpotato and yam. Rome, Italy: System-wide Genetic Resources Programme. Available here.
Benson E, Harding K, Debouck D, Dumet D, Escobar R, Mafla G, Panis B, Panta A, Tay D, Van denhouwe I, Roux N 2011. Refinement and standardization of storage procedures for clonal crops - Global Public Goods Phase 2: Part I. Project landscape and general status of clonal crop in vitro conservation technologies. System-wide Genetic Resources Programme. Available here.
Calles T, Dulloo ME, Engels JMM, Van den Houwe I. 2003. Best Practices for Germplasm Management - A new approach for achieving genebank standards. Technical Report. International Plant Genetic Resources Institute, Global Crop Diversity Trust, Rome, Italy. Available here.
Mafla G. 1994. Conservación de germoplasma In vitro. In: King C, Osorio J, Salazar L, editors. Memorias I Seminario Nacional sobre Biotecnología. Universidad del Tolima. Colombia. pp. 65-77.
Roca WM, Chaves R, Marin ML, Arias DI, Mafla G, Reyes R. 1989. In vitro methods of germplasm conservation. Genome 31 (2):813-817.
Roca WM, Mafla G, Segovia RJ. 1991. Costo mínimo de un laboratorio de cultivo de tejidos vegetales. In: Roca WM, Mroginski LA, editors. Cultivo de tejidos en la agricultura: Fundamentos y Aplicaciones. pp. 912-920.
Szabados L, Nuñez LM, Tello LM, Mafla G, Roa JC, Roca WM. 1991. Agentes gelanitizadores en el cultivo de tejidos. In: Roca WM, Mroginski LA, editors. Cultivo de tejidos en la agricultura: Fundamentos y Aplicaciones. pp. 79-93.
Slow growth storage of banana germplasm
Contributors to this page: Bioversity International, Belgium (Ines Van den Houwe); IITA, Nigeria (Dominique Dumet, Badara Gueye).
|
Contents: |
Sample processing for tissue culture banks
Multiplication of propagules for conservation
When an accession has successfully passed the initiation phase (click here for details), then it is ready to be multiplied for storage, either for normal growth or slow growth conservation. This multiplication phase is also required for rapid propagation of selected materials for research or distribution.
Starting material
- The desired number of proliferating cultures must be obtained through repeated subculturing of propagules on proliferation medium.
- For rapid multiplication purposes, shoot tip cultures should be subcultured at 4-6 week intervals.
- Clusters of multiple shoots should be divided into individual or smaller groups of 2-3 micro-shoots and/or buds.
- Superfluous corm tissue and blackened tissue should be trimmed.
- The shoots must be shortened to a size of 5-7 mm in height.
- Each excised shoot tip or group of shoots /buds should be transferred onto a fresh pre-sterilized multiplication medium.
- The cultures should be incubated at an ambient temperature of 28±2°C and a light intensity of 64 µmol m-2 s-1.
- After 2-4 weeks, new lateral shoots and/or buds start to develop.
- After a further two weeks, subculturing can be repeated.
This propagation phase of an accession may vary from a few weeks to a few months as the multiplication rate strongly depends on the genomic group to which the accession belongs and is influenced by the composition of the medium (particularly the cytokinin concentration), the explant size, age of culture and the size of the culture vial.
Visual inspection of plant materials
- As the storage capacity strongly depends on the initial quality of the cultures, the general performance of each culture should be visually assessed: vigour, absence of fungal and bacterial contamination, chlorosis, blackening, necrosis of the tissue before transfer to slow growth storage.
Disposal of contaminated materials
- Contaminated and low quality cultures should be immediately discarded. If the entire set is below standard because at least one of the criteria is not met, the cultures should be re-propagated onto a new medium.
- If sufficient suitable cultures are available for storage, the culture tubes should be sealed with a few layers of parafilm and transferred to slow growth conditions.
Watch the video illustrating the aseptic subculturing process of banana shoots
Or view the video on Youtube
Storage for tissue culture banks
- When the desired number of cultures for slow growth storage is obtained, the set of replicate cultures must be carefully observed after 2-3 weeks of growth.
Sample specifications
- An optimal sample size should be determined based on the purpose of the collection, taking in account most risks of possible losses.
- Based on statistical data, the proper sample size was determined between 12 and 24.
- An optimal number of 16-20 replicate shoot cultures per accession should be kept in storage.
- An accession tray containing an estimated reasonable number of replicate cultures should be placed in its assigned slow growth storage location within the storage growth room.
Container specifications
- Individual cultures should be stored in glass test tubes (150 mm height and 2.5 mm diameter), closed with a plastic kaput and sealed with several layers of parafilm in order to limit evaporation.
Growth media
- The test tubes should contain 20 ml of proliferation inducing culture medium composed of the MS Murashige and Skoog -mineral salts and vitamin mixture (Murashige and Skoog 1962) and be supplemented with 30 g/l sucrose; two growth regulators should be incorporated into the medium: cytokine in relatively high concentration (2.25 mg/l BAP) in order to induce multiple shoot/bud formation and an auxin (0.175 mg/l IAA) and solidified with 2 g/l Gelrite. (Van den houwe et al. 1995).
- The medium should be adjusted to pH 6.2 prior to autoclaving the medium.
Culture facility regimes
- The accession tissue cultures should be stored at an ambient temperature of 16°±1°C and at reduced light intensity of 25 µmol m² s-1.
- A 24-hour light regime should be applied and the relative humidity of the storage room should be kept at 75%.
Storage duration
If the above physical and chemical storage conditions are followed, an average period of 12 months can be expected before re-culturing is required. These storage conditions are minimal growth conditions that proved to be acceptable for most genotypes. Not all accessions and genotypes, however, respond equally well to the applied conditions. (Further reading: Van den houwe et al. 1995).
System for tracking materials/inventory system during tissue culture storage
- The cultures should be inventoried every time subculturing is carried out.
Monitoring the performance of tissue cultures in slow growth storage
Need for subculturing multiplication of stored cultures
Quantitative and qualitative criteria should be considered to define the moment that an accession should be recycled after the material has been maintained for a given time in storage.
- When the number of cultures maintained is reduced below the threshold value of 12, the accession should be moved to the transfer room for subculturing.
- If the number of cultures is higher than 12 but all cultures are characterized by an advanced stage of deterioration, necrosis, chlorosis, blackening or hyperhydrity, the accession should also be moved to the transfer room for subculturing (see routine monitoring methods).
- Ideally, one accession should be re-propagated into a set of 20 fresh shoot culture replicates, performing one subculture cycle. If, however, the number of newly established cultures is lower than 16, subculturing should be repeated to increase their numbers.
- In order to minimize the risk of selecting variant plant material from the remaining set of cultures, at least one shoot tip (with a maximum of three) should be isolated from each individual viable and healthy culture.
- Each individual shoot tip should be transferred to another recipient containing fresh culture medium.
- For safety reasons it is always recommended to hold 2-4 viable and healthy cultures of the previous subculture cycle as spare materials until it is known that the newly subcultured set is healthy and growing.
- Propagules should initially grow for 2-3 weeks under normal growth conditions at an ambient temperature of 28°C and under a PPF of 63 µmol m-² s-1 (with a 24-hour photoperiod).
The spare cultures from the previous storage cycle can be discarded when the new set of cultures are transferred to the cold storage conditions described above.
Inventory and monitoring of stored cultures
Accessions growing in tissue culture need to be inventoried and monitored on a timely basis in order to assess the number of healthy cultures remaining in storage and to determine the need for subculturing. The interval for routine visual monitoring of an active Musa collection should be about one month. Each individual culture in the accession tray should be checked visually and unsuitable cultures removed.
Checking the quality of the plantlets
The following factors should be taken into account to determine the quality of stored accessions:
- Viability.
- Vigour.
- Necrosis (of the leaves and apex).
- Chlorosis.
- Blackening of tissue / medium discoloration.
- Hyperhydricity.
- Ethiolation.
- Contamination
Plantlets of unacceptable quality should be immediately discarded.
Checking the number of replicates
- When the number of remaining healthy cultures falls below 12 or if the cultures are of unacceptable quality, the accession should be re-cultured under normal growth conditions in the following month.
- If a critical level of four or less cultures is reached, the accession must be considered at risk and immediate action should be taken to re-propagate or rescue the accession.
- In the case of contamination of all replicates, material should be transferred to the greenhouse, if plantlets are available. Otherwise, the propagules are regenerated and/or subjected to a decontamination treatment.
- If all remaining propagules are of poor quality, the material should either be immediately subcultured or rescued by being transfered into the greenhouse.
- If more than 12 cultures of the desired quality are left over in storage, the conservation cycle should continue for another month.
Monitoring genetic stability
Unless germplasm is regularly regenerated and transferred to the field for morphological observations, combined with the use of cytological techniques, genetic stability of a certain sample cannot be ascertained. Occasionally, abnormalities can be assessed in the in vitro samples.
In vitro assessment of variation
One of the criteria for efficient in vitro storage of germplasm is the maintenance of original genotypes over long periods of time. Although organized cultures (meristems, shoot and root-tip cultures) are believed to be genetically more stable than disorganized cultures (cell suspensions, protoplasts, callus, differentiated cells) variation appears to be relatively widespread in micro-propagated plants.
Factors like the culture mode, time in culture, number of subculture cycles, genotype and composition of the culture medium are known to influence the occurrence of somaclonal variation. The type and frequency of variation in micropropagated banana plants is known to be genotype and cultivar dependent.
- Monthly routine monitoring of the stored tissue culture samples should be carried out, making visual examinations for growth abnormalities.
- Some types of somaclonal variation (different degrees of dwarfism) can be observed at the tissue culture level.
- However, most types (leaf variegation, stem discoloration and particularly mutations expressed at the inflorescence and fruiting level - prolonged juvenility, small bunch, shortened fingers) cannot be assessed in vitro and require the regeneration of plants under field conditions. (Van den Houwe and Panis 2000).
Observations under greenhouse and field conditions (regeneration)
- When the accession has been continuously stored in vitro for over ten years, or when the accession is kept for more then ten subculture cycles in slow growth storage, the accession should be regenerated and observed morphologically for trueness-to-type under greenhouse and field conditions during at least two growing cycles.
- The morphological and taxonomic characteristics of the plants must be compared with those of the original accession.
References and further reading
Murashige T, Skoog F. 1962. A revised medium for rapid growth and bioassays with tobacco cell cultures. Physiologia Plantarum 15:473–497. Available for purchase here.
Strosse H, Van den houwe I, Panis B. 2004. Banana cell and tissue culture - review. Mohan Jain S, Swennen R (ed). Banana Improvement:Cellular, Molecular Biology, and Induced Mutations. Science Publishers Inc., Enfield, NH, USA:1-12. www.fao.org/docrep/007/ae216e/ae216e03.htm#bm03.1
Van den Houwe I, De Smet K, Tezenas du Montcel H, Swennen R. 1995. Variability in storage potential of banana shoot cultures under medium term storage conditions. Plant Cell, Tissue and Organ Culture 42:267-274. An abstract and full preview of the publication is available here.
Van den Houwe I, Panis B. 2000. In vitro conservation of banana: medium term storage and prospects for cryopreservation. Razdan MK, Cocking E, editors. Conservation of Plant Genetic Resources in vitro. Vol. 2. M/S Science Publishers, U.S.A. pp. 225-257.