


Regeneration guidelines for coconut

 View regeneration guidelines in full (in PDF) Also available in the following languages: |
The information on this page was extracted from:
Konan J.L., Bourdeix R. and George M.L. 2008. Regeneration guidelines: coconut. In: Dulloo M.E., Thormann I., Jorge M.A. and Hanson J., editors. Crop specific regeneration guidelines [CD-ROM]. CGIAR System-wide Genetic Resource Programme, Rome, Italy. 10 pp.
Before reading the regeneration details for this crop, read the general introduction that gives general guidelines to follow by clicking here.
Introduction
The coconut palm (Cocos nucifera L.) belongs to the Arecaceae family (Order Arecales) and is the only species of the genus Cocos. The coconut palm is diploid (2n=32). It is woody and perennial with a stem that is erect, unbranched and cylindrical and grows from a single shoot meristem at the apex of the plant. It is anchored by numerous adventitious roots which are produced from the swollen basal part of the stem. The top of the trunk consists of a radiating compact crown with large, thick cuticled pinnate leaves. The fruit is a fibrous drupe with a smooth outside skin (exocarp) which varies in colour.
The two main types of coconut palm are tall and dwarf. Tall coconut palms grow to a height of 20–30 m. They are slow maturing, flower 6–10 years after planting, and have a productive life of 60–70 years. Dwarf coconut palms reach a height of 8–10 m in 20 years. They begin bearing about the third year and have a shorter productive life of 30–40 years. Tall palms are normally cross-pollinating and heterozygous, while dwarf palms are normally self-pollinating and homozygous. The coconut plant is monoecious with inflorescences bearing both male and female flowers. The male flowers, which are on the top portion of spikelets attached to the peduncle, are more numerous than the female flowers, which occupy the base of the spikelets.
Coconut varieties are classified into four groups according to their mode of reproduction:
-
Type I (strict allogamy): Short female phase with no overlap with the male phase of the same inflorescence or with the male phase of the following inflorescence. Examples are some populations of the West African tall cultivar.
-
Type II (indirect partial autogamy): Short female phase with no overlap with the male phase of the same inflorescence but with considerable or total overlap with the male phase of the following inflorescence. Examples are the cultivars Rennell Island Tall, Malayan Tall, Vanuatu Tall.
-
Type III (direct autogamy): Long female phase completely overlapping with the male phase of the same inflorescence, with or without overlapping with the male phase of the following inflorescence. Examples are the cultivars Malayan Yellow Dwarf, Sri Lanka Green Dwarf and Cameroon Red Dwarf.
-
Type IV (semi direct autogamy): Short female phase partially overlapping with the male phase of the same inflorescence and with that of the following inflorescence. Examples are the Brazil Green Dwarf and many dwarf x tall hybrids.
Coconuts are conserved ex situ in field genebanks, but are propagated from seed. There should be at least 45 palms per dwarf accession and 90 palms per tall accession and they must have been generated from at least 10 parent palms for dwarf accessions and 40 parent palms for tall accessions. Accessions are generally planted close to each other and surrounded by palms of many varieties.
The following regeneration guidelines are based mainly on the manual prepared by Santos et al. (1996).
Choice of environment and planting season
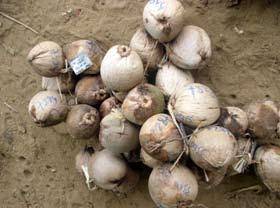
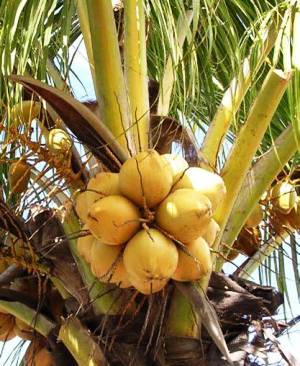 Coconuts (photo: EM Dulloo) |
Limits of adaptation (minimum and maximum)
- Altitude: 0–900 m
- Precipitation: 1000–4000 mm/year
- Temperature: 21–27°C
- Soil: wide range of soil types from sandy loam to heavy clay
- Humidity: 60–90%
Optimum recommended
- Altitude: up to 600 m
- Precipitation: 1500–2500 mm/year
- Temperature: 27°C
- Soil: aerated and well drained
- Humidity: 70–80%
Planting season
Seedlings (8–10 months old) should be transplanted at the onset of the rainy season or anytime when irrigation facilities are available.
Preparation for regeneration
When to regenerate
- When the number of living palms is less than 75 for cross-pollinating varieties or less than 30 for self-pollinating varieties.
- Before the palms reach a height which makes controlled pollinations difficult. If a ladder is used to climb the palms, this is when the palms become 10–12 m high (25–30 years old for tall types). If technicians can climb the coconut without a ladder, there is no such limit, and the accessions could be conserved for at least 50 years, if there are enough living palms.
Nursery site selection
- Rear seedlings in a well-maintained nursery to produce normal uniform plants. The nursery should be open, level and well-drained with light or loose-textured soil and far from sources of insect pests and diseases. Find a nursery site with a minimum area of 3600 m2 to accommodate about 12 000 seed nuts for planting on 50 ha.
Field selection
- Prepare the field with access roads, surface drainage and soil conservation measures to prevent erosion. Fence the field to protect seedlings from animals.
Preparation of planting material
- Harvest seed nuts manually at a minimum of 11 months after controlled pollination (see below). The bunch is ready for harvesting when at least one nut has a brown husk or if the water inside the nut cavity sloshes around when shaken.
- Harvest seed nuts every 2 months for tall accessions and every month for dwarf accessions.
- Store seed nuts in the shade to complete the maturation process. Maturation is reached when the husk becomes dry after about 2 weeks. The fruits have no dormancy and so cannot be stored for long.
Propagule type, size and amount
- Keep extra seed nuts from the controlled pollinations for back up as only about 65% will result in seedlings for transfer to the field. While most cultivars produce about 100 nuts per palm per year under natural conditions, the yield is much less with controlled pollination; a mother palm may not produce more than 20 fruits per year. However, yield can be improved if you remove the older bunches from the palms before starting the controlled pollination programme.
Method of regeneration
For most talls and some dwarf cultivars, a high rate of natural pollination between accessions results in seed nuts that are not true to type. Where the accessions are planted in isolation (for instance, a unique accession planted in an isolated valley or on a small island at a distance of at least 600 m from other coconut palms), seed nuts from open pollination provide true-to-type seed nuts and can be used to regenerate accessions.
Natural pollination can be used to regenerate a few dwarf accessions. For example, 95% of yellow and red dwarfs are autogamous (self-pollinating) and the yellow or red colour of the sprout of the germinated seed nuts can be used as a genetic marker to eliminate off-types.
For all other varieties (all tall types and the green dwarfs), use controlled pollination, with the requisite isolation, bagging and pollination of the inflorescences. Controlled pollination, in which an individual identified palm is crossed with designated individual female palms, is a labour-intensive and costly technique, requiring a well-organized and trained team of technicians, a well-equipped laboratory for pollen processing and supervision by an experienced researcher.
Pollination mechanism
Selection of male and female parents
- Randomly select true-to-type parents among the palms bearing inflorescences that are ready to open after a month, at the right stage for controlled pollination. For regenerating a tall accession, choose 48 female parents and 24 male parents (a convenient number according to the available size of the accession and the planned duration of the controlled pollination programme). If possible, use different male and female parents. If not, try to keep the palms used as both male and female to a minimum.
Pollen collection
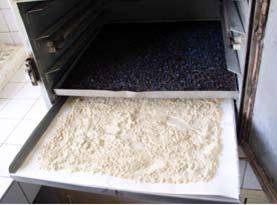
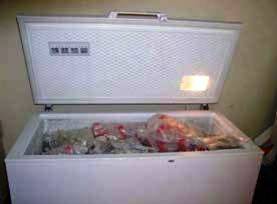
- This involves isolating the inflorescence in order to obtain pollen of the highest genetic purity; harvesting male flowers; preparing and conditioning the pollen to prolong and maintain high viability; and pollen quality control (see photos below)
- For allogamous and partially allogamous varieties, bag the inflorescences on the day the spathe opens. In the case of autogamous (dwarf) varieties in which the male phase starts as soon as the spathe opens naturally, put the bag on 72 to 48 hours before the presumed date of opening. A safety margin of 8 days between bagging the inflorescence and harvesting the pollen is sufficient to ensure the death of virtually all the pollen grains which were on the inflorescence when it was bagged. The few which might still be viable at the time would not survive the preparation and conditioning of the pollen.
- To bag the inflorescence, cut the spathe at the base, opening it first if it has not yet been done (in the case of autogamous plants). Surround the peduncle of the inflorescence with a wad of cotton impregnated with insecticide and spray the inflorescence with an insecticide. Taking care not to knock off the male flowers, fit the plastic bag over the inflorescence with the opening towards the base of the peduncle.
- Pleat the open end of the bag and then tie it with the cotton wad and a rubber band to stop insects from getting in. Also tie the sleeve with a rubber band and keep the plastic bag rolled up with tape.
 |
 |
|
Drying coconut pollen. (photo: Fonana Youssouf) |
Conditioning coconut pollen in a freezer. (photo: Fonana Youssouf) |
Isolation of female and male flowers:
- Isolate the inflorescence at least 8 days before the female flowers start becoming receptive. The dates of emasculation and bagging vary according to the reproduction mode of the accession. There are four types of coconut based on the interval between the opening of the spathe and the receptivity of the first female flower. Type I and II (22–24 day interval; emasculation 5 days after spathe opening; bagging 3 days later); Type III (0 interval; emasculation and bagging 48 hours before natural opening); and Type IV (emasculation the day of natural opening; bagging 3 days later). For types I and II, it is possible to bag and collect the pollen and then bag the same inflorescence again to use it as female for controlled pollination.
- It is very important that no female flower should be receptive at the time of bagging. Remove female flowers close to receptivity before placing the bag. As the presence of the bag has a strong depressive effect on fruit set, do not bag the inflorescences too early.
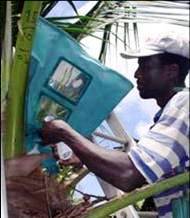
Hand pollinating a female coconut flower. (photo: Fonana Youssouf) |
Controlled pollination
- Prepare the pollen–talc mixture and pollinate by hand when most of the flowers have their stigmata open and are secreting nectar (see photo). When flowering lasts for 3–4 days and the female flowers are receptive for 2 days, one pollination is sufficient (this is the case with tall cultivars). When flowering lasts about 14 days and the female flowers are receptive for not more than 2 days, three pollinations will be required at 3-day intervals.
- Male parent 1 is used to pollinate female parents 1 and 2; male parent 2 is used to pollinate female 2 and 3; and so on, following the sequential double pair mating procedure. Each of these 48 crosses is made twice, for a total of 96 controlled pollinations. These pollinations will result in 110–130 seed nuts needed to plant 75 seedlings in the field (after seedbed and nursery selection and taking account that not all the seed nuts will germinate). About 4 months is needed for this controlled pollination process, including pollen harvest, bagging of the inflorescences, pollination and removing the bags.
- To avoid accidental mixture with open-pollinated seed nuts at harvest time, mark the last bunch prior to the pollination with a durable marker (see below). It is best to remove all older bunches prior to the controlled pollination. This way only the controlled pollinated nuts will develop and errors will be eliminated. It is also important to tag the bunch at the last spikelet in the peduncle with aluminum and copper wire tags (not galvanized iron sheet and wires) which include the palm identification numbers of the parents used.
Harvested coconut seednuts (photo: Fonana Youssouf) |
Labelling
- One year is required between pollination and harvest and another year for the plant to grow in the nursery. So, it is necessary to have labels that can withstand time and vagaries of weather.
- On the tree, mark the fruits with a felt-tipped pen with indelible black ink. At harvest, attach an aluminium label engraved with the same artificial pollination number to each fruit, by a copper wire (see photo) In the nursery, attach a second aluminium label with the same number to a leaf of the seedling. Avoid writing on the plastic bag.
- Mark seed nuts on the mother palm 7–8 months after pollination.
Planting
The seedbed
- Clear the seedbed before ploughing and harrowing it to a fine tilth. Seedbeds should be 10–20 cm high, 1 m wide and 2 m long with 1 m between beds.
- Slice off the small part of the top of the husk to help retain moisture in the husk during watering and to encourage germination.
- Plant nuts close to one another and cover them with soil, with about two-thirds of their size buried to prevent them from floating in case of heavy rains.
- Maintain seedbeds with daily watering and partial shading, and inspect for disease and pest incidence.
- When the sprout emerges through the husk to a height of 4–6 cm, trim seedlings of any injured roots and plant in polybags filled with appropriate soil–manure mixture.
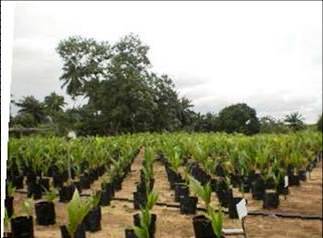
A polybag nursery. (photo: ML George) |
The polybag nursery
- Place the germinated nut in a bag half-filled with soil, with the sprout upright in the centre of the bag, then top the bag up with soil.
- Lay out the polybag nursery to enable equal setting of the seedlings at optimum distance, following a triangular system with equal spacing of 60cm (see photo).
- Set out the polybagged seedlings in the same order as they germinated. Place the earliest germinating seedlings in the first row in the eastern side of the area and the later germinating seedlings on the western side to reduce competition for sunlight.
- Apply fertilizer 2 months after germination (20g (NH4)2SO4 + 30 g KCl or NaCl per seedling) and 5 months after germination (40g (NH4)2SO4 + 60g KCl per seedling).
- The seedlings are transplanted to the field after 8–10 months, when leaf splitting occurs.
Land preparation
- Cut down thick vegetation, clear debris, then plough and harrow to improve soil tilth.
Planting layout, density and distance
- To facilitate the identification of palm pedigrees, prepare a planting map where the plots are identified to show the spots where specific palms are to be planted.
- Density of palms depends on the type of accession. Talls should be planted at a density of 143 palms/ha with a spacing of 9m between palms and 7.5m between rows. Dwarfs should be planted at a density of 205 palms/ha with a spacing of 6.5m between palms and 5.6 m between rows.
Planting method
- Select normal looking, pest- and disease-free, vigorous seedlings.
- Dig holes of 50 x 50 x 50 cm and allow about 2 months for weathering of the soil before planting in order to encourage early root–soil contact.
- Apply fertilizer mixed with soil to each hole before transplanting.
- Cover the base of the crown with loose topsoil, slightly firmed at the base of the crown.
- The top of the nut must be about 5–8 cm below the ground level. Make a slight depression towards the base of the crown to trap rainwater.
- After planting, record the pollination numbers in a plot map and check again by verifying the male and female parent of each palm in the field to ensure that the correct pedigree is planted. The palms with the wrong or uncertain pedigree should be replaced by a correct pedigree. This field check also allows calculation of the number of female and male parents that were used to rejuvenate the accession. This is important because information on the number of female and male parents initially used in the controlled pollination program is not sufficient; some of these parent palms may not have living progeny in the field.
Crop management
Weed management
- Weed every 4 months when there is a cover crop like Pueraria javanica. Otherwise, weed every 3 months or when necessary depending on the speed of weed growth.
Irrigation
- Provide irrigation when rainfall is limiting or during the dry season when the water deficit is over 50 mm for the month.
Fertilization
- Apply fertilizer (NPK + Mg) 1 year after planting based on the results of leaf analyses, and every year after that.
- Apply fertilizer at the onset of the rainy season.
- If using organic matter instead of mineral fertilizer, determine its mineral content before use to ensure that the palms are adequately fertilized.
Pest and disease control
- Visit the field twice a week (young plantation) or once a month (adult plantation) to monitor and control pests or diseases. Apply mechanical, chemical or biological treatment depending on the pest on advice by your plant health expert.
Harvesting
- Harvest seed nuts monthly, 11 months after pollination. All the nuts collected per pollination and per inflorescence should be grouped together to avoid mixing of the seed nuts.
- Take fruit to the nursery straight away and store in the shade to complete the maturation process. Never leave them in the plantation overnight in case of accidental mixing or loss.
- When colour coding and collection of hybrid seed nuts are complete, prepare a report of the harvest. State the number of nuts harvested per pollination number, the female palm numbers, and the respective colour codes used per crossing plan.
Monitoring accession identity
Many errors can occur with crosses from controlled pollinations and so the following controls should be put in place:
- Carefully record pollinations and harvesting. Record the unique number, given to each pollination and representing the exact pedigree of each seed nut, in a register or computer file.
- Using the Coconut Data Management (CDM) software and a planting map (see section on planting layout) can also help identify palm pedigrees.
- Replace plants which have lost their pollination numbers during transfer to the field with others of known pedigree.
- Detect off-types by their special traits, e.g. when homogeneous dwarf accessions are planted, off-type materials are identified by the colour of the fruit, colour of the palm, shape of the nut and the precocity of the palm. For tall accessions, special traits are the shape of the nut and vegetative characters (size of leaf, inflorescence, bunch and speed of growth), different colours of the root tips, the purplish colour of the mesocarp of some varieties or the sweet husk of immature nuts. When off-types are suspected, molecular markers can be used to check.
- Identify off-type materials at the nursery level by distinguishing features such as speed of germination and the colour of the palm. After planting in the field, mark the palm by painting the trunk to avoid any error during the observation. If the off-type is identified during the first two years after planting, replace it with legitimate material.
References and further reading
Batugal PA, Ramanatha RV, Oliver J, editors. 2005. Coconut Genetic Resources. IPGRI–Regional Office for Asia, the Pacific and Oceania (IPGRI-APO), Serdang, Selangor DE, Malaysia. Available here (4.4 MB).
Bioversity International, CIRAD. 2009. Key access and utilization descriptors for coconut genetic resources. Bioversity International, Rome, Italy; French Agricultural Research Centre for International Development, Montpellier, France. Available here.
CIRAD, COGENT, IPGRI. 2000. Coconut Data Management (CDM) manual, version 3.
Konan J-L, Bourdeix R, Batugal P. 2005. Production and provision of hybrid seednuts. Coconut hybrids for smallholders. CFC Technical Paper No. 42. pp. 12–25.
Nuce de Lamothe M de, Rognon F. 1975. Pollinisation assistée et contamination par des pollens indésirables [Assisted pollination and contamination by undesirable pollen]. Oléagineux 30:8–9, 359–364.
Nuce de Lamothe M de, Wuidart W, Rognon F, Sangare A. 1980. La fécondation artificielle du cocotier [The controlled pollination of coconut]. Oléagineux 35:193–205.
Rognon F. 1976. Biologie florale du cocotier. Durée et succession des phases mâles et femelles chez divers types de cocotiers. Oléagineux 31:13–18.
Sangare A, Rognon F, Nuce de Lamothe M de. 1978. Les phases mâles et femelles de l’inflorescence du cocotier. Influence sur le mode de reproduction [The male and female phases of the coconut inflorescence. Influence of the reproduction system]. Oléagineux 33:609–617.
Santos GA, Batugal PA, Othman A, Baudouin L, Labouisse JP, editors. 1996. Manual on Standardized Research Techniques in Coconut Breeding. IPGRI, Rome, Italy. The web version is available from: URL: www2.bioversityinternational.org/publications/Web_version/108/. Date accessed: 20 July 2010.
Acknowledgement
These guidelines have been peer reviewed by V. Ramanatha Rao, India, and Gerardo A. Santos, Philippines.
Comments
- No comments found
Leave your comments
Post comment as a guest