Regeneration
Regeneration of wild chickpea
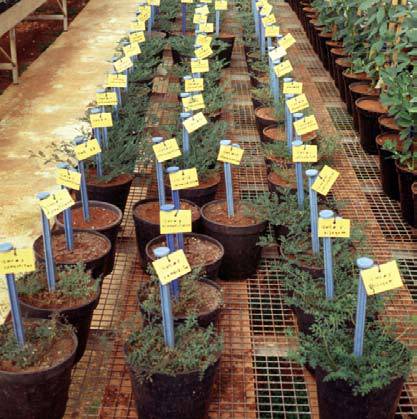 Regenerating wild chickpea in the greenhouse. Each pot is labelled with the accession’s unique identifying number (photo: ICARDA)
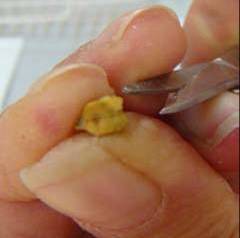
Scarifying wild chickpea seeds by making a small cut in the seed coat to improve water absorption and germination (photo: ICARDA)
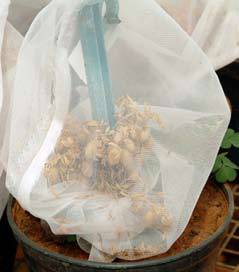
At the beginning of seed maturity each plant is covered with a light mesh bag, which is tied off at the base of the plant. Once the plant is fully mature the whole plant is harvested intact with the cloth bag (photo: ICARDA) |
This information was extracted from:
Street K ., Rukhkyan N. and Ismail A. 2008. Regeneration guidelines: chickpea. In: Dulloo M.E., Thormann I., Jorge M.A. and Hanson J., editors. Crop specific regeneration guidelines [CD-ROM]. CGIAR System-wide Genetic Resource Programme, Rome, Italy. 10 pp.
Before reading the regeneration details for this crop, read the general introduction that gives general guidelines to follow by clicking here.
Planting and growing conditions
Plant accessions in pots under greenhouse conditions as follows (see photo):
- Fill small pots (earthen or plastic pots, diameter of 30 cm x 30 cm deep) with an autoclaved mixture of 3:1 soil and sand.
- Scarify the seeds by making a small cut in the seed coat to improve water absorption and germination (see photo).
- Dress the seeds with fungicides and insecticides.
- Sow at least 50 seeds per accession with two seeds per pot at a depth of 3–5 cm.
- Water the pots immediately after sowing and then once every 3 days depending on evaporation rate.
- Starting from flowering, validate each accession against what is recorded in the database for the following characters:
- Peduncle length.
- Pedicle length.
- Aristae length.
- Pod pubescence.
- Stipule shape.
- Seed shape and colour at maturity.
- If the identity of the accession is in doubt, check it against its herbarium voucher specimen and discard if its identity is not the same as the original accession.
- At the beginning of seed maturity, cover each plant with a light mesh bag, which is tied off at the base of the plant to prevent loss of seeds due to shattering (see photo).
- Once the plant is fully matured, harvest the whole plant intact with the cloth bag.
- Extract the seeds from the dry plant material.
- Bulk seeds from single plants of the same accession.
- Weigh total seeds from each accession.
- Determine 100-seed weight for each accession.
- Dry seeds by placing them in a low humidity environment at room temperature for up to 3 weeks.
- Determine moisture content (it should be 3–6% for storage).
- Send a subsample of each accession for viability testing.
- Process the material for storage.
Regeneration of cultivated chickpea
This information was extracted from:
Street K ., Rukhkyan N. and Ismail A. 2008. Regeneration guidelines: chickpea. In: Dulloo M.E., Thormann I., Jorge M.A. and Hanson J., editors. Crop specific regeneration guidelines [CD-ROM]. CGIAR System-wide Genetic Resource Programme, Rome, Italy. 10 pp.
Before reading the regeneration details for this crop, read the general introduction that gives general guidelines to follow by clicking here.
Choice of environment and planting season
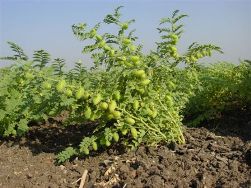 A chickpea plant (photo: ICARDA) |
Climatic conditions
Chickpea is a cool-season food legume that can be grown in a range of climates, from the semi-arid tropics to temperate environments. The environment most similar to that of the collection site is generally considered optimum.
Planting season
- Regenerate chickpea during the rainy season. In Mediterranean-type environments this coincides with the winter season.
- Sow after the first substantial rainfall event of the season and when there is a high likelihood of following rains.
- In environments where the rainy season coincides with warm, humid weather, plant during the post-rainy season as temperatures cool and the humidity declines. In India this is during October/November. This will reduce pressure from diseases and pests.
- The short days of the post-rainy season also induce flowering in photosensitive germplasm accessions, enabling seed production.
Preparation for regeneration
When to regenerate
- When seed stocks are fewer than 1,000 seeds.
- When germination drops below 75% (at ICARDA, 90% is the standard observed).
- If more than 25% of seeds are infected by one or more of the following fungi: Alternaria, Aspergillus, Cladosporium, Curvularia, Fusarium, Macrophomina, Penicillium, Phoma, Rhizopus spp.
- When seed demand is high.
Seed preparations for planting
- 1. After receiving accessions from the genebank, divide the seeds of each accession into subsets of 120 seeds for each 4-m-long row for a four-row plot.
- 2. For each subset of seed, prepare a packet and write the genebank accession number on each packet.
- 3. Treat seeds with appropriate fungicide and insecticide.
- 4. Place each subset of seed in a labelled packet, place the original packet with the genebank label on top and additional packets underneath and staple the packets together—four packets of 120 seeds for four rows.
- 5. The seeds are now ready for planting.
Field selection and preparation
- Sow in well-drained, weed-free soil to ensure a good reserve of soil moisture. Pre-sowing irrigation is recommended to ensure good germination.
- For best results, plant in normal soil types, with pH 7.5.
- Deep-plough to invert soil, followed by two or three harrowings to produce a fine tilth and an even, flat seedbed.
Method of regeneration
Planting layout, density and distance
- Plant out 480 seeds in four rows (120 seeds per row), 4-m long, for accessions that are populations of genetically diverse material, such as landraces.
- For pure lines that are genetic ally fixed, such as advanced breeding material, plant adequate amounts to recover the amount of seed required — at least 1 kg or 8,000–12,000 seeds.
- Leave at least 45 cm between rows to allow adequate space for inter-row cultivation.
- Leave an isolation distance of 90cm between plots.
Sowing method
- If using a machine designed for small research plot applications, plant directly into a flat seedbed at a depth of 5cm.
- Dibble one seed every 4cm.
- Ensure that the planter is free of residual seeds when moving onto the next accession.
- If planting by hand, open furrows to about 5cm depth and place seeds so they are 4 cm apart. Close furrows once completed.
Labelling
- Label each plot with a plot number and the accession’s unique identifying number (for example the IG number is used at ICARDA) written onto a plastic tag fastened to a stake about knee high. Use plastic labels and markers that can withstand weathering.
Crop management
|
|
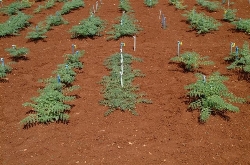
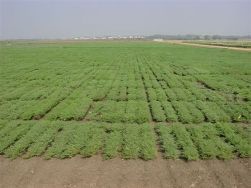
| Chickpea regeneration fields (photo above:ICARDA, photo below: ICRISAT) |
Weed management
- Directly after planting, apply a pre-emergence herbicide mixture that targets both cereal and broadleaf weeds, e.g. ICARDA uses a mixture of propyzamide and terbutryn.
- Cultivate between rows twice during early stages of plant growth using a mechanical cultivator.
- Weed by hand, if required, at later stages.
- Eliminate off-types and plants growing outside the row.
Fertilization
- Apply a basal dose of diammonium phosphate at 100 kg/ha.
Irrigation
- Irrigate the field immediately after sowing, preferably by sprinkler or drip system if dry planting was carried out.
- Apply supplementary irrigation 10 days after planting if no rain occurs, to ensure adequate seed yield. Plants should not become so water-stressed that flower or pod abortion occurs or pod-filling is impeded.
- Avoid excessive soil moisture during the cropping season.
Common pests and diseases
Contact your plant health experts to identify the symptoms of the likely pests and diseases and the appropriate control measures. Some of the major pests and diseases of chickpea are:
Insects:
- Nodule damaging fly
- Sitona weevil
- Cutworms
- Aphids
- Leaf miners
- Army worms
- Pod borers
- Semi-loopers
- Bruchids
Fungal diseases:
- Ascochyta blight, Ascochyta rabiei, Mycosphaerella rabiei (= Didymella rabiei )
- Black root rot: Fusarium solani
- Black streak root rot: Thielaviopsis basicola
- Botrytis grey mold: Botrytis cinerea
- Downy mildew: Peronospora sp.
- Dry root rot: Macrophomina phaseolina = Rhizoctonia bataticola
- Fusarium root rot: Fusarium acuminatum, Fusarium arthrosporioides, Fusariumavenaceum, Fusarium equiseti, Fusarium solani f.sp. eumartii = Fusarium eumartii
- Fusarium wilt: Fusarium oxysporum f.sp . ciceris
- Myrothecium leaf spot: Myrothecium roridum
- Mystrosporium leaf spot: Mystrosporium sp.
- Neocosmospora root rot: Neocosmospora vasinfecta
- Phytophthora root rot: Phytophthora citrophthora, Phytophthora cryptogea, Phytophthora drechsleri, Phytophthora megasperma
- Powdery mildew: Leveillula taurica, Oidiopsis taurica [anamorph], Erysiphe sp.
- Rust: Uromyces ciceris-arietini, Uromyces striatus
- Sclerotinia stem rot: Sclerotinia sclerotiorum, Sclerotinia trifoliorum
Viral diseases:
- Chickpea bushy dwarf virus (CpBDV) (Potyvirus)
- Chickpea stunt disease associated virus (CpSDaV) (Luteovirus)
- Distortion mosaic: chickpea distortion mosaic virus (CpDMV)
- Filiform: chickpea filiform virus (CpFV)
- Mosaic: alfalfa mosaic virus (AMV)
- Narrow leaf: bean yellow mosaic virus (BYMV)
- Necrosis: lettuce necrotic yellows virus (LNYV), pea streak virus (PeSV)
- Proliferation: cucumber mosaic virus (CMV)
- Stunt: bean (pea) leaf roll virus (BLRV)
- Yellowing: pea enation mosaic virus (PEMV-2)
Nematodes, parasites:
- Dirty root (reniform nematode): Rotylenchulus reniformis
- Pearly root (cyst nematode): Heterodera ciceri, Heterodera rosii
- Root-knot (root-knot nematode): Meloidogyne arenaria, Meloidogyne artiellia, Meloidogyne incognita, Meloidogyne javanica
- Root lesion (root lesion nematode): Pratylenchus brachyurus, Pratylenchus thornei
- Damping-off: Pythium debaryanum, Pythium irregulare, Pythium ultimum
Pest and disease control
- Coordinate periodic field inspections with pathologists and virologists during the growing season.
- Spray with appropriate chemicals when necessary.
- Spray appropriate chemic als as a preventive strategy if a partic ular disease is a major risk in your area; for example, at ICARDA chickpea is sprayed for Ascochyta blight every 3 weeks during the vegetative and flowering phase to prevent outbreaks.
Harvesting
- Harvest when pods are dry, i.e. pods rattle when shaken. Older leaves turn yellow and drop, indicating maturity.
- Harvest by hand or using a machine designed for experimental plots.
- Place the seed in a cloth bag with the plot tag and fix another tag on the outside of the bag.
- Clean the harvester meticulously after harvesting each accession.
- Where material does not lend itself to machine harvesting due to short plant height or lodging, harvest plots by hand and place the plants immediately in harvester to be threshed.
Post-harvest management
- Clean seeds of debris using a seed cleaning machine (mechanical sieve type) immediately after harvest in a way that causes least damage to the sample.
- Alternatively, clean the seed by hand.
- Meticulously clean the seed cleaner between each accession.
- Remove remaining debris by hand.
- If signs of insect attack are detected, it may be wise to fumigate the harvested seeds with an appropriate insecticide. However, this is not generally recommended,especially for long-term storage.
- Determine total weight of cleaned seeds.
- Determine 100-seed weight.
- Dry seed by placing it in a low-humidity environment at room temperature for up to 3 weeks. If using a controlled seed drying room, dry at 15°C and 15–20% RH. If a drying room is not available, dry seeds to moisture content of less than 8% with silica gel or another appropriate desiccant.
- Determine moisture content, which should be in the range 3–6% for storage.
- Send a subsample of each accession for viability testing.
- Process the material for storage.
Monitoring accession identity
Maintaining the correct identity of accessions
In processing seed for planting, during planting, in the field, during harvest and post harvest, take extreme care to ensure that the seeds for a given accession remain with the correct identity number. Packets of seeds, plots and harvested material must always be labelled with the appropriate ID number in such a way that there could be no chance of mixing up or losing the identity of the accession.
Maintaining population integrity
When conserving accessions of genetically diverse populations, it is important to maintain adequate quantities of seed to maximize the diversity in the sample (minimum 1,000 seeds).
When regenerating such accessions, it is equally important to plant an adequate number of seeds to conserve the original variation in the accession so that genetic drift does not occur within the population (see introductory chapter).
Comparisons with previous passport or morphological data
- Compare each accession with the following characterization data previously recorded for the accession:
- Growth habit.
- Flower colour.
- Seed colour.
- Seed shape.
If the identity of the accession is in doubt, check it against its herbarium voucher specimen. Discard the accession if its identity is not the same as the original accession.
References and further reading
Choumane W, Baum M. 2000. The use of RAPD markers for characterization of annual species of the genus Cicer. Annals of Agricultural Science (Cairo) 2:809–820.
Coyne CJ, Sharp-Vincent T, Cashman MJ, Watt CA, Chen W, Muehlbauer FJ, Mallikarjuna N. 2005. A method for germinating perennial Cicer species. SAT ejournal Vol 1, Issue 1. Available from: http://www.icrisat.org/Journal/cropimprovement/v1i1/icpn12/v1i1amethod.pdf. Date accessed: 29 August 2008.
Ladinsky G, Adler A. 1976. The origin of chickpea Cicer arietinum L. Euphytica 25(1):211–217.
Purseglove JW. 1968. Cicer arietinum L. In: Tropical Crops. Dicotyledons. Longman Group Limited, London. pp. 246–250.
Tayyar R, Federici CV, Waines GJ. 1996. Natural outcrossing in chickpea (Cicer arietinum L.). Crop Science 36:203–205.
Wellving AHA. 1984. Grain legumes. Seed Production Handbook of Zambia. Department of Agriculture. Lusaka. SIDA. pp. 226–254.
Regeneration guidelines for cultivated and wild chickpea
|
View regeneration guidelines in full (in PDF)
Also available in the following languages: |
The information on this page was extracted from:
Street K., Rukhkyan N. and Ismail A. 2008. Regeneration guidelines: chickpea. In: Dulloo M.E., Thormann I., Jorge M.A. and Hanson J., editors. Crop specific regeneration guidelines [CD-ROM]. CGIAR System-wide Genetic Resource Programme, Rome, Italy. 10 pp.
Before reading the regeneration details for this crop, read the general introduction that gives general guidelines to follow by clicking here.
Introduction
Chickpea (Cicer arietinum L.) is a cool-season food legume grown mainly by small farmers in many parts of the world. It is an important source of protein in the diets of the poor and is particularly important in vegetarian diets. It is also being used increasingly as a substitute for animal protein. Chickpea is an annual plant ranging from 30 to 70 cm in height, but tall types measuring more than 1 m are cultivated in some parts of the Russian Federation.
 Chickpea plant (photo: ICARDA) |
The plant has a deep root system and is considered well adapted to dry areas. Pods range in length from 8 to 41 mm and in width from 6 to 15 mm. Each pod usually contains two seeds. The 100 seed weight ranges from 7.5 to 68 g. Based on seed size and shape, two main kinds of chickpea are recognized: Desi types, which have small, dark-brown seeds and a rough coat, and Kabuli types, which have creamy-white seeds that are larger, with a smoother coat.
Cultivated chickpea belongs to the Fabaceae family. It is mostly self-pollinating but cross-pollination by insects sometimes occurs (Purseglove 1968). The genus Cicer comprises nine annual species, which are usually separated into three or four groups on the basis of genetic distance from C. arietinum . The primary gene pool of C. arietinum includes C. echinospermum P. H. Davis and C. reticulatum Ladiz., the putative wild progenitor (Ladizinsky and Adler 1976).
Some authors also group a perennial wild Cicer species, C. anatolicum Alef., with the primary gene pool species (Choumane and Baum 2000). The next closest group consists of C. bijugum Rech. f., C. judaicum Boiss. and C. pinnatifidum Jaub. & Spach (Tayyar and Waines 1996). The most distantly related annual wild Cicer species are C. yamashitae Kitam., C. chorassanicum (Bunge) Popov and C. cuneatum Hochst. ex A. Rich.
Cultivated chickpea (Cicer arietinum)
Choice of environment and planting season
Climatic conditions
Chickpea is a cool-season food legume that can be grown in a range of climates, from the semi-arid tropics to temperate environments. The environment most similar to that of the collection site is generally considered optimum.
Planting season
- Regenerate chickpea during the rainy season. In Mediterranean-type environments this coincides with the winter season.
- Sow after the first substantial rainfall event of the season and when there is a high likelihood of following rains.
- In environments where the rainy season coincides with warm, humid weather, plant during the post-rainy season as temperatures cool and the humidity declines. In India this is during October/November. This will reduce pressure from diseases and pests.
- The short days of the post-rainy season also induce flowering in photosensitive germplasm accessions, enabling seed production.
Preparation for regeneration
When to regenerate
- When seed stocks are fewer than 1000 seeds.
- When germination drops below 75% (at ICARDA, 90% is the standard observed).
- If more than 25% of seeds are infected by one or more of the following fungi: Alternaria, Aspergillus, Cladosporium, Curvularia, Fusarium, Macrophomina, Penicillium, Phoma, Rhizopus spp.
- When seed demand is high.
Seed preparations for planting
- 1. After receiving accessions from the genebank, divide the seeds of each accession into subsets of 120 seeds for each 4 m long row for a four-row plot.
- 2. For each subset of seed, prepare a packet and write the genebank accession number on each packet.
- 3. Treat seeds with appropriate fungicide and insecticide.
- 4. Place each subset of seed in a labelled packet, place the original packet with the genebank label on top and additional packets underneath and staple the packets together—four packets of 120 seeds for four rows.
- 5. The seeds are now ready for planting.
Field selection and preparation
- Sow in well-drained, weed-free soil to ensure a good reserve of soil moisture. Pre-sowing irrigation is recommended to ensure good germination.
- For best results, plant in normal soil types, with pH 7.5.
- Deep-plough to invert soil, followed by two or three harrowings to produce a fine tilth and an even, flat seedbed.
Method of regeneration
Planting layout, density and distance
- Plant out 480 seeds in four rows (120 seeds per row), 4 m long, for accessions that are populations of genetically diverse material, such as landraces.
- For pure lines that are genetic ally fixed, such as advanced breeding material, plant adequate amounts to recover the amount of seed required — at least 1 kg or 8000–12 000 seeds.
- Leave at least 45 cm between rows to allow adequate space for inter-row cultivation.
- Leave an isolation distance of 90 cm between plots.
Sowing method
- If using a machine designed for small research plot applications, plant directly into a flat seedbed at a depth of 5 cm.
- Dibble one seed every 4 cm.
- Ensure that the planter is free of residual seeds when moving onto the next accession.
- If planting by hand, open furrows to about 5 cm depth and place seeds so they are 4 cm apart. Close furrows once completed.
Labelling
- Label each plot with a plot number and the accession’s unique identifying number (for example the IG number is used at ICARDA) written onto a plastic tag fastened to a stake about knee high. Use plastic labels and markers that can withstand weathering.
Crop management
|
|
| Chickpea regeneration fields (photo above:ICARDA, photo below: ICRISAT) |
Weed management
- Directly after planting, apply a pre-emergence herbicide mixture that targets both cereal and broadleaf weeds, e.g. ICARDA uses a mixture of propyzamide and terbutryn.
- Cultivate between rows twice during early stages of plant growth using a mechanical cultivator.
- Weed by hand, if required, at later stages.
- Eliminate off-types and plants growing outside the row.
Fertilization
- Apply a basal dose of diammonium phosphate at 100 kg/ha.
Irrigation
- Irrigate the field immediately after sowing, preferably by sprinkler or drip system if dry planting was carried out.
- Apply supplementary irrigation 10 days after planting if no rain occurs, to ensure adequate seed yield. Plants should not become so water-stressed that flower or pod abortion occurs or pod-filling is impeded.
- Avoid excessive soil moisture during the cropping season.
Common pests and diseases
Contact your plant health experts to identify the symptoms of the likely pests and diseases and the appropriate control measures. Some of the major pests and diseases of chickpea are:
Insects:
- Nodule damaging fly.
- Sitona weevil.
- Cutworms.
- Aphids.
- Leaf miners.
- Army worms.
- Pod borers.
- Semi-loopers.
- Bruchids.
Fungal diseases:
- Ascochyta blight, Ascochyta rabiei, Mycosphaerella rabiei (= Didymella rabiei).
- Black root rot: Fusarium solani.
- Black streak root rot: Thielaviopsis basicola.
- Botrytis grey mold: Botrytis cinerea.
- Downy mildew: Peronospora sp.
- Dry root rot: Macrophomina phaseolina = Rhizoctonia bataticola.
- Fusarium root rot: Fusarium acuminatum, Fusarium arthrosporioides, Fusariumavenaceum, Fusarium equiseti, Fusarium solani f. sp. eumartii = Fusarium eumartii.
- Fusarium wilt: Fusarium oxysporum f. sp. ciceris.
- Myrothecium leaf spot: Myrothecium roridum.
- Mystrosporium leaf spot: Mystrosporium sp.
- Neocosmospora root rot: Neocosmospora vasinfecta.
- Phytophthora root rot: Phytophthora citrophthora, Phytophthora cryptogea, Phytophthora drechsleri, Phytophthora megasperma.
- Powdery mildew: Leveillula taurica, Oidiopsis taurica [anamorph], Erysiphe sp.
- Rust: Uromyces ciceris-arietini, Uromyces striatus.
- Sclerotinia stem rot: Sclerotinia sclerotiorum, Sclerotinia trifoliorum.
Viral diseases:
- Chickpea bushy dwarf virus (CpBDV) (Potyvirus).
- Chickpea stunt disease associated virus (CpSDaV) (Luteovirus).
- Distortion mosaic: chickpea distortion mosaic virus (CpDMV).
- Filiform: chickpea filiform virus (CpFV).
- Mosaic: alfalfa mosaic virus (AMV).
- Narrow leaf: bean yellow mosaic virus (BYMV).
- Necrosis: lettuce necrotic yellows virus (LNYV), pea streak virus (PeSV).
- Proliferation: cucumber mosaic virus (CMV).
- Stunt: bean (pea) leaf roll virus (BLRV)..
- Yellowing: pea enation mosaic virus (PEMV-2)
Nematodes, parasites:
- Dirty root (reniform nematode): Rotylenchulus reniformis.
- Pearly root (cyst nematode): Heterodera ciceri, Heterodera rosii.
- Root-knot (root-knot nematode): Meloidogyne arenaria, Meloidogyne artiellia, Meloidogyne incognita, Meloidogyne javanica.
- Root lesion (root lesion nematode): Pratylenchus brachyurus, Pratylenchus thornei.
- Damping-off: Pythium debaryanum, Pythium irregulare, Pythium ultimum.
Pest and disease control
- Coordinate periodic field inspections with pathologists and virologists during the growing season.
- Spray with appropriate chemicals when necessary.
- Spray appropriate chemic als as a preventive strategy if a particular disease is a major risk in your area; for example, at ICARDA chickpea is sprayed for Ascochyta blight every three weeks during the vegetative and flowering phase to prevent outbreaks.
Harvesting
- Harvest when pods are dry, i.e. pods rattle when shaken. Older leaves turn yellow and drop, indicating maturity.
- Harvest by hand or using a machine designed for experimental plots.
- Place the seed in a cloth bag with the plot tag and fix another tag on the outside of the bag.
- Clean the harvester meticulously after harvesting each accession.
- Where material does not lend itself to machine harvesting due to short plant height or lodging, harvest plots by hand and place the plants immediately in harvester to be threshed.
Post-harvest management
- Clean seeds of debris using a seed cleaning machine (mechanical sieve type) immediately after harvest in a way that causes least damage to the sample.
- Alternatively, clean the seed by hand.
- Meticulously clean the seed cleaner between each accession.
- Remove remaining debris by hand.
- If signs of insect attack are detected, it may be wise to fumigate the harvested seeds with an appropriate insecticide. However, this is not generally recommended,especially for long-term storage.
- Determine total weight of cleaned seeds.
- Determine 100-seed weight.
- Dry seed by placing it in a low-humidity environment at room temperature for up to 3 weeks. If using a controlled seed drying room, dry at 15°C and 15–20% RH. If a drying room is not available, dry seeds to moisture content of less than 8% with silica gel or another appropriate desiccant.
- Determine moisture content, which should be in the range 3–6% for storage.
- Send a subsample of each accession for viability testing.
- Process the material for storage.
Monitoring accession identity
Maintaining the correct identity of accessions
In processing seed for planting, during planting, in the field, during harvest and post harvest, take extreme care to ensure that the seeds for a given accession remain with the correct identity number. Packets of seeds, plots and harvested material must always be labelled with the appropriate ID number in such a way that there could be no chance of mixing up or losing the identity of the accession.
Maintaining population integrity
When conserving accessions of genetically diverse populations, it is important to maintain adequate quantities of seed to maximize the diversity in the sample (minimum 1,000 seeds).
When regenerating such accessions, it is equally important to plant an adequate number of seeds to conserve the original variation in the accession so that genetic drift does not occur within the population (see introductory chapter).
Comparisons with previous passport or morphological data
-
Compare each accession with the following characterization data previously recorded for the accession:
- Growth habit.
- Flower colour.
- Seed colour.
- Seed shape.
If the identity of the accession is in doubt, check it against its herbarium voucher specimen. Discard the accession if its identity is not the same as the original accession.
Wild chickpea
Planting and growing conditions
 Regenerating wild chickpea in the greenhouse. Each pot is labelled with the accession’s unique identifying number (photo: ICARDA) |
Plant accessions in pots under greenhouse conditions as follows (see photo):
- Fill small pots (earthen or plastic pots, diameter of 30 cm x 30 cm deep) with an autoclaved mixture of 3:1 soil and sand.
- Scarify the seeds by making a small cut in the seed coat to improve water absorption and germination (see photo).
- Dress the seeds with fungicides and insecticides.
- Sow at least 50 seeds per accession with two seeds per pot at a depth of 3–5 cm.
- Water the pots immediately after sowing and then once every 3 days depending on evaporation rate.
-
Starting from flowering, validate each accession against what is recorded in the database for the following characters:
- Peduncle length.
- Pedicle length.
- Aristae length.
- Pod pubescence.
- Stipule shape.
- Seed shape and colour at maturity.
- If the identity of the accession is in doubt, check it against its herbarium voucher specimen and discard if its identity is not the same as the original accession.
- At the beginning of seed maturity, cover each plant with a light mesh bag, which is tied off at the base of the plant to prevent loss of seeds due to shattering (see photo).
- Once the plant is fully matured, harvest the whole plant intact with the cloth bag.
- Extract the seeds from the dry plant material.
- Bulk seeds from single plants of the same accession.
- Weigh total seeds from each accession.
- Determine 100-seed weight for each accession.
- Dry seeds by placing them in a low humidity environment at room temperature for up to 3 weeks.
- Determine moisture content (it should be 3–6% for storage).
- Send a subsample of each accession for viability testing.
- Process the material for storage.
|
Scarifying wild chickpea seeds by making a |
At the beginning of seed maturity each plant is covered with a light mesh bag, which is tied off at the base of the plant. Once the plant is fully mature the whole plant is harvested intact with the cloth bag (photo: ICARDA) |
References and further reading
Choumane W, Baum M. 2000. The use of RAPD markers for characterization of annual species of the genus Cicer. Annals of Agricultural Science (Cairo) 2:809–820.
Coyne CJ, Sharp-Vincent T, Cashman MJ, Watt CA, Chen W, Muehlbauer FJ, Mallikarjuna N. 2005. A method for germinating perennial Cicer species. SAT ejournal Vol 1, Issue 1. Available from: http://www.icrisat.org/Journal/cropimprovement/v1i1/icpn12/v1i1amethod.pdf. Date accessed: 29 August 2008.
Ladinsky G, Adler A. 1976. The origin of chickpea Cicer arietinum L. Euphytica 25(1):211–217.
Purseglove JW. 1968. Cicer arietinum L. In: Tropical Crops. Dicotyledons. Longman Group Limited, London. pp. 246–250.
Tayyar R, Federici CV, Waines GJ. 1996. Natural outcrossing in chickpea (Cicer arietinum L.). Crop Science 36:203–205.
Wellving AHA. 1984. Grain legumes. Seed Production Handbook of Zambia. Department of Agriculture. Lusaka. SIDA. pp. 226–254.
Acknowledgement
These guidelines have been peer reviewed by S.S. Yadav, formerly of the Indian Agricultural Research Institute, India; and N.K . Rao, International Center for Biosaline Agriculture (ICBA), Dubai, United Arab Emirates.


