


Regeneration guidelines for wild potato

|
View regeneration guidelines in full (in PDF)
Also available in the following languages: |
The information on this page was extracted from:
Salas A., Gaspar O., Rodríguez W., Vargas M., Centeno R. and Tay D. 2008. Regeneration guidelines: wild potato.
In: Dulloo M.E., Thormann I., Jorge M.A. and Hanson J., editors. Crop specific regeneration guidelines [CD-ROM]. CGIAR System-wide Genetic Resource Programme, Rome, Italy. 9 pp.
Before reading the regeneration details for this crop, read the general introduction that gives general guidelines to follow by clicking here.
Introduction
Potato genetic resources are mainly conserved in clonal collections, e.g. tuber, in vitro culture and cryopreservation. Botanical seed collections of cultivated potato can be carried out only in selected cases for example, after duplicated accessions in the global in-trust collection held at the International Potato Center (CIP) have been identified, open-pollinated seed is harvested from the field-grown clones for safe maintenance. The handling of the berries and seed follow similar steps as described below.
The conservation of wild potato species germplasm, on the other hand, is primarily conducted in the form of botanical seed collections. There are 188 wild potato species recognized up to now (Spooner and Salas 2006). Of these, 141 species are conserved in The Germplasm Bank at CIP. Wild potato species have a wide geographical distribution, from the south-west of the United States to the central part of Argentina and Chile, from sea level up to 4500 masl in a wide range of environments that include puna zones and high plateaus in the Andes, dry forests in Mexico, vegetation on the Chilean coasts and humid forests in the oriental part of the Andes. Wild potato species have a basic chromosome number of x=12 and include diploids, triploids, tetraploids and hexaploids. Each species shows different characteristics of reproduction; most are allogamic to varying extents and a small group could be 100% autogamous (as in case of Solanum acaule Bitter).
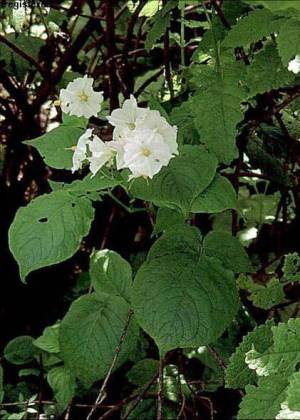 Solanum hypacrarthrum Bitte. (photo: A. Salas/CIP) |
Choice of environment and planting season
Climatic conditions
- The regeneration site must have a similar climate to the locality where the accession was originally collected.
- The selection of a regeneration locality is much more important for photosensitive species, such as equatorial species like S. colombianum Dunal and S. tundalomense Ochoa.
Planting season
- Planting is carried out in spring–summer. In South America, planting is carried out from September until the end of May.
Preparation for regeneration
When to regenerate
- When germination falls below 85% in stored germplasm.
- When seed is in poor condition, diseased or infested with pests.
- When seed is needed to distribute to other genebanks.
- To make safety duplications.
- When seed is needed for planting out to screen accessions for certain attributes.
The period between regeneration cycles varies with genotype. Each genotype shows different characteristics of reproduction and seed viability during long-term storage. Test germination every 5 years to determine minimum period of regeneration.
Pre-treatments and viability monitoring
Evaluate a sample of 100 seeds for viability. If average viability is >85%, store seeds in a cold chamber at -20°C for long-term conservation. If average viability is <85%, regenerate the accession. In case of dormancy pre-treat seeds with gibberellic acid to break dormancy.
Substrate selection and preparation
- Regenerate accessions in screen- and greenhouses under controlled conditions.
- Use a peat-based growing medium which gives quick rooting and an optimum water/air ratio. Incorporate a wetting agent to improve water absorption and distribution.
Preparation of planting material
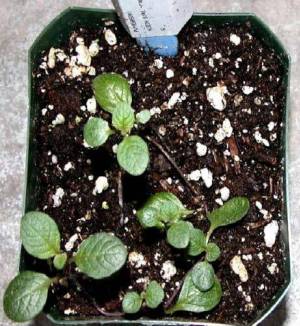
- Transfer healthy germinated seeds to clearly labelled 10-cm pots.
- After approximately 30 days, when seedlings have reached about 5cm (see photo below left), transplant the seedlings individually to compressed peat (e.g. Jiffy-7) pots, labelling each genotype with its accession data (see photo below right).
 |
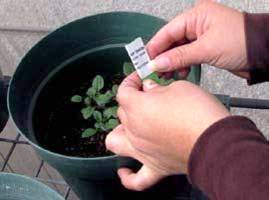
Labelling transplanted seedlings. |
|
Seedlings ready to be transplanted into 20-cm pots. |
Method of regeneration
Planting layout, density and distance
- Use 25 genotypes as the minimum population size to prevent genetic drift.
- Group pots by species and accession; leave a distance of 25 cm between pots.
Pollination
The pollination of wild potato species can be done using one of three different techniques, namely reciprocal crosses, bulk crossing and open pollination. Open pollination is normally used for cleistogamic and autogamic species as well as for outbreeders. For other wild species, either the reciprocal crosses or bulk crossing technique is used depending on the number of flowers per plant. The choice also depends on the amount of resources available and level of genetic integrity which is aimed for. Bulk crossing is less expensive than reciprocal crosses, but the latter ensure a higher genetic integrity of the accession.
The reciprocal crosses technique is chosen when there are less than 5 flowers per plant.
Flower number in wild potatoes is very variable, and depends on both the appropriate temperature and light under greenhouse condition.
Reciprocal crosses between sister plants:
- Use 25 plants per accession and about 3–5 flowers per plant, bulked for pol ination.
- Extract pollen from the anthers of a plant and place it on the stigma of a sister plant within the same accession. The total number of crosses depends on the number of flowers, from as low as 1 to as high as 10.
- Record the following information on the label: collection number, number of flowers crossed, genotypes used, locality and date.
Bulk crossing:
- Use 25 plants per accession, 10 flowers per plant.
- Bulk the pollen of all accessions and use it to pollinate each of the 25 plants.
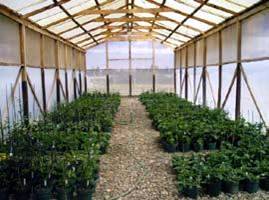 Wild potato plants regenerated in a screenhouse in Huancayo, Peru. (photo: M. Vargas/CIP) |
Open pollination:
- Use up to 25 plants per accession.
- Thirty days after open pollination, collect the seed from the berries of each plant; no insect vectors are used.
Isolation
- Grow plants in species groups in insect-proof greenhouses under controlled conditions (see photo).
Labelling of accessions
- Use plastic stakes with waterproof labels.
- Record the following information on the label: accession number, species and year of planting.
Crop management
Staking and cleaning
- Stake plants with bamboo.
- Place sticks near the edge of the pot when potting plants.
- Three weeks after potting, tie the plants to the bamboo stick with twist ties and remove any old leaves.
Irrigation
- Irrigate the potted mother plants to field capacity every 2 days (depending on the species and weather conditions).
Fertilization
- After planting, apply N-P2O5-K2O (20-20-20) water soluble fertilizer at 3 ppm to each pot.
- Before flowering, apply N-P2O5-K2O (24-8-16) water soluble fertilizer at 3 ppm to each pot.
Common pests and diseases
- Contact plant health experts to identify pests and diseases and to recommend appropriate control measures.
- Potato tuber moth (Phthorimaea operculella) and aphid are common insect pests and Oidium (causing powdery mildew) is a common pathogen.
Pest and disease control
- For insect attack (e.g. potato tuber moth), use insecticides such as pyrethroids at 1 ppm.
- For fungal attack, use a sulphur fungicide at 1 ppm.
- Do not use carbamate, phosphorates pesticides or urea fertilizer as wild potato species are very sensitive to these products.
- Conduct tests to determine the presence of potato virus T (PVT), potato spindle tuber viroid (PSTVd), Andean potato latent virus (APLV), potato yellowing virus (PYV) and Arracacha virus B - oca strain (AVB-O) in the mother plant.
- Destroy and safely dispose of plants that show obvious disease symptoms.
Other
- When berries are 20–30 days old, bag them in mesh bags to avoid possible mixtures and losses.
Harvesting
When berries have reached maturity (about 45 days) harvest each inflorescence separately, place in a labelled paper bag and record the number of berries obtained.
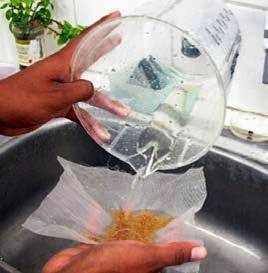
Seed separation procedure using water. |
Post-harvest management
- Extract seeds through manual maceration, i.e. separate the seeds of a ripe fruit with water (see photo), keeping each population separate to avoid seed mixing.
- Once the remnants of the ovary and unfilled seed are eliminated, spread the cleaned seed on filter paper with the corresponding label and date of processing.
- Pre-dry the seeds in shade for 5 days at room temperature.
- After 5–10 days, fine-clean seeds, count and place them in a manila envelope, labelled with the accession data and the total number of seeds obtained.
- Attach the labels from the cross, berry data, bags and filter paper to avoid any mistakes in sample identity.
Seed drying
- The process of seed drying is the most important phase for future viability of seeds in long-term conservation.
- Place envelopes containing seeds in a drying chamber with hot air at 30ºC. After about 7 days, the seed moisture should be reduced to 5%.
- Hermetically seal dry seeds in laminated aluminium-PE bags, identified with process data, collection number, species, crossing data, number of genotypes, flowers and berries obtained, total seed number, crosses, macerating and harvest date.
- These seeds represent the accession and species as a new regenerated population.
Seed storage
- Test seeds for viability.
- When the number of seeds is more than 5000 and the germination percentage is greater than 85%, store seeds in a cold chamber at -20ºC for long-term conservation.
Monitoring accession identity
Compare each accession with the following characterization data previously recorded for the accession:
- Growth habit
- Flower colour
- Seed colour
- Seed shape
Prepare herbarium specimens for future reference.
At harvest, characterize berries to confirm the taxon of the regenerated accessions.
Documentation of information during regeneration
Collect the following data during regeneration:
- Locality of regeneration
- Collaborators
- Sample number
- Germination per cent
- Number of plants established
- Days from sowing to flowering
- Method of pollination
- Number of pollinated flowers
- Pollination date
- Number of berries obtained
- Date berries harvested
- Processing date
- Number of seeds obtained
References and further reading
FAO/IPGRI. 1998. Potato. FAO/IPGRI Technical Guidelines for the Safe Movement of Germplasm. No. 19. FAO/IPGRI, Rome, Italy.
Harrington JF. 1963. Practical advice and instructions on seed storage. Proceedings of the International Seed Testing Association 28:989–994.
Hijmans RJ, Spooner DM. 2001. Geographic distribution of wild potato species. American Journal of Botany 88:2101–2112.
Hijmans RJ, Spooner DM, Salas AR, Guarino L, de la Cruz J. 2002. Atlas of wild potatoes. Systematic and Ecogeographic Studies on Crop Genepools 10. IPGRI, Rome, Italy. pp. 4–5.
Roberts EH. 1973. Predicting the storage life of seed. Seed Science and Technology 1:499–514. Roberts EH, Ellis RH. 1977. Prediction of seed longevity at sub-zero temperatures and genetic resources conservation. Nature 268:431–432.
Spooner DM, Salas AR. 2006. Structure, biosystematics and genetic resources. Gopal J, Paul Khurana SM, editors. In: Handbook of Potato Production, Improvement, and Post-harvest Management. Haworth Press Inc., New York, USA. pp. 1–39.
Acknowledgements
These guidelines have been peer reviewed by William Roca, International Potato Center (CIP), Peru, and Andrea M. Clausen, Instituto Nacional de Tecnología Agropecuaria (INTA), Argentina.
Comments
- No comments found
Leave your comments
Post comment as a guest