Regeneration guidelines for lentil
|
View regeneration guidelines in full (in PDF) Also available in the following languages: |
The information on this page was extracted from:
Street K., Rukhkyan N. and Ismail A. 2008. Regeneration guidelines: lentil. In: Dulloo M.E., Thormann I., Jorge M.A. and Hanson J., editors. Crop specific regeneration guidelines [CD-ROM]. CGIAR System-wide Genetic Resource Programme, Rome, Italy. 9 pp.
Before reading the regeneration details for this crop, read the general introduction that gives general guidelines to follow by clicking here.
Introduction
Lentil (Lens culinaris Medik.) is a legume that has been grown in the Mediterranean region since ancient times. The Fertile Crescent or west Asia is recognized as the centre of its domestication and diversity, where it is still an important winter-sown crop. It has now spread throughout Eurasia where it is grown mostly in the southern latitudes on calcareous soil types. The lentil plant is a dwarf (20–50 cm), bushy annual with weakly upright to semi-vine growth, with similar appearance to the vetch plant. Lentil has a restricted root system, tending to lodge at maturity because of its weak stem. It has many soft, hairy branches with pinnately compound leaves and numerous oval leaflets. Flowers are white, lilac or pale blue. The broad, smooth pods range from 8 to 40 mm long and 6 to 15 mm wide. Each pod bears 1–2 seeds which are thin and lens-shaped; colour ranges from brown to yellow to various mottled patterns. The weight of 100 seeds ranges from 1.5 to 8.0 g.
The genus Lens belongs to the Fabaceae family and includes the cultivated L. culinaris Medik. subsp. culinaris and wild subspecies L. culinaris subsp. orientalis (Boiss.) Ponert, the progenitor L. culinaris subsp. tomentosus Ladiz. and L. culinaris subsp. odemensis Ladiz., along with three wild species. The taxa within culinaris are in the primary gene pool, while L. ervoides (Brign.) Grande, L. nigricans (Bieb.) Godr. and L. lamottei Czefr. are in the secondary– tertiary gene pool. The taxonomy of Lens, however, remains in debate. All Lens species are self-pollinating annual diploids (2n=14). Two main groups of domesticated lentils are recognized on the basis of seed size: i) microsperma and ii) macrosperma.
This guideline applies to genebank accessions of lentil including breeding material, pure lines, landrace populations and populations of wild relatives.
Cultivated lentil (Lens culinaris)
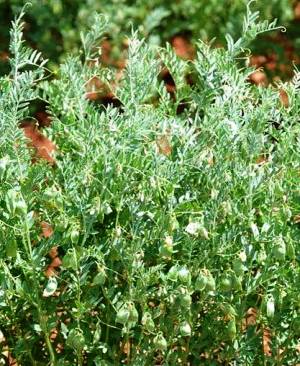 Lentil plant. (photo: ICARDA) |
Choice of environment and planting season
Climatic conditions
- Lentil requires low to medium rainfall (300–450 mm) with a stable dry period in spring to ensure ripening. It is moderately resistant to heat and drought.
Planting season
- Regenerate plants during the rainy season. In Mediterranean-type environments, this coincides with winter. Sow after the first substantial rainfall event of the season and when there is a high likelihood of following rains.
- In environments where the rainy season coincides with warm, humid weather, plant during the post-rainy season, when temperatures are cool and humidity is lower, to reduce pest and disease pressure. In India, this is during October. The short days of the post-rainy season also induce flowering in photosensitive germplasm accessions, enabling their seed production.
- Spring sowing is usual for northern Europe and America. Sow from late April to mid May.
Preparation for regeneration
When to regenerate
- When seed stocks are <1000 seeds.
- When germination drops below 90%.
- When seed demand is high.
Preparing seed for planting
1. After receiving accessions from the genebank, divide the seeds of each accession into four subsets of 200 seeds each. Each subset wil be planted in a 4-m-long row.
2. Prepare a packet for each subset of seed and write the genebank accession number on it.
3. Treat seeds with appropriate fungicide and insecticide.
4. Place each subset of seed in a labeled packet with the original genebank-labeled packet on top and additional packets underneath. Staple the packets together.
Field selection and preparation
- Soil should have good drainage and be free from weeds at the time of sowing to ensure a good reserve of soil moisture.
- Fusarium wilt is a major limitation to crop growth during regeneration of lentil. Control it through solarization of soil and field rotation, e.g. cereals–legumes–fallow.
- Where possible use heavy, alluvial, normal soils with a pH of 7.5.
- Deep plough to invert soil and follow with two or three harrowings to produce a fine tilth and an even flat seedbed.
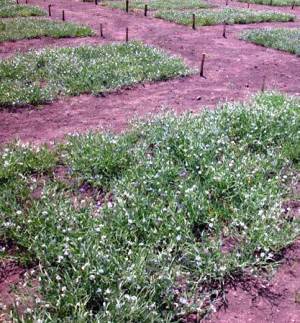 Planting layout for lentil regeneration. (photo: ICARDA)
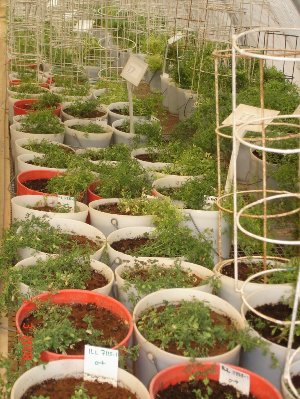
Rescue regeneration of lentil using pots. (photo: ICARDA) |
Method of regeneration
Planting layout, density and distance
- For accessions that are populations of genetically diverse material, such as landraces, use a total of 800 seeds planted in four rows (200 seeds per row), 4m long.
- For pure lines that are genetically fixed, such as advanced breeding material, plant adequate amounts to recover the amount of seed required (at least 300g or 8000–12 000 seeds.
- Leave at least 45 cm between rows to allow adequate space for inter-row cultivation (see photo).
- Leave 90 cm as isolation between plots.
Sowing method
- If using a machine designed for small research plot applications, plant directly into a flat seedbed at a depth of 3 cm.
- Dibble one seed every 2.5–3 cm.
- Ensure the planter is free of residual seeds when moving onto the next accession.
- If planting by hand, open furrows to about 3 cm depth and place seeds so they are 3 cm apart; close furrows once completed.
Labelling
- Label each plot with a plot number and the accession’s unique identifying number (e.g., ICARDA uses the IG number) written onto a plastic tag fastened to a stake about knee high. Use plastic labels and markers that can withstand weathering.
Crop management
Weed management
- Directly after planting apply a pre-emergence herbicide mixture that targets both cereal and broadleaf weeds, e.g. ICARDA uses a mixture of Propyzamide and Terbutryn.
- Cultivate between rows twice during early stages of plant growth using a mechanical cultivator, if available.
- Weed by hand at later stages if required.
- Eliminate off-types and plants growing outside the row by hand.
Fertilization
- Apply a basal dose of diammonium phosphate at 100 kg/ha.
Irrigation
- Irrigate the field directly after sowing for dry sowings. Irrigate pre-sowing to ensure excellent germination.
- Apply supplementary irrigation as necessary to ensure adequate seed yield. Plants should not become so water-stressed that flower or pod abortion occurs or pod-filling is impeded.
Common pests and diseases
Contact plant health experts to identify symptoms of the likely pests and diseases and the appropriate control measures. Common pests and diseases for lentils include:
Insects
- Green stink bug [Nezara viridula (L.), Taylorilygus pallidulus (Blanch)]
- Aphids: cowpea aphid [Aphis craccivora (Koch)], pea aphid [Acyrthosiphon pisum (Harris)]
- Leaf weevils (Sitona spp.)
- Apion spp.
- Bruchid spp.
- Maggots of Agromyzidae
- Leaf midges
- Legume-pod moth or limabean pod borer [Etiella zinckenella (Treit.)]
- Noctuid insect pests: lesser armyworm [Spodoptera exigua (Hb.)], Egyptian cotton leafworm [S. littoralis (Boisd.)], greasy or black cutworm [Agrotis ipsilon (Hfn.)], winter cutworm [A. segetum (Denis and Schiff.)], silvery moth [Autographa gamma (L.)], watermelon or cabbage looper [Trichoplusia ni (HB)].
Diseases
- Vascular wilt (soil-borne disease but the pathogen has also been found in association with Fusarium spp.)
- Collar rot (Corticium rolfsii)
- Root rot and stem rot (blight) (Sclerotinia sclerotiorum) Botrytis cinerea is the conidial stage
- Rust (Uromyces fabae)
- Powdery mildew (Erysiphe polygoni)
- Downy mildew (Peronospora lentis)
- Cercospora leaf spot (Cercospora zonata)
- Ascochyta leaf blight (Ascocytha lentis)
- Alternaria blight (Alternaria tenuis)
- Anthracnose (Colletotrichum trifolii)
- Nematode disease: root-knot nematode
- Bacterial disease: root rot.
Pest and disease control
- Coordinate periodic field inspections with pathologists and virologists during the growing season.
- Spray with appropriate chemicals when necessary.
 Lentil ready for harvest. (photo: ICARDA) |
Pollination and pollinator behaviour
- Coordinate periodic field inspections with entomologists during the growing season to identify the most efficient visitor/pollinator and determine relationship of pollinator versus flower morphology.
- Evaluate the accessions for additional phenological and floral morphological traits.
Harvesting
- Harvest when pods are dry (see photo). Dryness is indicated by a rattling sound when pods are shaken. Older leaves become yellow and drop, indicating maturity. Harvesting can be done either by hand (particularly if plant is too tall or has lodged) or by a machine designed for experimental plots. Place harvested seed in a cloth bag along with the plot tag and fix another tag on the outside of the bag.
- Apply a desiccant for improved harvestability, to even out ripening in a paddock, ripen late pods, kill green weeds and allow earlier harvesting. The best time for desiccation is when the crop first starts to yellow. The crop will be ready to harvest 5–10 days after the application of the desiccant, depending on the weather.
- Meticulously clean the harvester after harvesting each accession.
Post-harvest management
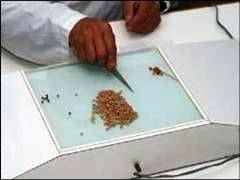
After mechanical cleaning, seeds are further cleaned by hand to remove any remaining debris. Seeds are inspected with the naked eye or under a binocular microscope for mechanical damage and empty seeds. (photo: ICARDA) |
1. Clean seeds of debris using a seed cleaning machine (mechanical sieve type) directly after harvest in a way that causes least damage to the sample. Alternatively, hand-clean or sort with appropriate sieves.
2. Meticulously clean seed cleaner between each accession.
3. Clean seeds of remaining debris by hand (see photo).
4. If signs of insect attack are detected, fumigate the harvested seeds with an appropriate insecticide. This is, however, not general y recommended, especial y for long-term storage.
5. Determine total weight of cleaned seeds.
6. Determine 100-seed weight (ranges from 1.5 to 8.0 g).
7. Dry accessions by placing seed in low humidity, room temperature environment for up to 3 weeks. If using a control ed seed drying room, dry at 15°C and 15% RH. If a drying room is not available, dry seeds to a moisture content of 3–7% with silica gel or another appropriate desiccant.
8. Determine moisture content—it should be 3–7% for storage.
9. Send a subsample of each accession for viability testing.
10. Process the material for storage.
Monitoring accession identity
Maintaining the correct identity of accessions
Throughout the process of regeneration from seed preparation to post harvest, take extreme care to ensure that the seeds for a given accession remain with the correct identity number. Always label packets of seeds, plots and harvested material with the appropriate ID number in such a way that there can be no chance of mixing up or losing the identity of the accession.
Maintaining population integrity
When conserving accessions of genetically diverse populations, it is important to maintain adequate amount of seed to maximize the diversity of the sample (minimum 1000 seeds). When regenerating such accessions, it is equally important to plant an adequate amount of seed to capture the original variation in the population so that genetic drift does not occur within the population (see introductory chapter).
Comparisons with previous passport or morphological data
Compare each accession with the following characterization data previously recorded for the accession:
- Growth habit
- Flower colour
- Seed colour
- Seed shape
If the identity of the accession is in doubt, check it against its herbarium voucher specimen. Discard the accession if its identity is not the same as the original accession.
Wild lentil
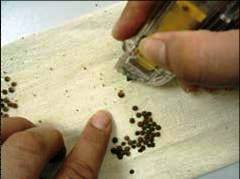 Scarifying seeds by making a small cut in the seed coat to improve water absorption and germination. (photo: ICARDA) |
Species
Lens ervoides (Brign.) Grande, L. lamottei Czefr., L. nigricans (M. Bieb.) Godr, L. culinaris subsp. orientalis (Boiss.) Ponert, L. culinaris subsp. tomentosus Ladiz., L. culinaris subsp. odemensis Ladiz.
Planting and growth conditions
Grow accessions in plastic pots under greenhouse conditions using the following procedure:
1. Fil smal pots (earthen or plastic pots, 30 cm diameter x 30 cm deep) with an autoclaved mixture of 3:1 soil and sand.
2. Scarify the seeds by making a smal cut in the seed coat to improve water absorption and germination (see photo).
3. Dress the seeds with fungicides and insecticides.
4. Sow at least 50 seeds per accession, with two seeds per pot at a depth of 2 cm.
5. Water the pots immediately after sowing and then every 5–6 days.
6. Starting from flowering, validate each accession against what is recorded in the database for the fol owing characters:
- Peduncle length
- Pedicle length
- Aristae length
- Pod pubescence
- Stipule shape
- Seed shape and colour at maturity
7. If the identity of the accession is in doubt, check it against its herbarium voucher specimen and discard it if it is not the same as the original accession.
8. At the beginning of seed maturity, cover each plant with a light mesh bag and tie it off at the base of the plant.
9. Once the plant is ful y matured, harvest the whole plant intact with the cloth bag.
10. Extract the seeds from the dry plant material.
11. Bulk seeds from single plants of the same accession.
12. Weigh the yield of seeds from each accession.
13. Determine 100-seed weight for each accession.
14. Dry seeds by placing them in a low humidity, room temperature environment for up to 3 weeks.
15. Determine moisture content—it should be 3–7% for storage.
16. Send a subsample of each accession for viability testing.
17. Process the material for storage.
Documentation of information during regeneration
Collect the following information during regeneration and record it in the genebank information system:
- Regeneration site name and map/GPS reference
- Name of scientist involved in regeneration
- Field/plot/nursery/greenhouse reference
- Accession number and population identification
- Source of seed
- Previous multiplication or regeneration references
- Preparation of planting materials (pre-treatments)
- Sowing date and density
- Field layout used
- Field management details (watering, fertilizer, weeding, pest and disease control, stresses recorded, others)
- Environmental conditions (altitude, precipitation, soil type, others)
- Emergence in the field or greenhouse (number of plants germinated)
- Number of plants established
- Days from sowing to flowering
- Harvest date and method
- Number of plants harvested
- Quantity of seeds (approximate weight)
- Agronomic evaluation; agro-morphological traits recorded
- Taxonomic identification
- Post harvest (uniformity of maturity, lodging susceptibility)
References and further reading
Barulina H. 1930. Lentils of the USSR and other countries. Bulletin of Applied Botany, Genetics and Plant Breeding 40(Suppl): 265–304.
Bioversity International, ICARDA, NBPGR. 2010. Key access and utilization descriptors for lentil genetic resources. Bioversity International, Rome, Italy; International Center for Agricultural Research in the Dry Areas, Syria; National Bureau of Plant Genetic Resources, India. Available here.
Ladizinsky G, Braun D, Goshen D, Muehlbauer FJ. 1984. The biological species of the genus Lens L. Botanical Gazette 145(2): 253–261.
Ladizinsky G. 1993. Wild lentils. Critical Reviews in Plant Sciences 12(3): 169–184.
Acknowledgements
These guidelines have been peer reviewed by María José Suso, Instituto de Agricultura Sostenible (CSIC), Spain; Margarita Vishnyakova, Department of Leguminous Crops, N.I. Vavilov Research Institute of Plant Industry (VIR), Russia; and S.S. Yadav, former Principal Legume Breeder, Division of Genetics, Indian Agricultural Research Institute, India.
Comments
- No comments found


Leave your comments
Post comment as a guest