


Other crops
Regeneration guidelines for small-grained cereals

View regeneration guidelines in full (in PDF)
Also available in the following languages:
|
The information on this page was extracted from:
Payne T.S., Amri A., Humeid B. and Rukhkyan N. 2008. Regeneration guidelines: small-grained cereals. In: Dulloo M.E., Thormann I., Jorge M.A. and Hanson J., editors. Crop specific regeneration guidelines [CD-ROM]. CGIAR System-wide Genetic Resource Programme, Rome, Italy. 12 pp.
Before reading the regeneration details for this crop, read the general introduction that gives general guidelines to follow by clicking here.
Introduction
Small-grained cereals include bread wheat (Triticum aestivum L.), spelt (T. spelta L.), durum wheat (T. durum Desf.), emmer (T. dicoccon Schrank), triticale (x Triticosecale spp.), barley (Hordeum vulgare L.) and oats (Avena sativa L.). These cereals are self-pollinated, annual, cool-season grasses that are grown for human food, animal feed and forage.
All of these species are found as both spring-and winter-planted types. Winter types require vernalization; cold tolerance is highest in wheat (down to -25°C), lower in barley (-20°C) and lowest in oats (-15°C). Accessions may be wild species, landraces, obsolete improved varieties, advanced improved varieties, breeding materials or genetic stocks and may be maintained as populations or as pure-breeding lines. Rye (Secale cereale L.) is excluded from this guideline because it requires specialized regeneration procedures due to its cross-pollinated reproductive nature.
 Bread wheat (Triticum aestivum L.) landraces being characterized for drought tolerance, Obregon, Mexico (photo: Ana Maria Sanchez/CIMMYT) |
Choice of environment and planting season
Planting season
- In dry areas with winter season precipitation, plant at the start of the rainy season.
- Select date of planting and seeding rate according to recommended agronomic practices or local farmers’ best practices.
- Planting too early may produce excessive early-season growth and use large amounts of moisture and nutrients but if moisture, nutrients and hot temperatures are not limiting, early planting normally results in higher yields. Later planting can improve seed quality.
- Early planting, however, can allow plants to take advantage of available moisture and may avoid terminal drought stress.
- Planting too late may increase the possibility of wind erosion due to poor ground cover and the danger of cold damage for autumn-sown cereals. Later plantings will mature a few days later.
Preparation for regeneration
Maintaining population integrity
When conserving and regenerating accessions that are populations of genetically diverse individuals, it is important to maintain adequate seed numbers (at least 500 viable seeds) to capture the full range of variation and genetic integrity, preventing the effects of genetic drift.
When to regenerate
- Regenerate accessions if the germination or viability rate is less than 85% or the number of viable seeds in the active collection falls below 1100.
- Newly introduced, collected or received materials require regeneration to meet international standards of seed amount and quality.
- Accessions with an unknown multiplication origin require regeneration to enable documentation of phytosanitary origin, purity and cleanliness.
Pre-treatments
- Treat seed with fungicides and insecticides if required. Use local recommendations as a guide to types and rates of chemical application.
Field selection and preparation
- Preferably use a field in which the previous crop was a non-cereal crop, or that had been fallow.
- Fence fields to prevent grazing, locate them away from bird roosts and rodent dens and remove any noxious weeds.
- Plough and disc-cultivate soils prior to sowing to prepare a uniform seed bed.
|
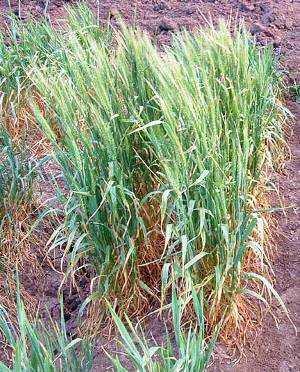
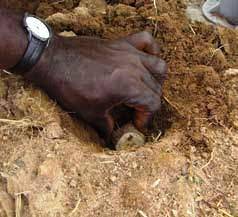
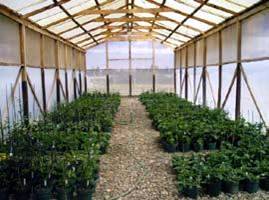
Using Jiffy pots for rescue regeneration of Barley and wild relatives (photo: ICARDA)
Barley regeneration plot (photo: ICARDA) |

Artificial vernalization
Accessions with a strong vernalization requirement will require a refrigerated vernalization treatment if field conditions do not provide cool enough temperatures for long enough (<5°C for 6–8 weeks) to satisfy their vernalization requirements. Conduct the artificial vernalization treatment 8–10 weeks before the optimum field seed sowing date to allow transplanted seedlings optimal plant growth and development in the field.
- Identify genotypes that require vernalization treatment.
- Treat seeds with a fungicide.
- Place seeds on moistened blotter paper and allow germination to begin at ambient temperatures.
- Place the papers into individual Petri dishes or clear plastic bags sealed with a twist-tie.
- Refrigerate at 1–3°C with a light source (8 hours/day) and keep blotter paper moist.
- The period of cold treatment may be as short as 4 weeks in accessions with a medium vernalization response, while those with a strong vernalization requirement may need 6–8 weeks of cold treatment.
- Carefully transplant seedlings into the field on completion of the vernalization cold treatment.
Wild cereal species
Germination of wild species tends to be much more irregular than that of cultivated seed. The following measures are recommended to encourage germination of seeds of wild relatives:
- In the case of husked seeds, remove seeds from husks.
- Consider germinating in Petri dishes if few seeds are available and transplant seedlings to pots or into the field.
NOTE: Wild species often have vernalization requirements.
NOTE: Seeds in lower florets will germinate first.
NOTE: Wild species often have day-length (long day) sensitivity and so require early planting.
Method of regeneration
- Use single replicate trials for seed regeneration and plant local check varieties at standard intervals (e.g. every 20th plot). Local check varieties should be adapted to the multiplication environment with a phenology and stature (flowering, maturity and plant height) allowing relative characterization measurements with adjacent plots.
Planting layout, density and distance
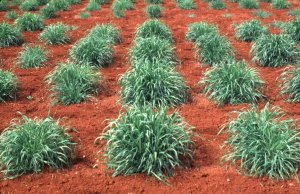
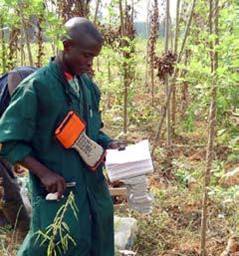
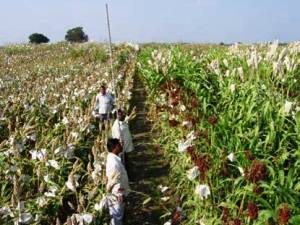
 Wild red oat (Avena sterilis L.) plots separated by sunflowers to protect against wind (photo: Axel Diederichsen/Plant Gene Resources of Canada) |
- Use six-row plots with 15–30 cm between rows.
- Harvest only the centre four rows for seed.
- Determine the plot length according to the amount of seed needed to fulfil all conservation and testing (phytosanitary, germination, etc.) requirements and the anticipated grain yield. (NOTE: a grain yield of 1 t/ha is equal to 100 g/m2 ).
- For tall and lodging-susceptible materials, leave a gap of 90 cm between plots or plant alternate plots with non-cereal crop species to avoid entangled culms and subsequent grain mixtures between accessions during harvest.
- Landraces and wild relatives may be especially prone to lodging under cultivated conditions, so grow them in a place protected from the wind (see photo) or in a tunnel, and stake plants as necessary.
Sowing rate
- Use a seed rate equivalent to 125–250 viable seeds/m2 (approximately 5–10 g/m2 or 5–10 g seed per 3-m row).
Labelling
- Place the seeds to be planted in packets labelled with genebank code number and plot identification number.
- Prepare a planting map prior to sowing, and immediately after sowing note on the map any planting errors committed, and record the sowing date. Mark first and final nursery plots with stakes at the time of sowing.
- Prepare a field book that lists the nursery name, plot number with corresponding germplasm name and accession number, and accession seed source. Record characterization and evaluation data in this field book.
- Label or tag each row with the nursery name and plot number. Use weather-proof labels and ink.
- Erect boards that have a brief description of the nursery and its contents to raise public awareness of your activities among colleagues and administrators as well as among local farmers, visitors and the media.
- Bar-coding and the use of palm-tops (hand-held field data recording equipment) can reduce errors and facilitate computerized management and control.
Crop management
When in doubt, follow locally recommended best crop husbandry practices, including date and rate of planting, amounts and timing of fertilizer and supplementary irrigation applications, weed, disease and pest control, and time of harvest and post-harvest seed storage. The goal is to maintain accession integrity while producing ample quantities of highly viable, sound grain.
Weed management
- Prepare a weed-free seed bed immediately prior to sowing.
- Avoid unnecessary herbicide treatment that could compromise the genetic integrity of accessions. Diverse genebank materials may react very differently to herbicides than cultivated materials. Control weeds throughout the growing cycle.
- Take particular care to exclude quarantined weed species from the regeneration nurseries and fields.
Irrigation
- In areas with less than 500mm annual available rainfall, supplementary irrigation may be required.
- If irrigation facilities are available, apply irrigation at least twice to establish a full soil moisture profile: a) immediately after sowing; b) immediately prior to flowering (e.g. during booting).
- In areas with high annual rainfall and also when irrigation is used, avoid sowing plots in areas of the field prone to waterlogging.
Fertilization
- Apply a fertilizer balanced for nitrogen, phosphorus and potassium, based on location conditions, practices, soil test results and fertilizer availability.
- Landraces, tall materials and wild relatives are not adapted to high nitrogen levels used in modern agriculture. For these materials, use low levels of nitrogen fertilizer. Apply 60% of the recommended local farmer rates to avoid excess plant growth, which can lead to lodging and heavy mildew infection.
 Wild oat panicle in a glassine bag to prevent loss of seed (photo: Axel Diederichsen/Plant Gene Resources of Canada)
Clean the plot combine after use! (photo: ICARDA) |
Pest and disease control
- Field crop rotation is often the best means of managing persistent pests and diseases.
- Use seed- and foliar-applied fungicides, herbicide and bird and rodent protective devices, as required, and follow integrated crop protection and management recommendations.
Roguing off-types
- Take care when roguing off-type plants from within an accession by only discarding plants that are known to be contaminants or volunteers. Monitor for off-type plants several times throughout the growing season.
For accessions that are prone to shattering
- To prevent seed loss due to shedding and shattering, bag ears or panicles during ripening using perforated plastic or glassine bags and fix the bags to stakes with pegs for support (see photo).
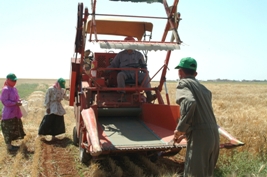
Harvesting
- Prior to harvest, prepare cloth or paper harvest bags labelled with the genebank code number and plot identification number.
- Harvest when spikes are mature, i.e. when 90% of spikes in the plot are yellow and the grains are hard when pressed between finger nails.
- Harvest only the four centre rows (row ends trimmed) of each six-row plot.
- Check that the information on the bag label and plot tag are the same. Place the seed harvested from a plot and the plot tag into the labelled harvest bag.
- To reduce the risk of bird damage and shattering, or pre-harvest sprouting in high rainfall conditions, cut and bundle each accession no later than one week after its maturity. Label each bundle with plot or harvest tags including the genebank code number and plot identification number. Dry bundles in a well ventilated, covered location.
- Thresh the seed using a stationary thresher or a plot combine.
- Clean the thresher or plot combine meticulously after harvesting each plot.
- Dry the grain using ambient, non-heated air to a uniform moisture content of 12% before grain weights are recorded and the grain is stored for further processing.
- Take particular care when threshing hull-less barley and naked oats as the germ is often more susceptible to mechanical removal or damage than is the case with hulled cereals or wheat.
- Spontaneous seed shattering and uneven maturity in wild relatives may require repeated harvesting of individual accessions by hand in order to harvest individual plants at the optimum maturity and reduce seed loss. Harvest spikes of these materials early in the morning, every second day.
Post-harvest management
Seed cleaning
- Clean threshed grain of chaff, straw, diseased seed, broken seed, weed seed and soil using air-blown seed cleaners.
- Meticulously clean the seed cleaner after cleaning each accession.
- Fumigate seed to prevent insect damage prior to cold storage.
Seed drying
- Primary drying for short-term storage: Keep harvested seed in cloth or paper bags in a dry location protected from rain and rodents. Dry seed in a well-ventilated room at not more than 35°C to a seed moisture content of 12–15%.
- Secondary drying for long-term storage: Place cloth or paper bags in a cool dry room at 10–25°C and 10–15% relative humidity for 6–8 weeks until seed reaches an equilibrium moisture content of 5–8%. If a drying room is not available, dry seeds to a moisture c ontent of 5–8% with silica gel or another appropriate desiccant.
Seed packaging
-
Pack seed in containers or packets that are impervious to air and moisture (preferably in laminated aluminum foil packets for long-term base collections or screw-topped plastic or glass bottles for medium-term, active collections).
- Long-term collections should contain about 1250–2500 seeds, or approximately 50–100 g of seed, per accession.
- Medium-term, active collections should contain about 5000–7500 viable seeds (200–300 g), or more in the case of genetically heterogeneous accessions.
- Safety duplicate sample(s) should contain about 500 seeds, or 10–20 g of seed.
- Express excess air from the packet or container and then seal it hermetically.
- During seed processing, check seed characteristics against the passport and characterization data to ensure the correct accession identity by taxon, seed texture and colour.
- Do not use fungicides or insecticides for seed storage as these chemicals often reduce seed viability in longer-term storage conditions.
- Pack a standard number of packets or containers into boxes and code each box for its contents and storage location within the storage facility.
- Bar-coding of individual packets/containers facilitates genebank management and limits human error.
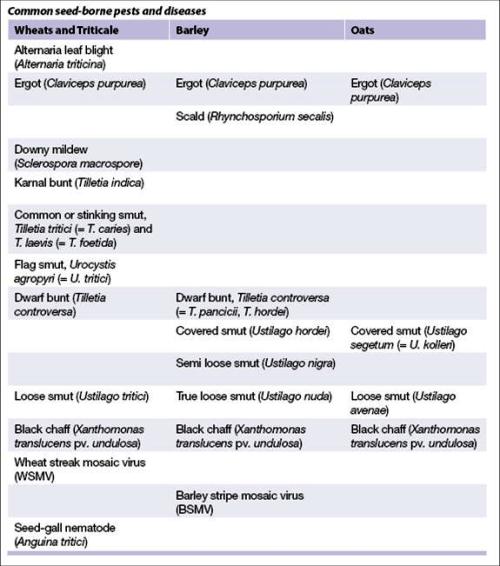
Germplasm seed health inspection
- Before incorporating accessions into your collection, check for the presence of quarantined seed-borne diseases. All accessions intended for distribution must be healthy to pass phytosanitary regulations and limit the spread of disease.
Common seed-borne pests and diseases
Storage conditions
- Store hermetically sealed accession packets or containers at as low a temperature as possible: 0–2°C for medium-term, active storage; -18 to -20°C for long-term storage.
Safety duplication
- The accessions in your collection are vulnerable to a wide range of threats, such as lack of adequate funding, equipment failures, regeneration errors, loss of skilled expertise, changes in institutional priorities, civil strife and natural catastrophes.
- Unique varieties are lost whenever disaster strikes, therefore securing duplicates of your collections in locations outside your institute campus provides an insurance policy for the collection and the world’s food supply.
- All genebanks are also encouraged to use the Svalbard Global Seed Vault as a ‘black box’ safety duplication repository. Seed deposit guidelines can be obtained from: This email address is being protected from spambots. You need JavaScript enabled to view it.
Monitoring accession identity
As materials are regenerated, conduct true-to-type verification using passport descriptors, comparative reference seed collections, minimum characterization traits, herbarium sheets and photo-documentation.
- The accession should be discarded if its characteristics do not match the original accession.
- Store phenotypically heterogeneous accessions (often the case with original landrace or wild relative populations) as obtained.
- During the initial multiplication, take separate head-rowed subsamples (individual spikes from distinct plants) and regenerate them separately.
- Identify subsampled pure lines as derivatives from the initial heterogeneous accession, linked through the original progenitor accession identification number.
- If doubts arise as to the number of subsamples to be taken, err on the high side to ensure maintenance of the greatest amount of potentially useful diversity from the original population.
Documentation of information during regeneration
Collect the following information during regeneration, based on multi-crop passport descriptors (FAO/IPGRI 2001):
- Donor’s details (number, name, institution, country).
- Germplasm acquisition agreement (GAA) status.
- Standard materials transfer agreement (SMTA) or MTA status.
- Genus, species and subspecific taxonomy.
- Accession identification number(s).
- Name(s).
- Accession ancestral pedigree, cross and selection historical data.
- Biological status: wild, traditional cultivar or landrace, breeding or research material, improved cultivar, other, or unknown.
- Country of origin.
- Collection mission data.
- Collector or breeder’s name and affiliations.
- Collecting or breeding number.
- Collection site latitude, longitude and elevation.
- Collection site description.
- Date and location of regenerations.
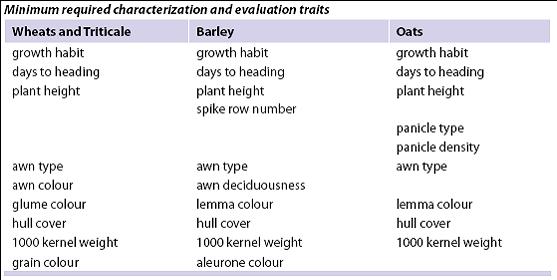
Standard methods and scale for the reporting descriptor traits can be found under the respective crop ‘List of Descriptors’ at: http://www.ars-grin.gov/cgi-bin/npgs/html/croplist.pl.
References and further reading
Breese EL. 1989. Regeneration and multiplication of germplasm resources in seed genebanks: The scientific background. IBPGR, Rome, Italy.
Cook RJ, Veseth RJ. 1991. Wheat Health Management. APS Press, The American Phytopathological Society, St. Paul, MN, USA.
Engels JMM, Visser L, editors. 2003. A guide to effective management of germplasm collections. IPGRI Handbooks for Genebanks No. 6. IPGRI, Rome, Italy. Available in English (1.4 MB) and Spanish (1.5 MB).
FAO/IPGRI. 1994. Genebank standards. Food and Agriculture Organization of the United Nations, Rome and International Plant Genetic Resources Institute, Rome. Available in English, Spanish, French and Arabic .
FAO/IPGRI. 2001. Multi-Crop Passport Descriptors. FAO and IPGRI, Rome, Italy. Available in English, French and Spanish.
IBPGR. 1985. Oat descriptors. IBPGR, Rome, Italy.
IBPGR. 1985. Descriptors for wheat (Triticum spp.), revised. IBPGR, Rome, Italy. Available here
IPGRI. 1994. Descriptors for barley (Hordeum vulgare L.). IPGRI, Rome, Italy. Available here.
ISTA. 2008. International Rules for Seed Testing. ISTA Secretariat, Switzerland.
Lehmann ChO, Mansfeld R. 1957. Zur Technik der Sortimentserhaltung [On the technique for collection-maintenance]. Kulturpflanze 5:108–138.
Mathre DE, editor. 1997. Compendium of Barley Diseases, 2nd edition. APS Press, The American Phytopathological Society, St. Paul, MN, USA.
Mezzalama ML, Gilchrist L, McNab A. 2001. Seed health: rules and regulations for the safe movement of germplasm. CIMMY T, Mexico City, Mexico.
Wiese MV. 1987. Compendium of Wheat Diseases, 2nd edition. APS Press, The American Phytopathological Society, St. Paul, MN, USA.
Acknowledgements
The author wishes to acknowledge the inputs of Harold Bockelman, USDA Small Grains Collection, USA; Monica Mezzalama, International Maize and Wheat Improvement Center (CIMMY T) Seed Health Laboratory, Mexico; and Imke Thormann, Bioversity International, Italy. These guidelines have been peer reviewed by Axel Diederichsen, Plant Gene Resources of Canada; Christoph U. Germeier, Julius Kuehn Institute, Federal Research Centre for Cultivated Plants, Germany; Igor Loskutov, N.I. Vavilov Research Institute of Plant Industry (VIR), Russia; and Jan Valkoun, International Center for Agricultural Research in the Dry Areas (ICARDA), Syria (retired).
Regeneration guidelines for yam
|
View regeneration guidelines in full (in PDF)
Also available in the following languages: |

The information on this page was extracted from:
Dumet D. and Ogunsola D. 2008. Regeneration guidelines: Yams.
In: Dulloo M.E., Thormann I., Jorge M.A. and Hanson J., editors. Crop specific regeneration guidelines [CD-ROM]. CGIAR System-wide Genetic Resource Programme, Rome, Italy. 7 pp.
Before reading the regeneration details for this crop, read the general introduction that gives general guidelines to follow by clicking here.
Introduction
Yams (Dioscorea spp.) are annual or perennial vines and climbers with annual or perennial underground tubers. They belong to the Dioscoreaceae family. This tuber-producing plant is popular in the humid and subhumid tropics, particularly in Africa, the West Indies and parts of Asia and South and Central America. Knuth (1924) estimated that there are about 600 species in the genus Dioscorea L. The most important edible yams belong to only a few species, such as D. rotundata Poir. (widely known as white Guinean yam), D. alata L. (known as water yam, winged yam or greater yam), D. cayenensis Lam. (yellow yam or yellow Guinea yam; may be composed of a complex set of different species), D. esculenta (Lour.) Burkill (lesser yam, potato yam or Chinese yam), D. dumetorum (Kunth) Pax (bitter yam or trifoliate yam), D. bulbifera L. (aerial potato yam), D. trifida L.f. (cush-cush yam), D. opposita auct. (cinnamon yam) and D. japonica Thunb.
Yams are mainly treated as annual during cultivation.Their life cycle consists of the following stages: propagules (true seed or tuber), emerging seedling or plantlet, mature plant, senescing plant and dormant tubers. Yam is generally a short-day plant. The intensity of flowering among commonly cultivated yam ranges from nil to profuse. Yams are principally
conserved vegetatively in field genebanks; efforts are also underway in some genebanks to conserve them in vitro for safety duplication.
Procedures described in this guideline refer to field collections only for the following species: D. alata, D. rotundata, D. cayenensis, D.
bulbifera, D. esculenta, D. dumetorum, D. praehensilis, D. mangenotiana and D. bulkilliana.
Choice of environment and planting season
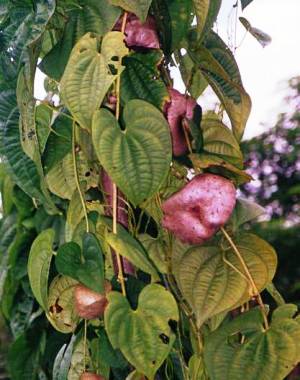
Yam plant. (photo: M.E. Dulloo) |
Climatic conditions
- Select an environment similar to the collection site. Yams normally grow at low altitudes with precipitation of about 1000–1400 mm per year and mean annual temperatures ranging from 22 to 30°C.
Planting season
- Do not plant accessions at the beginning of the rainy season; wait until the rains are well established and steady. In the West African yam belt, for example, planting is done between mid-March and the end of May.
Preparation for regeneration
When to regenerate
- Regenerate all accessions once a year, starting when tubers break dormancy. In all yam producing zones, tuber dormancy breaks not long before the beginning of the rainy season. In IITA, Ibadan (Nigeria) for example, it is April to June for tubers conserved in a dry cool tuber store at 18–20°C.
Pre-treatments
-
Before planting, treat seed tubers (mini-sets or small tubers) with a mixed solution of insecticide, fungicide and nematicide prepared as follows:
- Perfekthion (insecticide): 40 ml
- Dithane M 45 (fungicide): 50 g
- Basamid fumigant (nematicide): 10 g
- Wood ash: 200 g
- Water: 10 L
- Dip seed tubers into this solution for 2 to 3 minutes, and then leave them in a shaded place (e.g. under a tree) for 18 to 24 hours to allow the cut surface to dry.
Field selection and preparation
- Yams require a loose, deep, free-draining fertile soil with a pH close to neutral.
- Choose a field with no (or very low) pest and disease incidence (viruses, insects, nematodes, fungi).
- The field must be flat land with irrigation facilities and no (or limited) erosion.
- Clear the field of stumps, before mowing, ploughing, harrowing and ridging.
Method of regeneration
Propagation method
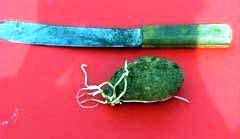
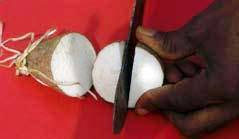
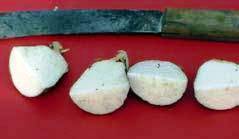
- Prepare 30 seed tubers (mini-sets or small tubers) per accession (see photos below). Transfer them to net bags, each labelled with a paper tag.
 |
 |
 |
|
Preparation of minisets. (photos: Dominique Dumet /IITA) |
||
- Tuber seeds (50–250g) can either be full small healthy tubers or larger tubers cut into mini-sets and pre-treated as described above.
- For a high germination rate, size the mini-sets, taking into account the germination ability of the accession as observed (on station) or documented during germplasm surveys.
- Generally, full small healthy tubers are recommended.
Planting method (see photos below)
- Direct plant with a hoe on top of the ridge or mound.
- Place tubers 10–15 cm deep into the soil.
 |
 |
|
Yam planting. (photos: Dominique Dumet /IITA) |
|
Planting layout, density and distance
- Plant 30 mini-sets for each accession.
- Label and divide the field to clearly separate each accession (with tape, rope, bamboo pegs of about 1 m length or other appropriate material).
- For regeneration: allocate a 2.5 m row length for each accession with a 0.5 m pathway.
- For characterization/evaluation: allocate 6 m for each accession with a 1 m pathway.
Labeling
- Use weather-resistant labels.
- When using plastic labels to identify accessions in the field, write details (accession number, code) with pencil, not markers (whether permanent or not), which usually rub off before the end of the season.
Crop management
Stakes for crop management. |
Staking
- When possible, provide a long, strong and well branched stick for each plant or set of plants belonging to the same accession (see photo).
- Place sticks at the beginning of the germination and 50 cm away from the plant.
- Almost any convenient timber or bamboo may be used as a stake.
Weed management
- Carry out weeding twice a month for about 5 months.
Irrigation
- Use irrigation in the dry season; sprinkle water twice a week for 6 hours and for about 2 months.
Fertilization
- Before planting, apply 5 bags (50 kg/bag) of urea per hectare.
- During active growth, if there are signs of deficiency (leaves yellowing or non active growth) apply 3 bags of urea/hectare (only apply when rain is steady), i.e. 5 g per plant.
- Apply fertilizers in a circular or ring form 10 cm away from plant.
Common pests and diseases
- Contact plant health experts to identify the symptoms of the likely pests and diseases and the appropriate control measures.
- During growth, attack by the yam beetle (Heteroligus meles), yam nematodes (mainly Scutellonema bradys and Meloidogyne spp.) and viruses (mostly YMV) may be common.
- The major post-harvest disease is tuber rots caused mostly by fungi: soft rots caused by Penicillium spp., Fusarium oxysporum and Botrydiplodia theobromae; dry rots caused by Rosselinia and Sphaerostilbe. Other frequently encountered fungi are Rhizopus nodosus and F. solani.
Pest and disease control
- Only regenerate healthy tubers; eliminate rotten tubers and those with mealy bugs, rodent damage or showing fungus.
Preventive:
- Against insects (mealy bug etc.) use insecticides such as Tricel, Indocel or Perfecktion at 80 ml/20 L of water.
- Against rodents use bait traps with peanut butter (preferably) or rodent poison products.
- Against fungus use fungicide such as Dithane M45 (50 g into 20 L of water)
- Use dry grass as mulch to cover exposed tubers to protect them from rodent attack and sun scorching).
Non-preventive:
- Do not keep plants with obvious virus infection. Label as infected and destroy them.
Harvesting
- Once plants have senesced (all dried), dig out tubers with a 2-m-long iron stick, cutlass and hoe. Gently brush each tuber before transferring it to a net bag. Weigh each bag and send it for post-harvest treatment.
Post-harvest management
- Apply the same treatment as before planting (described above).
- After drying, transfer tubers to yam barns. Place each bag on the shelves (avoid compact storage) for 4 to 6 weeks.
- Transfer bags to yam store (temperature = 18–20°C, i.e. in a dry cool area) for conservation for 3 to 4 months.
- During storage, check yam germplasm weekly (look for rotting, insect and rodent damage etc.).
- Monitor sprouts until follow-on dormancy break.
Documentation of information during regeneration
Collect the following information during regeneration:
- Accession number
- Regeneration site name and map/GPS reference
- Environmental conditions (altitude, precipitation, soil type, others)
- Name of collaborator (only if NARS involved)
- Field layout used: field/plot/nursery/greenhouse reference
- Flower type (male/female)
- Number of tubers sorted
- Number of tubers planted
- Planting date (±more than 7 days)
- Number of plants germinated
- Field management details (watering, fertilizer, weeding, pest and disease control, stresses recorded, others)
- Date of first harvest and method
- Date of final harvest
- Number of tubers harvested
- Total weight (kg)
- Location in yam store
- Date of first sprouting (during storage)
- Agronomic evaluation; agro-morphological traits recorded
- Post-harvest (describe any relevant procedures)
References and further reading
Bioversity International, IITA. 2009. Key access and utilization descriptors for yam genetic resources. Bioversity International, Rome, Italy; International Institute of Tropical Agriculture, Nigeria. Available here.
Knuth R. 1924. Dioscoreaceae. In: Engler A, editor. Das Pflanzenreich 87(IV-43): 1–387.
Orkwor GC, Asiedu R, Ekanayake IJ, editors. 1998. Food Yams. Advances in Research. International Institute of Tropical Agriculture and National Root Crops Research Institute, Nigeria.
Acknowledgement
These guidelines have been peer reviewed by Alexandre Dansi, University of Abomey-Calavi, Benin, and Perla Hamon, Institute de Recherche pour le Développement (IRD), France.
Regeneration guidelines for sorghum
|
View regeneration guidelines in full (in PDF)
Also available in the following languages: |
The information on this page was extracted from:
Upadhyaya H.D., Gopal Reddy V. and Sastry D.V.S.S.R. 2008. Regeneration guidelines: sorghum.
In: Dulloo M.E., Thormann I., Jorge M.A. and Hanson J., editors. Crop specific regeneration guidelines [CD-ROM]. CGIAR System-wide Genetic Resource Programme, Rome, Italy. 9 pp.
Before reading the regeneration details for this crop, read the general introduction that gives general guidelines to follow by clicking here.
Introduction
Sorghum (Sorghum bicolor (L.) Moench.) belongs to the Poaceae family and is widely cultivated. It is considered to be one of the most important cereal crops in the world. There are about 30 Sorghum species; S. bicolor is cultivated for grain and forage while S. halepense (L.) Pers. (Johnson grass) and S. propinquum (Kunth) Hitchc. are cultivated only for forage. Wild relatives of sorghum include S. bicolor subsp. verticilliflorum (Steud.) de Wet ex Wiersema & J. Dahlb. (common wild sorghum; synonym: S. arundinaceum), Sorghum purpureosericeum (Hochst. ex A. Rich.) Asch. & Schweinf. and Sorghum versicolor (Andersson).
Sorghum is an important part of the diet for many of the world’s population. It is mainly consumed as flat bread or porridge. It is also used as a forage crop (ICRISAT 2008) and sweet sorghum is grown to produce sorghum syrup.
Sorghum is extremely drought-tolerant, making it an excellent choice for semi-arid and dry areas. Most cultivars are annuals although some are perennial. Sorghum stems may reach over 4 m height, with small grains of 3–4 mm diameter. It is usually grown in clumps. The inflorescence varies greatly in size and shape, ranging from loose drooping branches to a compact-oval shape (IBPGR and ICRISAT 1993).
Although it is mostly self-pollinating, protogyny may cause at least 5% natural cross-pollination (Purseglove 1972). The genetic integrity of sorghum accessions is thus maintained by selfing.
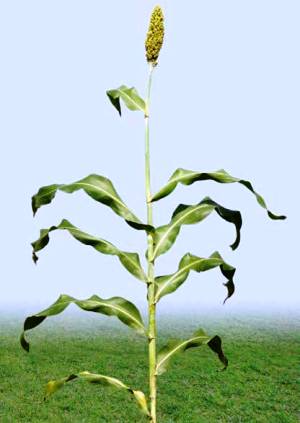
Sorghum (Sorghum bicolor) plant. |
Choice of environment and planting season
Climatic conditions
Sorghum can be divided into three groups, based on adaptation to temperature and daylight:
- Cool-tolerant, tropical (high-altitude) sorghums grow and reproduce under relatively low temperatures, especially low night temperatures. They occur in the highlands in the tropics and are photoperiod sensitive.
- Temperate sorghums are relatively insensitive to photoperiod and tolerate cold conditions at the beginning and end of the growing season but not during flowering. They are adapted to warm or hot days with cool nights.
- Lowland tropical sorghums are adapted to relatively warm days and warm nights throughout the growing season; they are photoperiod sensitive.
Regeneration should be planned according to the type of sorghum and the prevailing environment.
Preparation for regeneration
When to regenerate
- When seed stocks are <50g.
- When germination falls below 75%.
- If the percentage of seeds infected by one or more of the following fungi is >25%: Alternaria, Aspergillus, Cladosporium, Curvularia, Fusarium, Macrophomina, Penicillium, Phoma and Rhizopus spp.
Seed sample
- Sorghum is seed propagated. To maintain genetic integrity, use seed from the original source as far as possible.
- At least 50 plants are required for regeneration, preferably more.
- About 8–15 g of seed (depending on seed size) are required for regenerating an accession.
- For each accession, prepare one seed packet for planting each row.
- Label the packets with identification number and row number and arrange them according to field lay-out.
Field selection and preparation
Sorghum can be grown on a wide range of soils but vertisols (black soils) are best for regeneration. Soil pH should be 5.5–8.5 and the plant will tolerate some salinity, alkalinity and poor drainage.
- Select fields in which sorghum was not grown in the previous year.
- Choose a field with good drainage that is weed-free at the time of sowing to ensure a good reserve of soil moisture.
- Prepare the land to a fine tilth by deep ploughing, followed by three or four harrowings.
- Level the field and make ridges 75 cm apart. This facilitates better establishment of seedlings and plant stands.
Method of regeneration
Planting layout, density and distance
- Divide the field into plots (also known as tiers), leaving 1-m walking space between them. The plots can vary from 3 to 9 m wide depending on the size of the field.
- Mark rows 75 cm apart across each tier, perpendicular to the length of the field, giving rows of 3–9 m long, depending on the width of the plot.
- Ensure a minimum distance of 3 m between different accessions.
Planting method
- Assign row numbers in a serpentine pattern (i.e. planting from left to right in the first row followed by right to left in the second row or vice versa).
- Sow mechanically using a tractor-mounted four-cone planter if planting a large number of accessions or plant by hand.
Labelling
- Label each accession with a tag fastened to a stake about knee height.
- Use strong paper for tags to withstand weathering.
 Sorghum panicles covered with paper bags prior to anthesis. (photo: ICRISAT) |
Crop management
The genetic integrity of sorghum accessions is maintained by selfing when large numbers of accessions have to be regenerated simultaneously and isolation is not possible.
- Trim flag leaves of emerging panicles.
- Cover the panicles in well labelled paper bags of 10 x 5 x 37 cm prior to anthesis (see photo).
- Staple or use a paper clip to hold corners of bags together so they are not blown off the panicle.
- Remove bags after 21 days (i.e. at dough stage) and tie them around the peduncles to identify selfed panicles when harvesting.
Fertilization
- Apply fertilizers on the basis of soil test results. In the absence of a soil test apply nitrogen and phosphorus, each at 40 kg/ha. If potash is required, apply 35 kg/ha.
- Apply fertilizer alongside the rows in 5-cm-deep furrows 5 cm to the side of the seed at the time of sowing. As a second dose, apply nitrogen at the rate of 40–60 kg/ha between rows 30 days after planting.
Thinning
- Thin out seedlings when they are 2 weeks old to maintain a distance between plants of 10–15 cm. At least 90 plants per accession are needed.
Weed management
- Apply pre-emergent herbicide. Inter-cultivate twice during early stages of crop growth and hand weed if necessary at later stages.
- Eliminate off-types and plants growing off-row.
Irrigation
- Irrigate after sowing if soil is dry, to avoid wilting of leaves at any stage of crop growth and to ensure moist soil at flowering.
Common pests and diseases
Contact plant health experts to identify pests and diseases and recommend appropriate control measures.
- The main diseases of sorghum are: Anthracnose (Colletotrichum graminicolum), leaf blight (Helminthosporium turcicum), downy mildew, honeydew (Sclerospora sorghi) and smut (Sphacelotheca spp.).
- The main insect pests are sorghum shoot fly and stem borer (Chilo partellus).
- Sorghum crops can also be attacked by birds.
Monitoring accession identity
Comparisons with morphological data
Compare the following traits in characterization data:
- Panicle exsertion
- Panicle compactness and shape
- Glume colour
- Glume covering (race)
-
Grain colour
Harvesting
- Identify seed maturity by the formation of a black layer on the seeds. A dark patch in the pericarp, apparently associated with black layer formation, indicates physiological maturity. The optimum time to harvest seed for maximum longevity is 7 weeks after anthesis.
- Harvest and thresh seed manually. Small precision seed threshers can also be used successfully provided the equipment is cleaned thoroughly between accessions.
- Bulk seeds from at least 50 selfed plants to maintain the accession.
- Cut the panicles (select only selfed panicles, one from each plant, identified by clipped flag leaf and selfing bag clasped around peduncles) just below the base with secateurs.
- Collect panicles from each row in a well-labelled gunny bag (label both inside and out with accession and row numbers).
Post-harvest management
- Dry panicles in shade for a week until seed moisture content is reduced to 12% (ideal for hand threshing).
- Thresh individual panicles by beating gently and clean the seeds of debris by winnowing.
- Collect equal quantities of seed from each panicle/plant and bulk them to reconstitute the original accession.
- Prevent spillover and contamination of accessions during threshing and subsequent handling.
- Verify accession identity using seed traits (see below). Send a representative sample for observations on seed traits, seed health and viability testing. Reject samples with a high percentage of infection and list for next regeneration.
- Avoid chemical treatment of seed intended for storage. Collect the seeds in a labelled muslin cloth bag for further drying, preferably at a lower temperature and relative humidity (20–25°C and about 30–40% relative humidity).
- Keep seeds at these conditions until seed moisture is 8–9% (for medium-term conservation). For long-term conservation, dry the seeds to 5–7% moisture content using forced ventilation in a seed dryer maintained at 15°C and 15–20% relative humidity.
- If a drying room and forced ventilation facilities are not available, dry seeds to a moisture content of 5–7% with silica gel or other suitable desiccant.
- Pack seeds in moisture-impermeable containers (plastic bottles or aluminium foil) for conservation and distribution.
- Move seeds to a short-term storage area.
Regeneration of wild sorghum
Grow wild species in an isolated area to avoid possible outcrossing with germplasm of related species or introduction of weeds. Grow weedy or invasive species, such as S. propinquum and S. halepense, in a glasshouse under careful management.
- For field grow out, prepare broad beds 1.5 m wide and 6 m long. For growing in a glasshouse, use pots of 30 cm diameter filled with a mixture of 3 parts black soil: 2 sand: 1 farmyard manure.
- Germinate the wild species in paper cups and transplant them at 20 cm spacing in the field or in pots in the glasshouse.
- Follow the same crop husbandry practices recommended for cultivated sorghum.
- Cover panicles in parchment paper bags before stigma emergence to prevent outcrossing.
- Harvest the panicles individually as they mature, i.e. before shattering.
- Collect the seeds from each plant into a labelled muslin cloth bag.
- Dry the seeds held in the cloth bags under shade and clean them by gentle blowing or winnowing.
- Take equal quantities of seed from each plant and reconstitute the accession for further drying and subsequent storage.
Documentation of information during regeneration
Collect the following information during regeneration:
- Regeneration site name and map/GPS reference
- Name of collaborator
- Field/plot/nursery/greenhouse reference
- Accession number; population identification
- Source of seed
- Generation or previous multiplication or regeneration (if generation is not known)
- Preparation of planting materials (pre-treatments)
- Sowing date and density
- Field layout used
- Field management details (watering, fertilizer, weeding, pest and disease control, stresses recorded, others)
- Environmental conditions (altitude, precipitation, soil type, others)
- Emergence in the field or greenhouse (number of plants germinated)
- Number of plants established
- Days from sowing to flowering
- Pollination control method used (method, number of plants pollinated)
- Harvest date and method
- Number of plants harvested
- Quantity of seeds harvested
- Agronomic evaluation; agro-morphological traits recorded
- Comparisons with reference materials (record any identification numbers or references of any samples taken from this regeneration plot)
- Post-harvest (describe any relevant procedures)
References and further reading
Bioversity International, ICRISAT, United Sorghum Check-off Program. 2010. Key access and utilization descriptors for sorghum genetic resources. Bioversity International, Rome, Italy; International Crops Research Institute for the Semi-Arid Tropics, India; United Sorghum Check-off Program, USA. Available here.
IBPGR and ICRISAT. 1993. Descriptors for sorghum [Sorghum bicolor (L.) Moench.]. IBPGR, Rome, Italy; ICRISAT, Patancheru, India. Available here.
ICRISAT. Sorghum [online]. Available from: http://www.icrisat.org/crop-sorghum.htm. Date accessed: 26 May 2010.
Kameswara Rao N, Sastry DVSSR. 1998. Seed quality considerations in germplasm regeneration. In: Engels JMM, Ramanatha Rao R, editors. Regeneration of Seed Crops and their Wild Relatives. Proceedings of a Consultation of a Meeting, 4–7 December
1995. ICRISAT, Hyderabad, India. International Plant Genetic Resources Institute, Rome, Italy. pp. 144–149. Available here (1.8 MB).
Purseglove JW. 1972. Sorghum bicolor (L.) Moench. In: Tropical Crops. Monocotyledons. Longman Group Limited, London. pp. 261–287.
Rao NK, Bramel PJ. 2000. Manual of genebank operations and procedures. Technical Manual No. 6. ICRISAT, Patancheru, India.
Acknowledgement
These guidelines have been peer reviewed by Kameswara Rao, International Center for Biosaline Agriculture (ICBA), Dubai, UAE.
Regeneration guidelines for sweet potato
|
View regeneration guidelines in full (in PDF)
Also available in the following languages: |
The information on this page was extracted from:
Rossel G., Espinoza C., Javier M. and Tay D. 2008. Regeneration guidelines: sweet potato.
In: Dulloo M.E., Thormann I., Jorge M.A. and Hanson J., editors. Crop specific regeneration guidelines [CD-ROM]. CGIAR System-wide Genetic Resource Programme, Rome, Italy. 9 pp.
Before reading the regeneration details for this crop, read the general introduction that gives general guidelines to follow by clicking here.
Introduction
Sweet potato (Ipomoea batatas (L.) Lam.) is a herbaceous, perennial plant belonging to the Convolvulaceae family. It has a vine system that expands rapidly and horizontally along the ground.
Although its growth habit is mainly prostrate, it varies from erect and semi-erect to spreading. Sweet potato is the world’s seventh most important food crop, after wheat, rice, maize, potato, barley and cassava. More than 133 million tonnes of sweet potato are produced globally per year, more than 95% in developing countries (www.cipotato.org). The most common names for this plant in Latin America are batata, camote, boniato, batata doce, apichu and kumara.
Sweet potato was probably domesticated more than 5000 years ago, in either South America or Central America, with recent evidence suggesting the latter (Rossel et al 2001). The CIP genebank contains 6855 accessions of Ipomoea batatas (4616 landraces and 2239 improved cultivars and breeding materials) and 1171 accessions of 67other Ipomoea species. The former are mainly conserved vegetatively in pots in greenhouses or screenhouses or under in vitro culture. Wild, related species and 2556 landrace accessions are conserved as seeds in cold chambers.
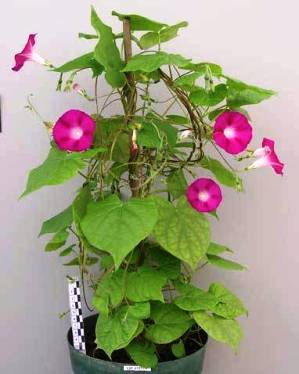
Wild sweet potato plant, Ipomoea purpurea (L.) Roth. |
Within a sweet potato collection, a wide variation is generally observed in the flowering habits of different accessions. Under normal sowing conditions, some cultivars do not flower. Several techniques have been developed to promote sweet potato flowering, including short photoperiod, grafting, trellises etc. This guide describes the procedures for regeneration of seed collections of Ipomoea batatas and other wild relatives.
A wide range of additional information about sweet potato can be found at the Sweetpotato Knowledge Portal.
Choice of environment and planting season
Climatic conditions
- Sweet potato grows at latitudes ranging from 40°N to 32°S. On the equator it is grown at altitudes from sea level to 3000 masl (Huaman 1987).
- It is a semi-tropical plant that grows best between 20 and 30°C and requires a minimum of 5 months of frost-free growing conditions with abundant sunshine (a photoperiod of 13–15 hours light is recommended) and warm nights. Colder temperatures injure the roots.
- Annual rainfall of 750–1000 mm is ideal, with a minimum of 500 mm in the growing season (Ahn 1993).
Planting season
- Sweet potato can be grown all year round if soils are well drained. In the coastal region of Peru it grows best when planted from September to November.
Preparation for regeneration
When to regenerate
- When seed germination falls below 85%.
-
When number of stored seeds is less than 2000.
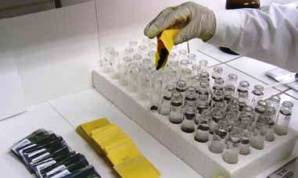
Sweet potato seeds submerged in concentrated sulphuric acid for scarification. (photo: Victor Fernandez/CIP)
- For evaluation trials.
- For preparing safety duplication of seed collection.
Seed scarification and germination
Seed germination is difficult and requires scarification by mechanical abrasion or chemical treatment.
- Before scarification, submerge seeds in three disinfectant solutions: first 1N hydrochloric acid (HCl), followed by a soapy solution and finally 96% ethanol for 5 minutes in each. Scarify the seed testa with a scalpel or sandpaper.
- Chemical treatment: place seeds in plastic mesh and submerge them in concentrated sulphuric acid (see photo) until the acid starts turning dark (10–40 minutes). Rinse in running water overnight.
- After scarification, place 30 seeds in Petri dishes with filter paper. Keep the plates moist with distilled water.
- Put plates in a germination chamber at 18–20°C, 80% humidity and photoperiod of 12 hours light.
- Evaluate every 7 days for 3 weeks.
- Register germination date for each accession.
- If mean germination is above 85% continue to store the accession; if not, schedule the accession for regeneration.
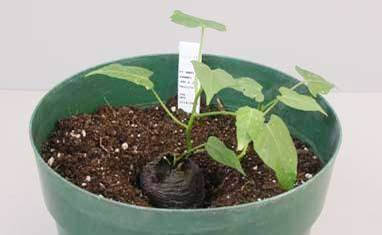
Sweet potato seedling transplanted into 20-cm pot. |
Preparation of planting material
- Sow seedlings into compressed peat (e.g. Jiffy-7) pots.
- After 30 days transplant into 20-cm pots (see photo) with soil composed of moss, dark-brown earth and sand (2:1:1).
- After about 40–65 days from initial sowing plants are ready for grafting.
Preparation of rootstocks
- The most efficient rootstock is Ipomoea nil cv. Kidachi Asagao.
- Germinate seeds on Petri dishes with filter paper. Keep plates moist with distil ed water.
- After 8–10 days transplant seedlings into 20-cm pots with soil composed of moss, dark-brown earth and sand (2:1:1).
- After about 40–65 days from initial sowing plants are ready to receive grafts.
Labelling
- Label the pots appropriately by placing, for example, waterproof self-adhesive barcode labels onto plastic plant pot sticks. Labels should contain the following information: accession number, collecting number, genus and species, planting date.
- Use appropriate labels (e.g. self-tie barcode labels) to identify accessions in the field.
Method of regeneration
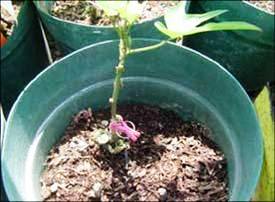 Sweet potato scion grafted onto rootstock from Ipomoea nil cv. Kidachi Asagao. (photo: Vilma Hualla/CIP) |
Planting layout, density and distance
- Plant 30 seeds per accession (one per pot) and place pots on tables in a greenhouse, keeping a space of 25 cm between pots.
Grafting onto rootstocks with profuse flowering
- Graft sweet potato scions onto rootstocks that produce large numbers of flowers simultaneously.
- Use a 'cleft' type of graft with a 15-cm sweet potato scion.
- Spray the grafted plants with a fungicide for a few minutes.
- Fix the graft with a small hook or parafilm (see photo) to seal the graft, cover the plant with a clear plastic bag and place it in shade for 1 week.
- After about 3 weeks, initiate a short-day treatment after pruning the tip of the scion.
- Best results are obtained when rootstock plants are young and the scions come from mature sweet potato plants.
Flowering induction
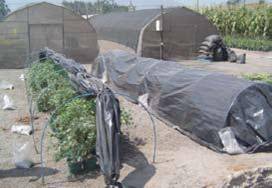 Use black plastic sheet to create short-day conditions to induce flowering. (photo: Vilma Hualla/CIP) |
Flowering and fruit set are highest at temperatures of 20–25°C and a relative humidity above 75%.
- Prepare a flowering bed made of frames to support black plastic or other dark material to cover plants.
- Transfer the grafted plants from the greenhouse to flowering beds.
- Cover the flowering beds at about 1600 h and remove covers the next day at about 0800h to stimulate flowering (see photo). Continue this short-day treatment for 1–2 months.
- Apply weekly sprays of 1000 ppm giberellic acid.
- Flower buds will appear about 3 weeks after short-day treatment.
- Once induced, move plants to a greenhouse for hand pollination or controlled pollination, or to an isolated field. In some cases, this short-day treatment must be repeated to assure continuous flowering.
- The use of trel ises makes flowering induction and seed production relatively efficient. The benefits are associated with the upward vegetative growth of plants, higher exposure to light, less attack from soil-borne pathogens and insects and by making it easier to col ect seed capsules. Structures such as tripods, stakes and wire mesh can be used as trel ises.
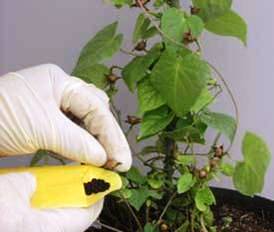
Pollination
Cross-pollination
- In the case of plants maintained in beds in the field, a day before flowers open, hold all petals with a clip or cover the flower buds with a glassine paper bag to avoid pollination or contamination with ‘foreign’ pollen.
- Remove the clips/paper bags when extracting anthers for pollination.
- Emasculate flower buds of female parents the afternoon before anthesis and cover them with glassine paper bags.
- Extract the pollen from anthers of the male parents and place it on the stigmas of female parents or rub the extracted anthers on the stigmas of female parents.
- Cover the pollinated flowers with a paper bag.
- Identify the flower with a label indicating: accession numbers of the parents, collecting number, genus and species, place and date of cross-pollination.
Open pollination
- Transfer the plants from the greenhouse to the field, near to beehives where bees and other insects will pollinate them.
Crop management
Evaluation of fertilization and seed formation
- Unfertilized flowers fall 2–3 days after pollination.
- Seed capsules form 30–50 days after pollination, depending on weather conditions.
Staking
- Provide appropriate stakes to support the spirals of the sweet potato vines and to avoid them mixing with other accessions.
Irrigation
- Immediately after transplanting, water the plants once a week. After 1 month, start watering twice a week.
Fertilization
- Apply fertilizers (N:P:K 15:15:15) monthly.
Common pests and diseases
- Damping-off caused by different soil-borne pathogenic fungi species, such as Pythium spp., Rhizoctonia and Fusarium, affects seedlings during transplantation.
- Whiteflies (Bemisia tabaci) are a major pest of sweet potato, transmitting viruses and other disease agents.
- Thrips can stunt and reduce growth in young transplants.
- Red spider mites (Tetranychus urticae) can infest plants in greenhouses. Heavily infested plants are severely weakened and may die.
- Contact plant health experts to identify the symptoms of the likely pests and diseases and the appropriate control measures.
Pest and disease control
- To control damping-off, apply a fungicide.
- To control thrips and whiteflies, apply monthly sprays of an insecticide.
- To control red spider mites, apply an acaricide/insecticide monthly.
Harvesting
Harvesting sweet potato seed. |
The fruit of sweet potato is a capsule, more or less spherical with a terminal tip, and can be pubescent or glabrous. Each capsule contains one to four seeds that are slightly flattened on one side and convex on the other. Seeds are brown to black in colour and have a diameter of about 3 mm.
- Harvest periodically before capsules open to avoid seed losses, as not all plants produce seed at the same time (see photo).
- Keep harvested seeds in paper bags and identify them, preferably with barcode labels.
- Measure the 100-seed weight and total weight of seeds.
- Calculate the number of seeds (for a small number of seeds count manually).
- Record all data.
Post-harvest management
Seed cleaning
- Thresh by hand to remove all debris from seeds.
- Disinfect seeds with an appropriate disinfectant by keeping the treated seeds in Petri dishes sealed with parafilm and store for at least 30 days to detect if there is any insect emergence.
- If no insects are found, continue with normal packaging and storage procedures.
- Perform a germination test to calculate initial germination percentage.
Seed drying
Method 1 uses a silica gel desiccant under temperature-controlled conditions for 14 days to reduce seed moisture content to 7–10%.
- Weigh seed and silica gel at 1 g of seed: 2 g silica gel using a precision balance.
- Prepare the seeds and silica gel in separate Petri dishes to allow easy removal and renewal of the gel (when colour changes from deep blue to pink or pale blue).
- Place the Petri dishes on plastic trays and cover with plastic bags.
- Put the trays in an incubator set at 17°C.
- Distribute the trays evenly in the incubator.
Method 2 uses a drying chamber.
- Place seed bags in drying chamber (30°C) for 20 days until seed moisture reaches 7–10%.
- Package seed immediately to avoid rehydration.
Seed packaging
- Pack seeds into aluminium foil bags with about 1000 seeds per bag.
- Place waterproof self-adhesive barcode labels on the outside and inside of seed packets, with the following information: accession number, collecting number, type of seed (original, sib cross, open-pollination or self-pollination), year and place of collection or regeneration of seed, number of seeds, storage date, genus and species.
- Fill storage containers with the seed bags and seal immediately to protect the seeds from high ambient relative humidity.
- Store in storage room.
Seed storage
-
Two types of seed stores are used to conserve sweet potato germplasm:
- Medium-term storage (10 years) at 0°C (active collection): used for accessions with less than 60% germination or those that need to be regenerated.
- Long-term storage (50 years) at -20°C (base collection): used for accessions where germination is greater than 85%.
- In the storage facilities at CIP the aim is to store 1500–2000 seeds per accession for long-term conservation and 1500–2000 seeds per accession for an active collection.
Monitoring accession identity
- Verify accession identity using morphological descriptors according to the published list of sweet potato descriptors (CIP/AVRDC/IBPGR 1991).
- Take pictures.
- Prepare herbarium specimens.
Documentation of information during regeneration
Collect the following information during regeneration:
- Accession number
- Collecting number (Original number assigned by the collector(s) of the sample)
- Genus and species
- Country of col ection (Code of the country in which the sample was originally collected)
- Locality of regeneration
- Environmental conditions (altitude, temperature, precipitation)
- Field, plot, greenhouse, screenhouse reference
- Germination
- Number of plants established
- Days from sowing to flowering
- Method of pollination
- Number of pollinated flowers
- Pollination date
- Number of capsules obtained
- Date of capsule harvest
- Processing date
- Number of seeds obtained
References and further reading
Ahn PM. 1993. Tropical Soils and Fertilizer Use. Intermediate Tropical Agriculture Series.
Longman Scientific and Technical Ltd, UK.
Bioversity International, CIP. 2010. Key access and utilization descriptors for sweet potato genetic resources. Bioversity International, Rome, Italy; International Potato Centre (CIP), Lima, Peru. Available here.
CIP. 1999. Sweetpotato (Ipomoea batatas) Germplasm Management Training Manual. Huaman Z, editor. CIP, Lima, Peru.
CIP, AVRDC, IBPGR. 1991. Sweet Potato: Descriptors for Sweet potato. Huaman Z, editor. IBPGR, Rome, Italy.
Huaman Z. 1987. Current status on maintenance of sweetpotato genetic resources at CIP. In: Exploration, maintenance and utilization of sweetpotato genetic resources. Report of the First Sweetpotato Planning Conference 1987. CIP, Lima, Peru. pp. 101–120.
Rossel G, Kriegner A, Zhang DP. 2001. From Latin America to Oceania: The historic dispersal of sweet potato re-examined using AFLP. CIP Program Report 1999–2000. CIP, Lima, Peru. pp. 315–321.
Sweetpotato Knowledge Portal [online]. Available from: http://sweetpotatoknowledge.org/. Date accessed: 18 July 2011. The portal is supported by the International Potato Centre, CIP, and by the Sweetpotato Action for Security and Health in Africa (SASHA).
Acknowledgement
These guidelines have been peer reviewed by K. Abraham, Head of Crop Improvement Division, Central Tuber Crops Research Institute (CTCRI), India and Algerico Mariscal, Director, PhilRootcrops, Philippines.
Regeneration guidelines for wild potato
|
View regeneration guidelines in full (in PDF)
Also available in the following languages: |
The information on this page was extracted from:
Salas A., Gaspar O., Rodríguez W., Vargas M., Centeno R. and Tay D. 2008. Regeneration guidelines: wild potato.
In: Dulloo M.E., Thormann I., Jorge M.A. and Hanson J., editors. Crop specific regeneration guidelines [CD-ROM]. CGIAR System-wide Genetic Resource Programme, Rome, Italy. 9 pp.
Before reading the regeneration details for this crop, read the general introduction that gives general guidelines to follow by clicking here.
Introduction
Potato genetic resources are mainly conserved in clonal collections, e.g. tuber, in vitro culture and cryopreservation. Botanical seed collections of cultivated potato can be carried out only in selected cases for example, after duplicated accessions in the global in-trust collection held at the International Potato Center (CIP) have been identified, open-pollinated seed is harvested from the field-grown clones for safe maintenance. The handling of the berries and seed follow similar steps as described below.
The conservation of wild potato species germplasm, on the other hand, is primarily conducted in the form of botanical seed collections. There are 188 wild potato species recognized up to now (Spooner and Salas 2006). Of these, 141 species are conserved in The Germplasm Bank at CIP. Wild potato species have a wide geographical distribution, from the south-west of the United States to the central part of Argentina and Chile, from sea level up to 4500 masl in a wide range of environments that include puna zones and high plateaus in the Andes, dry forests in Mexico, vegetation on the Chilean coasts and humid forests in the oriental part of the Andes. Wild potato species have a basic chromosome number of x=12 and include diploids, triploids, tetraploids and hexaploids. Each species shows different characteristics of reproduction; most are allogamic to varying extents and a small group could be 100% autogamous (as in case of Solanum acaule Bitter).
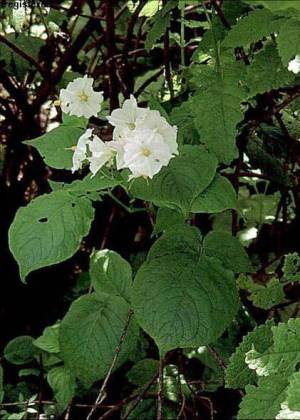 Solanum hypacrarthrum Bitte. (photo: A. Salas/CIP) |
Choice of environment and planting season
Climatic conditions
- The regeneration site must have a similar climate to the locality where the accession was originally collected.
- The selection of a regeneration locality is much more important for photosensitive species, such as equatorial species like S. colombianum Dunal and S. tundalomense Ochoa.
Planting season
- Planting is carried out in spring–summer. In South America, planting is carried out from September until the end of May.
Preparation for regeneration
When to regenerate
- When germination falls below 85% in stored germplasm.
- When seed is in poor condition, diseased or infested with pests.
- When seed is needed to distribute to other genebanks.
- To make safety duplications.
- When seed is needed for planting out to screen accessions for certain attributes.
The period between regeneration cycles varies with genotype. Each genotype shows different characteristics of reproduction and seed viability during long-term storage. Test germination every 5 years to determine minimum period of regeneration.
Pre-treatments and viability monitoring
Evaluate a sample of 100 seeds for viability. If average viability is >85%, store seeds in a cold chamber at -20°C for long-term conservation. If average viability is <85%, regenerate the accession. In case of dormancy pre-treat seeds with gibberellic acid to break dormancy.
Substrate selection and preparation
- Regenerate accessions in screen- and greenhouses under controlled conditions.
- Use a peat-based growing medium which gives quick rooting and an optimum water/air ratio. Incorporate a wetting agent to improve water absorption and distribution.
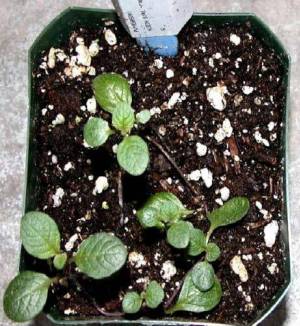
Preparation of planting material
- Transfer healthy germinated seeds to clearly labelled 10-cm pots.
- After approximately 30 days, when seedlings have reached about 5cm (see photo below left), transplant the seedlings individually to compressed peat (e.g. Jiffy-7) pots, labelling each genotype with its accession data (see photo below right).
 |
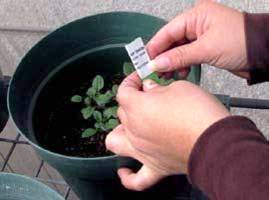
Labelling transplanted seedlings. |
|
Seedlings ready to be transplanted into 20-cm pots. |
Method of regeneration
Planting layout, density and distance
- Use 25 genotypes as the minimum population size to prevent genetic drift.
- Group pots by species and accession; leave a distance of 25 cm between pots.
Pollination
The pollination of wild potato species can be done using one of three different techniques, namely reciprocal crosses, bulk crossing and open pollination. Open pollination is normally used for cleistogamic and autogamic species as well as for outbreeders. For other wild species, either the reciprocal crosses or bulk crossing technique is used depending on the number of flowers per plant. The choice also depends on the amount of resources available and level of genetic integrity which is aimed for. Bulk crossing is less expensive than reciprocal crosses, but the latter ensure a higher genetic integrity of the accession.
The reciprocal crosses technique is chosen when there are less than 5 flowers per plant.
Flower number in wild potatoes is very variable, and depends on both the appropriate temperature and light under greenhouse condition.
Reciprocal crosses between sister plants:
- Use 25 plants per accession and about 3–5 flowers per plant, bulked for pol ination.
- Extract pollen from the anthers of a plant and place it on the stigma of a sister plant within the same accession. The total number of crosses depends on the number of flowers, from as low as 1 to as high as 10.
- Record the following information on the label: collection number, number of flowers crossed, genotypes used, locality and date.
Bulk crossing:
- Use 25 plants per accession, 10 flowers per plant.
- Bulk the pollen of all accessions and use it to pollinate each of the 25 plants.
 Wild potato plants regenerated in a screenhouse in Huancayo, Peru. (photo: M. Vargas/CIP) |
Open pollination:
- Use up to 25 plants per accession.
- Thirty days after open pollination, collect the seed from the berries of each plant; no insect vectors are used.
Isolation
- Grow plants in species groups in insect-proof greenhouses under controlled conditions (see photo).
Labelling of accessions
- Use plastic stakes with waterproof labels.
- Record the following information on the label: accession number, species and year of planting.
Crop management
Staking and cleaning
- Stake plants with bamboo.
- Place sticks near the edge of the pot when potting plants.
- Three weeks after potting, tie the plants to the bamboo stick with twist ties and remove any old leaves.
Irrigation
- Irrigate the potted mother plants to field capacity every 2 days (depending on the species and weather conditions).
Fertilization
- After planting, apply N-P2O5-K2O (20-20-20) water soluble fertilizer at 3 ppm to each pot.
- Before flowering, apply N-P2O5-K2O (24-8-16) water soluble fertilizer at 3 ppm to each pot.
Common pests and diseases
- Contact plant health experts to identify pests and diseases and to recommend appropriate control measures.
- Potato tuber moth (Phthorimaea operculella) and aphid are common insect pests and Oidium (causing powdery mildew) is a common pathogen.
Pest and disease control
- For insect attack (e.g. potato tuber moth), use insecticides such as pyrethroids at 1 ppm.
- For fungal attack, use a sulphur fungicide at 1 ppm.
- Do not use carbamate, phosphorates pesticides or urea fertilizer as wild potato species are very sensitive to these products.
- Conduct tests to determine the presence of potato virus T (PVT), potato spindle tuber viroid (PSTVd), Andean potato latent virus (APLV), potato yellowing virus (PYV) and Arracacha virus B - oca strain (AVB-O) in the mother plant.
- Destroy and safely dispose of plants that show obvious disease symptoms.
Other
- When berries are 20–30 days old, bag them in mesh bags to avoid possible mixtures and losses.
Harvesting
When berries have reached maturity (about 45 days) harvest each inflorescence separately, place in a labelled paper bag and record the number of berries obtained.
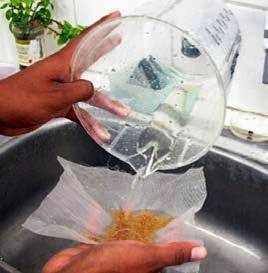
Seed separation procedure using water. |
Post-harvest management
- Extract seeds through manual maceration, i.e. separate the seeds of a ripe fruit with water (see photo), keeping each population separate to avoid seed mixing.
- Once the remnants of the ovary and unfilled seed are eliminated, spread the cleaned seed on filter paper with the corresponding label and date of processing.
- Pre-dry the seeds in shade for 5 days at room temperature.
- After 5–10 days, fine-clean seeds, count and place them in a manila envelope, labelled with the accession data and the total number of seeds obtained.
- Attach the labels from the cross, berry data, bags and filter paper to avoid any mistakes in sample identity.
Seed drying
- The process of seed drying is the most important phase for future viability of seeds in long-term conservation.
- Place envelopes containing seeds in a drying chamber with hot air at 30ºC. After about 7 days, the seed moisture should be reduced to 5%.
- Hermetically seal dry seeds in laminated aluminium-PE bags, identified with process data, collection number, species, crossing data, number of genotypes, flowers and berries obtained, total seed number, crosses, macerating and harvest date.
- These seeds represent the accession and species as a new regenerated population.
Seed storage
- Test seeds for viability.
- When the number of seeds is more than 5000 and the germination percentage is greater than 85%, store seeds in a cold chamber at -20ºC for long-term conservation.
Monitoring accession identity
Compare each accession with the following characterization data previously recorded for the accession:
- Growth habit
- Flower colour
- Seed colour
- Seed shape
Prepare herbarium specimens for future reference.
At harvest, characterize berries to confirm the taxon of the regenerated accessions.
Documentation of information during regeneration
Collect the following data during regeneration:
- Locality of regeneration
- Collaborators
- Sample number
- Germination per cent
- Number of plants established
- Days from sowing to flowering
- Method of pollination
- Number of pollinated flowers
- Pollination date
- Number of berries obtained
- Date berries harvested
- Processing date
- Number of seeds obtained
References and further reading
FAO/IPGRI. 1998. Potato. FAO/IPGRI Technical Guidelines for the Safe Movement of Germplasm. No. 19. FAO/IPGRI, Rome, Italy.
Harrington JF. 1963. Practical advice and instructions on seed storage. Proceedings of the International Seed Testing Association 28:989–994.
Hijmans RJ, Spooner DM. 2001. Geographic distribution of wild potato species. American Journal of Botany 88:2101–2112.
Hijmans RJ, Spooner DM, Salas AR, Guarino L, de la Cruz J. 2002. Atlas of wild potatoes. Systematic and Ecogeographic Studies on Crop Genepools 10. IPGRI, Rome, Italy. pp. 4–5.
Roberts EH. 1973. Predicting the storage life of seed. Seed Science and Technology 1:499–514. Roberts EH, Ellis RH. 1977. Prediction of seed longevity at sub-zero temperatures and genetic resources conservation. Nature 268:431–432.
Spooner DM, Salas AR. 2006. Structure, biosystematics and genetic resources. Gopal J, Paul Khurana SM, editors. In: Handbook of Potato Production, Improvement, and Post-harvest Management. Haworth Press Inc., New York, USA. pp. 1–39.
Acknowledgements
These guidelines have been peer reviewed by William Roca, International Potato Center (CIP), Peru, and Andrea M. Clausen, Instituto Nacional de Tecnología Agropecuaria (INTA), Argentina.
More Articles...
Subcategories
-
main
- Article Count:
- 17