


CGKB News and events Other crops
Introduction for the regeneration guidelines of crops


|
View introduction in PDF Also available in the following languages: |
Contact person for Other crops: Ehsan Dulloo, Bioversity, Italy
The information on this page was extracted from:
Dulloo M.E., Hanson J., Jorge M.A., and Thormann I. 2008. Regeneration guidelines: general guiding principles. In: Dulloo M.E., Thormann I., Jorge M.A. and Hanson J., editors. Crop specific regeneration guidelines [CD-ROM]. CGIAR System-wide Genetic Resource Programme (SGRP), Rome, Italy. 6 pp.
Before reading the regeneration details for the different crops, this general introduction giving guidelines to follow should be read.
Background
Genebanks must ensure that their germplasm accessions are kept viable and at high quality for as long as possible. Even under the highest standards of management, however, germplasm deteriorates with time and needs to be regenerated. For many genebanks, maintaining collections at acceptable levels of viability and quality is difficult due to the costs involved and their limited capacity and technical expertise — especially when faced with the complex regeneration procedures required by some species (FAO 1998). This has resulted in regeneration backlogs, which is putting important unique material in danger, as highlighted by both FAO’s State of the World Report and the crop conservation strategies developed over the past few years with support from the Global Crop Diversity Trust (the Trust), in many cases facilitated by CGIAR centres. The Trust is therefore supporting the regeneration of such priority threatened material around the world. While a generic decision-support tool for regeneration exists (Sackville Hamilton and Chorlton 1997), some crop-specific knowledge and expertise is required. Unfortunately, although such knowledge exists in genebanks around the world, including the CGIAR Centres, no attempt has been made - until now - to identify, collate and publish best practices to help collection holders undertake regeneration in ways that maintain the genetic integrity and optimize the viability of the planting material they produce. The Trust has therefore requested Bioversity, acting on behalf of the System-wide Genetic Resources Programme (SGRP), to develop crop-specific regeneration guidelines for the 21 major food crops banana, bean, breadfruit, cassava, chickpea, coconut, cowpea, fababean, fingermillet, grasspea, maize, major aroids, lentil, pearl millet, pigeon pea, potato, rice, sorghum, sweet potato, wheat and yam) that are being targeted in the Trust’s regeneration initiative.
Definition
In these guidelines, the term regeneration is taken to mean the re-establishment of samples genetically similar to the original collection when viability or plant numbers are low. Regeneration is also necessary for new accessions which need long-term conservation if quantities are too low, and may be required for sanitary reasons to eliminate diseases. In the case of clonal crops conserved in field genebanks, re-establishment could either be on the same site or in a different site for security or to avoid diseases and pests.
General guiding principles
Assuring genetic integrity
Germplasm regeneration is a critical operation in genebank management, that which involves the greatest risks to the genetic integrity of germplasm, due to selection, out-crossing or mechanical mixing. The risk of losing genetic integrity is especially high when regenerating genetically heterogeneous germplasm accessions of out-crossing crops. The aim of regeneration is to maintain the original genetic diversity and structure of the accession or collection (see recommendations under ‘General regeneration guidelines’ below).
Assuring efficiency
The reproductive rate of the species and variety at the regeneration site should be considered in order to produce sufficient seeds or planting materials. The number of seeds, cuttings or other planting materials required for regeneration should be carefully calculated, taking into account the desired number of plants for regeneration, germination and field establishment rates of the accession, the amount of seed required after regeneration and whether or not characterization and evaluation are linked to regeneration.
Assuring quality
The aim of regenerating crops is to produce sufficient quantities of healthy, viable seeds, tubers or other vegetative plant propagules. Before distributing germplasm, genebanks must screen it for the presence of seed-borne or vegetative-borne pathogens and pests to prevent spread of diseases and pests. This germplasm should provide an uncontaminated basic stock for breeding programmes, multiplication or other projects.
General regeneration guidelines
Type of collection
The two types of genebank collections recognized for seed crops are active collections and base collections. Active collections should preferably be regenerated from original seeds taken from base collections. However, using seeds from an active collection for up to three regeneration cycles before returning to original seeds (base collection) is also acceptable (FAO/IPGRI 1994). Base collections should only be regenerated using residual seed from the most original sample in the base collection. In the case of clonally propagated crops, materials are usually maintained in a field collection (Engels and Visser 2003). Some tropical tree species may only need replanting once every 15 years or longer, while other species need to be replaced every few months.
It is good practice to establish a duplicate collection as there will be no remnant seed to fall back on when plants fail, as in the case of seed-propagated crops. Clonally propagated crops can also be conserved in vitro or by cryopreservation, where these technologies have been developed for the specific crop, and such material can also serve as back up to field genebanks. Regeneration of in vitro or cryopreservation collections is not covered in these guidelines (see Reed et al. (2004) for more information).
When to regenerate
Regeneration is a costly process and should only be carried out as often as is necessary to ensure accessions are available in sufficient quantity and adequate quality.
For most seed crops, accessions are regenerated:
- when seed viability falls below 85% of the initial germination percentage in active collections, as determined by viability monitoring (see FAO/IPGRI 1994; Rao et al. 2006; ISTA 2008 for more details). The initial viability before storage should not be less than 85%, although in some genebanks a lower percentage (<75%) is used, especially for wild species.
- when the number of viable seeds per accession is <1500 in active or base collections of populations and <250 seeds for inbred lines.
Poor-quality (low viability) accessions are more important to regenerate than those with inadequate numbers of seeds. Accessions in base collections take priority over those in active collections.
For clonally propagated crops, the decision to regenerate will depend on:
- maturity and deterioration of the plant materials under conservation
- pest and disease status of the field collection
- need to replace collection due to external hazards (drought, floods, cyclones)
- need to increase availability of propagation materials.
Sample size
The sample drawn from a seed accession for regeneration should be randomly chosen to represent the diversity within the accession or collection and to give a high probability of retaining low frequency alleles. As a rule of thumb, Crossa et al. (1993) estimate a range of 90–210 seeds are needed to retain with a probability of 90–95% alleles with a frequency of 0.003 to 0.05 for a number of loci ranging from 10 to 150. Cross-pollinating species usually require more plants to maintain the genetic variation that exists within the population than self-pollinating species [See Crossa (1995) for more details]. However, this is not always the case and may depend on the degree of within-accession variation in sub-populations of selfing species.
The minimum number of seeds for regeneration can be estimated from the standard sample size used for regeneration and the sample viability according to the following equation:
|
1Germination and field establishment percentage should be expressed as decimals: i.e. 95% expressed as 0.95. |
In the case of clonally-propagated crops, since plants should be genetically identical within the accession, the choice of sample size is mostly related to the probability of plant survival in the field and to guarantee that at least a few plants will survive to be harvested so that the accessions can be regenerated again. Often, a minimum 5–10 plants per accession are required, or more if propagules are required for other purposes.
Preparation of seeds / planting material
When preparing seeds stored in a genebank for regeneration, it is necessary to remove the containers from storage and leave them to warm up overnight at room temperature before opening them, to avoid a rapid uptake of moisture. For clonally propagated crops, different parts of the plant may need to be used for regeneration, from tuberous roots to vines, stems, suckers or other plant parts. For each one, particular methods apply for selection, cutting, disinfestation and short-term storage or pre-conditioning before planting.
Maintaining effective population size
One of the major objectives of regeneration is to ensure that effective population size (Ne) is maintained within the accession. Methods for computing the variance of Ne, for (1) germplasm collection and regeneration of diploid monoecious species, (2) cross-pollinated species and (3) mixed self and random mating species, have been developed by Crossa and Vencovsky (1994); Crossa and Vencovsky (1997) and Vencovsky and Crossa (1999) respectively.
According to Crossa and Vencovsky (1994) and Vencovsky and Crossa (1999), the best strategy for maintaining high Ne is to take an equal number of seeds from the largest possible number of maternal plants. It is more difficult to collect self-pollinating than cross-pollinating species. If there are differences in maturity at flowering and maturity between plants within the accession, it is better to harvest individual plants and mix an equal proportion of seeds from different mother plants to avoid maternal effects. For clonally propagated crops, the population size is not as important because plants within an accession are usually genetically identical. However, many clonally propagated crops have a significant amount of heterozygosity due to some level of natural out-crossing and perpetuation through vegetative means later, which may be reflected as variation between plants of an accession (Vasil et al. 1994; Lebot and Aradhya 1992). So, 5–10 plants per accession is recommended. When it is proved that they are genetically identical, it is more important to select material from a few healthy and vigorous mother plants than
from a large number of inferior plants. The number planted will therefore depend on the level of heterozygosity and intraspecific diversity as well as on cost of conservation and the needs of characterization and evaluation.
Choice of environment
Germplasm accessions should be regenerated when possible in the same ecological region where they originated. Alternatively, select a location that minimizes selection pressures on genotypes or populations. If no suitable sites are found, collaborate with other institutions that can provide suitable sites or facilities for regeneration. Take care during regeneration and when handling seed or plant propagules to avoid contamination from adjacent plots, to minimize gene flow and to prevent inadvertent introduction of transgenes. Plants that can be clearly identified as contaminants and do not belong in the population should be removed. Accessions should not be planted in fields where the same crop has previously been grown to reduce the risk of volunteer plants, as well as the accumulation of soil pests and diseases.
Regeneration plots should be as uniform as possible and fields should be well drained. Good irrigation should be available even for rain-fed crops to avoid any selection exerted by drought as well as to ensure good yields. A soil nutrient test is also advisable to determine what fertilizers are needed.
Isolation
The breeding system of the particular crop is important. In the case of cross-pollinated species, use proper isolation distances, temporal isolation, bagging, cages and other mechanisms. Since the degree of outcrossing in a number of plant species is related to location, it is a good practice to estimate the outcrossing rate at the place where plants are being regenerated so that the appropriate pollinating technique is used.
Crop management
It is good practice to keep the regeneration plots as clean a possible from alien seeds and plants. Weeding should be carried out regularly to eliminate competition. During the preparation of the regeneration plots, weeds and soil-borne pests and diseases should be eliminated with an appropriate treatment, e.g. herbicides sprays, sterilizing soil, cultivation followed by herbicide and/or deep ploughing to kill emerging weeds.
Monitoring accession identity
Label all accessions individually with long-lasting labels or permanent ink and keep field maps so that the accession identity can be monitored through the crop season. For seed crops, it is recommended to keep an original seed sample for reference in a small plastic bag in a dry environment at 15°C. Whenever the accession is regenerated, the newly harvested seed can be matched to the seed sample to verify that the accession is true to type. The identity of regenerated seed or propagules can also be confirmed by comparing with the original characterization data for specific traits of the accessions, if available.
Harvesting
In general, harvesting is done at optimum maturity (which is after the point of physiological maturity) of the plant, when the maximum number of seeds are ripe, tolerant of desiccation and can be threshed with minimal mechanical injuries and before they deteriorate and disperse naturally [see Rao et al. (2006) for more information]. In the case of clonally propagated crops, the physiological maturity of the mother plant is the most important criterion for the collection of propagules for successful regeneration or short-term conservation. The maturity of the edible part of the plant is usually irrelevant in cases where it does not coincide with the part being propagated.
Common pests and diseases
The guidelines provide a list of the common pest and diseases for each crop but not all the symptoms or control measures. During regeneration (including harvest and post-harvest), crops must be inspected by plant protection specialists, particularly for seed-borne or vegetatively transmitted diseases, to ensure the highest possible health and viability of regenerated material.
References and further reading
Crossa J. 1995. Sample size and effective population size in seed regeneration of monoecious plants. In: Engels JMM, Rao RR, editors. Regeneration of Seed Crops and Their Wild Relatives (1.5 MB). Proceedings of a consultation meeting, 4–7 December 1995, ICRISAT, Hyderabad, India. IPGRI, Rome, Italy. pp.140–143.
Crossa J, Hernandez CM, Bretting P, Eberhart SA, Taba S. 1993. Practical considerations for maintaining germplasm in maize. Theoretical and Applied Genetics 86: 673–678.
Crossa J, Vencovsky R. 1994. Implications of the variance effective population size on the genetic conservation of monoecious species. Theoretical and Applied Genetics 89:936–942.
Crossa J, Vencovsky R. 1997. Variance effective population size for two-stage sampling of monoecious species. Crop Science 37:14–26.
Engels JMM, Visser L, editors. 2003. A guide to effective management of germplasm collections (1.4 MB) Handbooks for Genebanks No. 6. IPGRI, Rome, Italy.
FAO/IPGRI. 1994. Genebank standards (0.2 MB). Food and Agriculture Organization of the United Nations, Rome / International Plant Genetic Resources Institute, Rome, Italy.
FAO. 1998. The state of the world’s plant genetic resources for food and agriculture. Food and Agriculture Organization of the United Nations, Rome, Italy.
Hanson J. 1985. Practical manuals for genebanks: Procedures for Handling Seeds in Genebanks. IPGRI, Rome, Italy.
ISTA. 2008. International rules for seed testing. International Seed Testing Association. IPGRI ISTA Secretariat, Switzerland.
Lebot V, Aradhya KM. 1992. Collecting and evaluating taro Colocasia esculenta for isozyme variation. FAO/IBPGR Plant Genetic Resources Newsletter 90:47–49.
Rao NK, Hanson J, Dulloo ME, Ghosh K, Nowell D, Larinde M. 2006. Seed Handling in Genebanks. Handbook for Genebanks No. 8. Bioversity International, Rome, Italy.
Reed BM, Engelmann F, Dulloo ME, Engels JMM. 2004. Technical guidelines for the management of field and in vitro germplasm collections. Handbooks for Genebanks No. 7. IPGRI, Rome, Italy.
Sackville Hamilton NR, Chorlton KH. 1997. Regeneration of accession in seed collections: a decision guide (4.5 MB) Handbooks for Genebanks No. 5. IPGRI, Rome, Italy.
Soest LJM van. 1990. Plant genetic resources: safe for the future in genebanks. Impact of Science on Society 158:107–120.
Vasil IK, Thorpe TA, editors. 1994. Plant Cell and Tissue Culture. Kluwer Academic Publishers, Dordrecht. The Netherlands. 604 pp.
Vencovsky R, Crossa J. 1999. Variance effective population size under mixed self and random mating with applications to genetic conservation of species. Crop Science 39:1282–1294.
Regeneration guidelines for bean
View regeneration guidelines in full (in PDF)
Also available in the following languages: |
The information on this page was extracted from:
Salcedo J.M. 2008. Regeneration guidelines: common bean. In: Dulloo M.E., Thormann I., Jorge M.A. and Hanson J., editors. Crop specific regeneration guidelines [CD-ROM]. CGIAR System-wide Genetic Resource Programme, Rome, Italy. 9 pp.
Before reading the regeneration details for this crop, read the general introduction that gives general guidelines to follow by clicking here.
Introduction
Common bean (Phaseolus vulgaris L.) belongs to the legume family (Leguminosae). It is widely cultivated and represents one of the largest food components in Latin America and Africa valued for its high content of protein and micronutrients such as iron and folic acid. It is one of the most economically important crops in Latin America and provides an income source for small farmers (Pachico 1989).
The common bean is mainly self-pollinated; however, many authors have reported outcrossing or natural hybridization in both wild and cultivated populations. Ibarra-Perez et al. (1997) reported cross-pollination rates between 0 and 85%.
 Common bean (Phaseolus vulgaris L.) growing the greenhouse. (photo: Orlando Toro/CIAT) |
Although outcrossing is sporadic, it is necessary to take some precautions during regeneration, mainly in wild accessions grown in the greenhouse or field in order to maintain genetic integrity.
Choice of environment and planting season
Climatic conditions
- Common bean grows well at temperatures ranging from 15 to 27°C and will withstand temperatures up to 29.5°C.
- High temperature (close to or higher than 35°C) and moisture stress during flower and pod setting results in abortion of large numbers of blossoms and developing pods.
- The ideal growing conditions are rainfall of 350–500 mm rainfall during the growing season combined with low relative humidity to minimise risk of bacterial and fungal disease.
Planting season
- Beans are considered a warm-season crop, sensitive to temperature extremes. Low temperatures slow down plant growth while high temperatures accelerate it. Generally, plants are more adaptive during short days; they are very frost tender and need a minimum average soil temperature (18°C) to germinate well. Sow after the last frost-free date. Take account of day length and temperature when selecting time of sowing to ensure the most favourable growing conditions.
- Most types of bean require a frost-free growing season of 85 to 120 days.
Preparation for regeneration
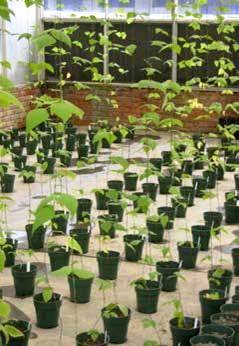 Regenerating common bean (Phaseolus vulgaris L.)in the greenhouse at CIAT, Palmira,Colombia.(photo: Orlando Toro/CIAT) |
When to regenerate
- When seed stocks are <1200 seeds.
- When germination drops below 85% during the initial germination test before storing or the periodical monitoring of viability every 5 years.
- If the seed stocks are found to be infected by pathogens, i.e. fungi, bacteria and viruses.
Field selection and preparation
- In general, common bean requires deep, fertile soil, from loose to slightly compact, with good physical properties, a pH of 5.5–6.5, and flat or rolling topography with good drainage.
- Prepare the seedbed carefully then irrigate before planting so that the soil is uniformly moist.
- The altitude of the planting area should be the same as, or very similar to, the altitude of the origin of each material to ensure flowering.
To avoid disease problems, do not grow beans in the same field in consecutive years.
Greenhouse regeneration (see photo)
- Use 8 litre poly pots (recommended size) as seedbeds to allow sufficient space for root development.
- If re-using pots, remove any dirt with a brush, wash pots thoroughly in disinfectant, rinse and soak in a 5% bleach solution for 5 minutes, drain and stack to dry.
- Fill pots with sterile soil or soil replacement and tamp gently to settle soil.
- Water the soil gently to ensure it is damp throughout and settled into the pot; the level needs to be about 3–5 cm below the rim to ensure water does not run out.
Method of regeneration
To maintain genetic integrity, collect seed sample from the original source if possible. The minimum quantity of seeds required for regeneration is 80. In some cases, especially accessions from germplasm donations, the minimum number of seeds is not always available, but regeneration should still be carried out.
One of the few outcrossing species is Phaseolus coccineus L., which is a virtually obligate ‘outcrosser’. To obtain adequate seed and maintain diversity, plants should be sib-pollinated (in some cases, particularly with the cultivated varieties, tripping will work to get adequate seed, but may not give good diversity).
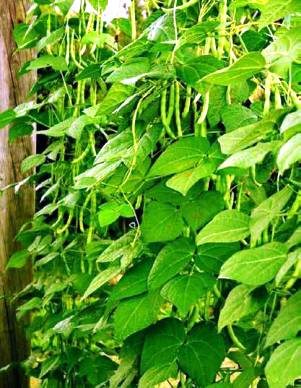
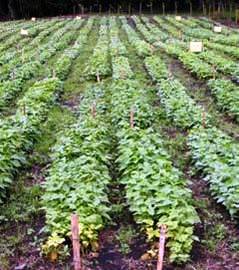 Field plots of common bean (Phaseolus vulgaris L.) at CIAT, Tenerife, Colombia. (photo: Orlando Toro/CIAT) |
Planting layout, density and distance
- Plant bean seeds in rows 2–5 m long. Plots of 3–5 rows may be adequate, depending on the number of seeds being planted per accession (see photo).
- Bush-type dry bean varieties are best planted in 40-cm rows, or drilled in narrow rows, which allows them to fill in rows more quickly and shade out weeds.
- Space plants 20–30 cm apart, with up to three seeds per hole.
- Plant at a depth of 3–5 cm.
- In the greenhouse, plant the seed at a depth of 2–3 cm. Use three seeds per pot and thin to two plants after germination. Use 25 pots (50 plants) for each accession to assure genetic diversity.
Planting method
In the field:
- In order to avoid mechanical damage to the seeds, plant by hand.
- Use a bamboo pole, or similar, for accessions with an indeterminate growth habit (climbers).
- For accessions with semi-climber or prostrate growth habit, cut the vines when they are too vigorous to avoid connection between accessions.
In the greenhouse:
- Place seed on top of soil and press with a finger to push it into the soil or use a ‘dibble’ to make a hole for the seed.
- After planting, gently water the soil to moisten it and dampen the seed.
Crop management
Fertilization
- Common bean responds well to both chemical and organic fertilizer. Do a soil test to determine soil fertility status.
- Apply fertilizer at the time of sowing.
- In general, organic materials are recommended as they increase the population of saprophyte micro-organisms and help to reduce the presence of disease in the crop.
Weed management
- Keep the seedbed weed free to allow seedlings to establish. The most critical time is between 15–30 days after emergence of seedlings.
- Weed by hand if labour is not a constraint or use recommended herbicides, especially pre-emergence formulations.
- Up to three weedings may be required in the case of hand or mechanical weeding before the crop canopy fully covers the ground.
- After flowering, avoid weeding, or keep to a minimum, as it tends to result in flower loss.
Thinning
- Thin 2 weeks after seedling emergence or at four-leaf stage, leaving one seedling per station. This should be done when the soil is moist and soft to make hand-pulling easy.
- Take care not to break shoots or damage the root system of remaining seedlings. Thin during the cooler part of the day (early morning or late afternoon) to reduce stress on plants.
Irrigation
- If regeneration is carried out under rainfed conditions, provide supplementary irrigation during drought periods. Where a sprinkler system is used, avoid overwatering during flowering to lessen flower drop.
- Use furrows for flood irrigation and water once a week for 2 hours, more often during flowering.
Common pests and diseases
Contact plant health experts to identify pest and disease symptoms and appropriate control measures. Common pests and diseases include:
- Beet armyworm, stem maggot, white grub, aphid, leaf drillers, pod-sucking bugs, stem borers, thrips and weevils
- Greenhouse pests: whitefly (Tialeurodes vaporariorum), thrips such as the western flower thrip (Frankliniella occidentalis) and two-spotted spider mite (Tetranychus urticae)
- Anthracnose (caused by the seed-borne fungus Colletotrichum lindemuthianum)
- Angular leaf spot, scab and Ascochyta blight
- Rust (caused by the fungus Uromyces phaseoli)
- Bacterial blights (caused by e.g. Xanthomonas phaseoli, Pseudomonas phaseolicola, Xanthomonas fuscans and Corynebacterium flaccumfaciens)
- Bean common mosaic virus BCMV (caused by mosaic viruses spread by aphids)
Pest and disease control
- Plant beans after a cereal crop such as maize, wheat or sorghum, rather than after soya beans or sunflowers to avoid disease problems.
- Check fields and greenhouses weekly for insect pests.
- In the greenhouse, avoid disease by not over-watering plants and ensure that soil or growing medium is properly sterile before planting. Increasing humidity (e.g. with a misting system) encourages beneficial insect predators and discourages insect pests such as mites.
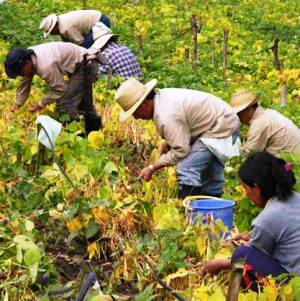 Harvesting common bean (Phaseolus vulgaris L.) in the field at CIAT, Tenerife, Colombia. (photo: Orlando Toro/CIAT) |
Harvesting
- Harvest when pods become dry, before shattering. Dryness can be judged by the rattling sound pods make when shaken and by brown pod colour. Harvest immediately to avoid pest damage.
- Harvest one accession (plot) at a time by hand picking the mature pods from each plant (see photo) and placing them in paper bags or other appropriate containers, which are labelled both outside and inside.
- Keep the bags of each accession together inside a labelled muslin cloth bag for drying.
Post-harvest management
1. Where ambient conditions are not conducive to pre-drying, use cold air-flow cabinets at 20°C and 35% relative humidity. (These can be improvised by using regular fans to create a continuous airflow.)
2. Extract seed from dried pods manually to avoid damage to the seed embryo. This may involve opening the pods individually by hand or tapping the muslin cloth bag containing pods with a small rod.
3. Clean by removing damaged or immature seeds and discarding foreign plant material.
This could be done by winnowing with baskets.
4. Verify the identity of each accession by comparing seeds with the original sample and with photographic images of seeds that were sown. (See section below.)
5. Visually check the entire lot of seeds harvested per accession and count out at least 1220 seeds, which is the minimum number required for storage per accession.
6. Dry seeds for a second time in hermetically sealed storage rooms at 20°C and 20% relative
humidity. The seeds reach moisture levels close to 9%.
7. Carry out seed tests for viability (50 seeds) and health (200 seeds).
8. Pack seeds in plastic containers with airtight closure at 5°C while awaiting results from the viability and health tests.
9. Verification of viability higher than 85%.
10. Verification of healthy sample free of fungi, bacteria and viruses.
11. Third seed drying in hermetically sealed storage rooms at 15°C and 10% relative humidity, where seeds reach moisture levels close to 6%. Alternatively, reduce seed moisture content using silica gel at 2:1 or 3:1 ratio in closed cabinets (or desiccation jars for small volumes).
12. Verify moisture of each accession in micro ovens using 1 g ground seed per accession. Moisture content may also be determined by non-destructive methods using electronic moisture meters.
13. Vacuum-pack seed in aluminium foil packets identified with barcode and accession number, taking samples for separate purposes: 1.) Distribution, 2.) Base collection, 3.) Periodic monitoring, 4.) Safety duplicate, 5.) Return to country of origin.
Monitoring accession identity
Compare with previous passport or morphological data and compare the following characterization traits, using data from seed characterization according to standard descriptors for common bean seeds (IBPGR 1982).
In seedlings and mature plants:
- Type of germination (hypogeal/epigeal)
- Hypocotyl colour
- Growth habit
- Days before flowering
- Flower colour
- Type of pods
- Height
In seeds:
- Main colour
- Secondary colour
- Tertiary colour
- Seed shape
- Weight of 100 seeds
- Seed brightness/opacity
Regeneration of wild common bean
Wild populations of common bean generally have smaller seeds which in some cases still have significant dormancy levels or require more specific conditions for germination. Before sowing, treat seeds with pre-germination processes in laboratory conditions.
- Disinfect seeds following a standard protocol: 1) soak in 70% alcohol for 1 min, 2) in fungicide for 10 min, 3) 2.5% sodium hypochlorite for 5 min.
- Spread seeds out onto germination paper or filter paper in petri dishes, at 30°C with 8 hours light–16 hours darkness, in germination cabinets or under laboratory conditions.
- After the radicle and apical meristem have emerged, transfer seedlings to plastic pots with sterile, lightly fertilized soil.
- Use closed greenhouses to avoid the risk of outcrossing.
- Space pots 20–30 cm apart.
- Depending on the material growth habits, some conditions need to be provided to facilitate a good development (use of guide strings for climbing plants for instance, sufficient spacing between prostrate plants, and 80 cm wooden sticks for bush plants)
- Some wild materials still feature early pod dehiscence. When fruits start to mature, perform daily monitoring to harvest the seeds before pods open, thus preventing seed loss.
- Carry out post-harvest management in the same way as for cultivated materials.
Documentation of information during regeneration
Collect the following information during regeneration:
- Regeneration site name and map/GPS reference
- Name of collaborator
- Field/plot/nursery/greenhouse reference
- Accession number; population identification
- Generation or previous multiplication or regeneration (if generation is not known)
- Preparation of planting materials (pre-treatments)
- Sowing date and density
- Field layout used
- Field management details (watering, fertilizer, weeding, pest and disease control, stresses recorded, others)
- Environmental conditions (altitude, precipitation, soil type, others)
- Emergence in the field or greenhouse (number of plants germinated)
- Number of plants established
- Days from sowing to flowering
- Breeding system
- Pollination control method used (method, number of plants pollinated)
- Harvest date and method
- Number of plants harvested
- Quantity of seeds harvested
- Agronomic evaluation; agro-morphological traits recorded
- Comparisons with reference materials (record any identification numbers or references of any samples taken from this regeneration plot)
- Post harvest (describe any relevant procedures)
References and further reading
Bioversity International, CIAT. 2009. Key access and utilization descriptors for bean genetic resources. Bioversity International, Rome, Italy; International Center for Tropical Agriculture, Cali, Colombia. Available here.
Ibarra-Perez FJ, Bahman E, Saines G. 1997. Estimation of outcrossing rate in common bean. Crop Science 37:60–65.
IBPGR. 1982. Phaseolus vulgaris Descriptors. IBPGR, Rome, Italy. Available here.
Lewis G, Schrie B, Mackinder B, Lock M, editors. 2005. Legumes of the World. Royal Botanic Garden Publishing, Kew, UK. 592 pp.
McCormack J. 2004. Bean Seed Production. An organic seed production manual for seed growers in the Mid-Atlantic and Southern U.S. Available for purchase from: http://www.savingourseeds.org.
Pachico D. 1989. Trends in world common bean production. In: Schwartz HF, Pastor-Corrales MA, editors. Bean production problems in the tropics. CIAT, Cali, Colombia. pp. 1–8.
Rios M, Quirós J, Arias J, editors. 2003. Fríjol. Recomendaciones generales para su siembra y manejo. Antioquia, Colombia. Corporación Colombiana de Investigación Agropecuaria Corpoica.
Salcedo J, Debouck DG, Torres AM, Guevra C. 2006. Flow chart of operations for bean and tropical forage germplasm. Genetic Resources Unit files (Poster). CIAT, Cali, Colombia.
Available from: http://isa.ciat.cgiar.org/urg/showunitfiles.do?type=unitfiles&by=&collection. Date accessed: 30 September 2008.
Welsh MM. 2008. Operations Manual for the Phaseolus Germplasm Collection. Western Regional Plant Introduction Station, Pullman, Washington.
Acknowledgements
These guidelines have been peer reviewed by Molly Welsh, USDA Western Regional Plant Introduction Station, USA; and Jaime Roberto Fonseca and Tereza Cristina de Oliveira Borba, Empresa Brasileira de Pesquisa Agropecuária (EMBRAPA), Brazil.
Regeneration guidelines for breadfruit
 View regeneration guidelines in full (in PDF) |
The information on this page was extracted from:
Ragone D. 2008. Regeneration guidelines: breadfruit. In: Dulloo M.E., Thormann I., Jorge M.A. and Hanson J., editors. Crop specific regeneration guidelines [CD-ROM]. CGIAR System- wide Genetic Resource Programme, Rome, Italy. 7 pp.
Before reading the regeneration details for this crop, read the general introduction that gives general guidelines to follow by clicking here.
Introduction
Breadfruit (Artocarpus altilis (Parkinson) Fosberg) is a long-lived, tropical, evergreen tree primarily grown for its starchy carbohydrate fruit. Breadfruit has been cultivated in the Pacific Islands for nearly three millennia and was domesticated from A. camansi Blanco (breadnut) in New Guinea and nearby islands. A few seedless breadfruit Polynesian cultivars were distributed to the Caribbean, along with breadnut, in the late 1700s and are now widely distributed in the tropics. In most regions of the world breadfruit varieties are seedless triploid forms (2n=84). In some parts of the Pacific, diploid (2n=56) varieties are also found, some of which produce fertile seeds while others are less fertile (Ragone 2001; Zerega et al. 2004). Low fertility in diploids probably resulted from continuous vegetative propagation accumulating genetic abnormalities (somatic mutations). Breadfruit is outcrossing but produces seedless fruit parthenocarpically if there is no fertilization. This crop is maintained ex situ as clonal trees in field genebanks. Trees can live 80 years or more.
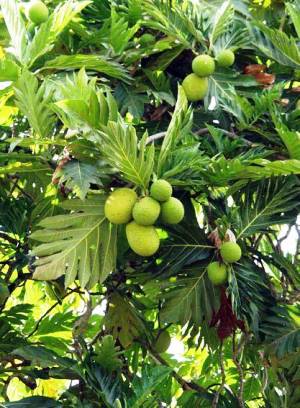 An abundance of breadfruit on a Polynesian variety in the breadfruit collection at the National Tropical Botanical Garden, Hawaii. (photo: Jim Wiseman) |
Choice of environment and planting season
Limits of adaptation
Breadfruit is adapted to a wide range of ecological conditions.
- Altitude: grows best in equatorial lowlands below 600–650 m but is found at elevations up to 1550 m.
- Latitude: the latitudinal limits are approximately 17°N and S but the range extends to the Tropics of Cancer and Capricorn in maritime climates.
- Rainfall: a mean annual rainfall of 1000–3000 mm or greater
- Temperature: 15–40°C; optimum 21–32°C
- Soil: prefers deep, fertile, well-drained, light and medium soils with pH 6.1–7.4.
- Depending on the variety, can tolerate coastal and shallow sandy soils of coral atolls.
Planting season
Plant at the onset of the rainy season and irrigate as needed during the first 1–3 months of establishment.
Preparation for regeneration
Breadfruit is clonally propagated using root shoots or root cuttings. Vegetative propagation is required for seedless varieties and preferred for seeded varieties. Seeds are rarely used because seedlings are not true to type.
When to regenerate
- As trees age, become crowded and unhealthy.
- To produce plants for distribution.
Selection of planting material
- Collect root shoots and cuttings after the fruiting season and when the tree is in an active vegetative stage. This is when carbohydrate levels in the roots are at their highest.
- Breadfruit roots tend to spread and can intermingle with those of adjacent trees so follow a root back to the source tree to make sure it is from the desired parent tree.
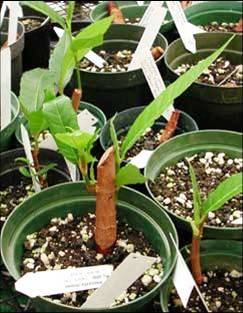
 Surface roots and root sucker used for vegetative propagation of breadfruit. Large arrows indicate where the sucker should be severed. Small arrows point to a suitable, healthy, well-formed root. (photo: Diane Ragone) |
Preparation of root shoots
- Collect healthy shoots (see photo) when they are at least 20–25 cm tall and the stem has become woody and is producing lobed leaves. Shoots up to 1 m tall can be used.
- Cut the attached root 10–15 cm on either side of the shoot and carefully remove the shoot from the soil. Use a sharp machete or clippers to sever the shoot from the parent tree and to facilitate wound healing.
- Trim the leaves to reduce transpiration. On taller shoots, excise the tip at a 45-degree angle at a height of 15–30 cm as the shoot tip tends to die back and new growth develops from buds along the stem.
- The success rate of directly transplanting shoots to another location is low, around 25%. The percentage of successful rooting and new vegetative growth in the nursery ranges from 50 to 90%. Grow root shoots under nursery conditions for at least 3–6 months until they are large enough for field planting.
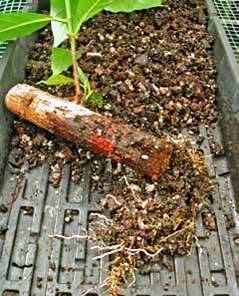
Preparation of root cuttings
- Select healthy, undamaged roots that are growing just beneath the surface of the soil and carefully excavate them. Do not use surface roots because they tend to dry out and are less successful. Look for roots with small rounded bumps (adventitious buds) on the surface which will develop into new shoots (see photo).
- Use roots 1.5–6 cm in diameter (3–4 cm for best results). Removing roots larger than 6 cm can damage the tree as the wounded area will heal more slowly.
- Use a sharp machete or clippers to sever the root. The remaining attached root will often develop a root shoot at the cut end.
- Cut harvested roots into 10–25 cm sections.
- Wash and scrub root cuttings to remove soil and discard any pieces that are damaged or misshapen. Treat with fungicide to prevent root rot. Hormone treatment is not required but standard hormone mixes can be used according to the manufacturer’s recommendation.
Raising root shoots / root cuttings
- Place root shoots and cuttings in a propagating bed, flats, or individual pots and label each piece with its accession number (see photo below left).
- Space 10–15 cm apart in a row, with 15–20 cm between rows in beds or flats.
- Use well-drained potting media or clean, washed silica sand with coir dust or sawdust (2:1 ratio). Do not use beach sand because it is too saline and alkaline.
- Place cuttings either horizontally (lightly covered with media) or at a 45 degree angle with the upper quarter exposed.
- Keep cuttings shaded (up to 60% shade) and moist, but not wet; misting is recommended and the roots should never be allowed to dry out.
- The percentage of rooting ranges from 30 to 85% (photo photo below right).
- Shoots begin to develop from adventitious buds after 3–4 weeks.
- When shoots are 20–25 cm tall with their own roots, usually in 4–6 months, carefully uproot and transplant the cutting into a 1–2 gallon pot; use a well-drained media (e.g. potting mix with perlite or volcanic cinder, clean local loamy or sandy soil) and fertilize sparingly, at half the manufacturer’s recommendations.
- Keep plants in partial shade and weed free.
- Grow to a size of 0.6–1.6 m over 6–9 months and then plant in the field.
- If plants are to be field planted in full sun, gradually move to full sun conditions in the nursery for about 2 months to condition them to the site conditions. Keep plants moist and do not expose to strong wind.
 |
 |
|
Root suckers and root cuttings in potting media in shadehouse, developing new buds and shoots. (photo: Diane Ragone) |
Healthy new feeder roots developing on an excised root cutting. (photo: Jim Wiseman) |
Field selection and preparation
- Breadfruit can be grown on a variety of soil types but does best in well-drained sandy loam or clay loam soils.
- Trees may shed their fruit and leaves and eventually die if the soil remains excessively wet or waterlogged.
Method of regeneration
Planting layout, density and distance
- Plant 1–3 trees of each accession 12–15 m apart in the field.
Planting method
- Trim back the lower leaves by one-half to two-thirds to reduce transpiration. Do not remove or damage the growing point where new leaves develop.
- Protect from wind and excessive heat during transport.
- Dig a hole as deep as the container and twice as wide, add a small amount of slow-release balanced N-P-K fertilizer to the bottom of the hole and cover with soil.
- Carefully remove the tree from the container to prevent damage to the root system and place it in the hole.
- Add soil to no higher than the level of the plant in the pot, add compost and water well.
- Close to 100% success rate can be expected.
Crop management
Weed management
- Mulching young plants helps to preserve soil moisture, maintain a steady supply of nutrients and control weeds around the root system.
- Avoid herbicide use around the base of the tree as it can cause damage if it comes in contact with the surface roots or tender trunk.
Irrigation
- If the weather is dry, irrigate for the first 1–3 months of establishment. Deep irrigation is important to encourage a deep root system.
Common pests and diseases
- Contact plant health experts to identify the symptoms of the likely pest and diseases and the appropriate control measures.
- Breadfruit is relatively free of pests and diseases. Snails and mealy bugs can be a problem on young plants and over-watering in the nursery can result in fungal dieback.
Pest and disease control
- Follow good nursery practices (e.g. monitoring to control pests when they first appear, no over-watering or over-fertilizing). Use insecticidal soaps, sprays, or fungicides sparingly when needed, following manufacturer’s recommendations.
Others
- Protect young trees from cattle, goats, horses and other animals that eat the bark and tender shoots.
Monitoring accession identity
Once the tree is mature and bears fruit, compare general fruit and leaf characters with the original mother plant to ensure that the regenerated plant was obtained from the desired parent tree.
Documentation of information during regeneration
Collect the following information during regeneration:
- Regeneration (nursery) site name and map/GPS reference
- Name of collaborator
- Accession number(s)
- Type of propagating material (e.g. root shoot, root cutting)
- Nursery planting date
- Survival rate of propagating material
- Nursery management details (media, watering, fertilizer, weeding, others)
- Field site name and map/GPS reference
- Field conditions (altitude, precipitation, temperature, soil type, others)
- Number of plants established, planting distance
References and further reading
Bioversity International, NTBG. 2009. Key access and utilization descriptors for breadfruit genetic resources. Bioversity International, Rome, Italy; National Tropical Botanical Garden, Hawaii, USA. Available here.
Coronel RE. 1983. Rimas and kamansi. Promising Fruits of the Philippines. University of the Philippines at Los Baños. pp 379–398.
Nakasone HY, Paull RE. 1998. Breadfruit. In: Tropical Fruits. CAB International, Wallingford, UK. pp. 329–334.
Ragone D. 1997. Breadfruit: Artocarpus altilis (Parkinson) Fosberg. Promoting the conservation and use of underutilized and neglected crops. 10. IPGRI, Rome, Italy.
Ragone D. 2001. Chromosome numbers and pollen stainability of three species of Pacific Island breadfruit (Artocarpus, Moraceae). American Journal of Botany 88(4):693–696.
Ragone D. 2006. Artocarpus altilis (breadfruit). In: Elevitch CR, editor. Traditional Trees of Pacific Islands. Permanent Agriculture Resources (PAR), Holualoa, Hawaii. pp 85–100. Available at http://www.traditionaltree.org. Date accessed: 22 July 2008.
Smith NJH, Williams JT, Plucknett DL, Talbot JP. 1992. Tropical Forests and Their Crops. Cornell University Press, Ithaca, NY. pp. 296–303.
Webster SA 2006. The Breadfruit in Jamaica: A Commercial and Horticultural Perspective. Seymour Webster, Port Antonio, Jamaica.
Zerega NJC, Ragone D, Motley TJ. 2004. Complex origins of breadfruit: implications for human migrations in Oceania. American Journal of Botany 91(5):760–766.
Useful web links
The Breadfruit Institute [homepage of the Breadfruit Institute] [online]. Available from: URL: http://ntbg.org/breadfruit/. Date accessed: 22 July 2008
Morton J. 1987. Breadfruit [online]. Available from: URL: http://www.hort.purdue.edu/newcrop/morton/breadfruit.html. Date accessed: 22 July 2008.
Acknowledgement
These guidelines have been peer reviewed by Francis Zee, United States Department of Agriculture (USDA), USA and Bill Raynor, Nature Conservancy, USA.
Regeneration guidelines for coconut
 View regeneration guidelines in full (in PDF) Also available in the following languages: |
The information on this page was extracted from:
Konan J.L., Bourdeix R. and George M.L. 2008. Regeneration guidelines: coconut. In: Dulloo M.E., Thormann I., Jorge M.A. and Hanson J., editors. Crop specific regeneration guidelines [CD-ROM]. CGIAR System-wide Genetic Resource Programme, Rome, Italy. 10 pp.
Before reading the regeneration details for this crop, read the general introduction that gives general guidelines to follow by clicking here.
Introduction
The coconut palm (Cocos nucifera L.) belongs to the Arecaceae family (Order Arecales) and is the only species of the genus Cocos. The coconut palm is diploid (2n=32). It is woody and perennial with a stem that is erect, unbranched and cylindrical and grows from a single shoot meristem at the apex of the plant. It is anchored by numerous adventitious roots which are produced from the swollen basal part of the stem. The top of the trunk consists of a radiating compact crown with large, thick cuticled pinnate leaves. The fruit is a fibrous drupe with a smooth outside skin (exocarp) which varies in colour.
The two main types of coconut palm are tall and dwarf. Tall coconut palms grow to a height of 20–30 m. They are slow maturing, flower 6–10 years after planting, and have a productive life of 60–70 years. Dwarf coconut palms reach a height of 8–10 m in 20 years. They begin bearing about the third year and have a shorter productive life of 30–40 years. Tall palms are normally cross-pollinating and heterozygous, while dwarf palms are normally self-pollinating and homozygous. The coconut plant is monoecious with inflorescences bearing both male and female flowers. The male flowers, which are on the top portion of spikelets attached to the peduncle, are more numerous than the female flowers, which occupy the base of the spikelets.
Coconut varieties are classified into four groups according to their mode of reproduction:
-
Type I (strict allogamy): Short female phase with no overlap with the male phase of the same inflorescence or with the male phase of the following inflorescence. Examples are some populations of the West African tall cultivar.
-
Type II (indirect partial autogamy): Short female phase with no overlap with the male phase of the same inflorescence but with considerable or total overlap with the male phase of the following inflorescence. Examples are the cultivars Rennell Island Tall, Malayan Tall, Vanuatu Tall.
-
Type III (direct autogamy): Long female phase completely overlapping with the male phase of the same inflorescence, with or without overlapping with the male phase of the following inflorescence. Examples are the cultivars Malayan Yellow Dwarf, Sri Lanka Green Dwarf and Cameroon Red Dwarf.
-
Type IV (semi direct autogamy): Short female phase partially overlapping with the male phase of the same inflorescence and with that of the following inflorescence. Examples are the Brazil Green Dwarf and many dwarf x tall hybrids.
Coconuts are conserved ex situ in field genebanks, but are propagated from seed. There should be at least 45 palms per dwarf accession and 90 palms per tall accession and they must have been generated from at least 10 parent palms for dwarf accessions and 40 parent palms for tall accessions. Accessions are generally planted close to each other and surrounded by palms of many varieties.
The following regeneration guidelines are based mainly on the manual prepared by Santos et al. (1996).
Choice of environment and planting season
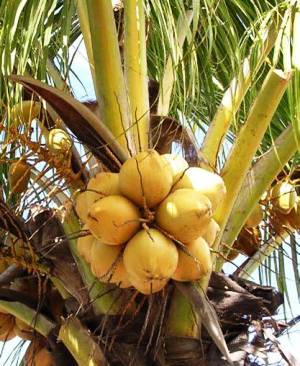 Coconuts (photo: EM Dulloo) |
Limits of adaptation (minimum and maximum)
- Altitude: 0–900 m
- Precipitation: 1000–4000 mm/year
- Temperature: 21–27°C
- Soil: wide range of soil types from sandy loam to heavy clay
- Humidity: 60–90%
Optimum recommended
- Altitude: up to 600 m
- Precipitation: 1500–2500 mm/year
- Temperature: 27°C
- Soil: aerated and well drained
- Humidity: 70–80%
Planting season
Seedlings (8–10 months old) should be transplanted at the onset of the rainy season or anytime when irrigation facilities are available.
Preparation for regeneration
When to regenerate
- When the number of living palms is less than 75 for cross-pollinating varieties or less than 30 for self-pollinating varieties.
- Before the palms reach a height which makes controlled pollinations difficult. If a ladder is used to climb the palms, this is when the palms become 10–12 m high (25–30 years old for tall types). If technicians can climb the coconut without a ladder, there is no such limit, and the accessions could be conserved for at least 50 years, if there are enough living palms.
Nursery site selection
- Rear seedlings in a well-maintained nursery to produce normal uniform plants. The nursery should be open, level and well-drained with light or loose-textured soil and far from sources of insect pests and diseases. Find a nursery site with a minimum area of 3600 m2 to accommodate about 12 000 seed nuts for planting on 50 ha.
Field selection
- Prepare the field with access roads, surface drainage and soil conservation measures to prevent erosion. Fence the field to protect seedlings from animals.
Preparation of planting material
- Harvest seed nuts manually at a minimum of 11 months after controlled pollination (see below). The bunch is ready for harvesting when at least one nut has a brown husk or if the water inside the nut cavity sloshes around when shaken.
- Harvest seed nuts every 2 months for tall accessions and every month for dwarf accessions.
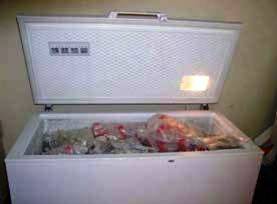
- Store seed nuts in the shade to complete the maturation process. Maturation is reached when the husk becomes dry after about 2 weeks. The fruits have no dormancy and so cannot be stored for long.
Propagule type, size and amount
- Keep extra seed nuts from the controlled pollinations for back up as only about 65% will result in seedlings for transfer to the field. While most cultivars produce about 100 nuts per palm per year under natural conditions, the yield is much less with controlled pollination; a mother palm may not produce more than 20 fruits per year. However, yield can be improved if you remove the older bunches from the palms before starting the controlled pollination programme.
Method of regeneration
For most talls and some dwarf cultivars, a high rate of natural pollination between accessions results in seed nuts that are not true to type. Where the accessions are planted in isolation (for instance, a unique accession planted in an isolated valley or on a small island at a distance of at least 600 m from other coconut palms), seed nuts from open pollination provide true-to-type seed nuts and can be used to regenerate accessions.
Natural pollination can be used to regenerate a few dwarf accessions. For example, 95% of yellow and red dwarfs are autogamous (self-pollinating) and the yellow or red colour of the sprout of the germinated seed nuts can be used as a genetic marker to eliminate off-types.
For all other varieties (all tall types and the green dwarfs), use controlled pollination, with the requisite isolation, bagging and pollination of the inflorescences. Controlled pollination, in which an individual identified palm is crossed with designated individual female palms, is a labour-intensive and costly technique, requiring a well-organized and trained team of technicians, a well-equipped laboratory for pollen processing and supervision by an experienced researcher.
Pollination mechanism
Selection of male and female parents
- Randomly select true-to-type parents among the palms bearing inflorescences that are ready to open after a month, at the right stage for controlled pollination. For regenerating a tall accession, choose 48 female parents and 24 male parents (a convenient number according to the available size of the accession and the planned duration of the controlled pollination programme). If possible, use different male and female parents. If not, try to keep the palms used as both male and female to a minimum.
Pollen collection
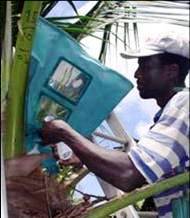
- This involves isolating the inflorescence in order to obtain pollen of the highest genetic purity; harvesting male flowers; preparing and conditioning the pollen to prolong and maintain high viability; and pollen quality control (see photos below)
- For allogamous and partially allogamous varieties, bag the inflorescences on the day the spathe opens. In the case of autogamous (dwarf) varieties in which the male phase starts as soon as the spathe opens naturally, put the bag on 72 to 48 hours before the presumed date of opening. A safety margin of 8 days between bagging the inflorescence and harvesting the pollen is sufficient to ensure the death of virtually all the pollen grains which were on the inflorescence when it was bagged. The few which might still be viable at the time would not survive the preparation and conditioning of the pollen.
- To bag the inflorescence, cut the spathe at the base, opening it first if it has not yet been done (in the case of autogamous plants). Surround the peduncle of the inflorescence with a wad of cotton impregnated with insecticide and spray the inflorescence with an insecticide. Taking care not to knock off the male flowers, fit the plastic bag over the inflorescence with the opening towards the base of the peduncle.
- Pleat the open end of the bag and then tie it with the cotton wad and a rubber band to stop insects from getting in. Also tie the sleeve with a rubber band and keep the plastic bag rolled up with tape.
 |
 |
|
Drying coconut pollen. (photo: Fonana Youssouf) |
Conditioning coconut pollen in a freezer. (photo: Fonana Youssouf) |
Isolation of female and male flowers:
- Isolate the inflorescence at least 8 days before the female flowers start becoming receptive. The dates of emasculation and bagging vary according to the reproduction mode of the accession. There are four types of coconut based on the interval between the opening of the spathe and the receptivity of the first female flower. Type I and II (22–24 day interval; emasculation 5 days after spathe opening; bagging 3 days later); Type III (0 interval; emasculation and bagging 48 hours before natural opening); and Type IV (emasculation the day of natural opening; bagging 3 days later). For types I and II, it is possible to bag and collect the pollen and then bag the same inflorescence again to use it as female for controlled pollination.
- It is very important that no female flower should be receptive at the time of bagging. Remove female flowers close to receptivity before placing the bag. As the presence of the bag has a strong depressive effect on fruit set, do not bag the inflorescences too early.
Hand pollinating a female coconut flower. (photo: Fonana Youssouf) |
Controlled pollination
- Prepare the pollen–talc mixture and pollinate by hand when most of the flowers have their stigmata open and are secreting nectar (see photo). When flowering lasts for 3–4 days and the female flowers are receptive for 2 days, one pollination is sufficient (this is the case with tall cultivars). When flowering lasts about 14 days and the female flowers are receptive for not more than 2 days, three pollinations will be required at 3-day intervals.
- Male parent 1 is used to pollinate female parents 1 and 2; male parent 2 is used to pollinate female 2 and 3; and so on, following the sequential double pair mating procedure. Each of these 48 crosses is made twice, for a total of 96 controlled pollinations. These pollinations will result in 110–130 seed nuts needed to plant 75 seedlings in the field (after seedbed and nursery selection and taking account that not all the seed nuts will germinate). About 4 months is needed for this controlled pollination process, including pollen harvest, bagging of the inflorescences, pollination and removing the bags.
- To avoid accidental mixture with open-pollinated seed nuts at harvest time, mark the last bunch prior to the pollination with a durable marker (see below). It is best to remove all older bunches prior to the controlled pollination. This way only the controlled pollinated nuts will develop and errors will be eliminated. It is also important to tag the bunch at the last spikelet in the peduncle with aluminum and copper wire tags (not galvanized iron sheet and wires) which include the palm identification numbers of the parents used.
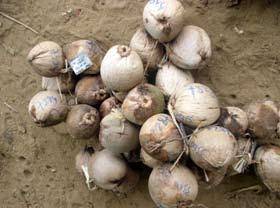
Harvested coconut seednuts (photo: Fonana Youssouf) |
Labelling
- One year is required between pollination and harvest and another year for the plant to grow in the nursery. So, it is necessary to have labels that can withstand time and vagaries of weather.
- On the tree, mark the fruits with a felt-tipped pen with indelible black ink. At harvest, attach an aluminium label engraved with the same artificial pollination number to each fruit, by a copper wire (see photo) In the nursery, attach a second aluminium label with the same number to a leaf of the seedling. Avoid writing on the plastic bag.
- Mark seed nuts on the mother palm 7–8 months after pollination.
Planting
The seedbed
- Clear the seedbed before ploughing and harrowing it to a fine tilth. Seedbeds should be 10–20 cm high, 1 m wide and 2 m long with 1 m between beds.
- Slice off the small part of the top of the husk to help retain moisture in the husk during watering and to encourage germination.
- Plant nuts close to one another and cover them with soil, with about two-thirds of their size buried to prevent them from floating in case of heavy rains.
- Maintain seedbeds with daily watering and partial shading, and inspect for disease and pest incidence.
- When the sprout emerges through the husk to a height of 4–6 cm, trim seedlings of any injured roots and plant in polybags filled with appropriate soil–manure mixture.
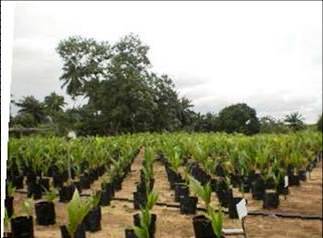
A polybag nursery. (photo: ML George) |
The polybag nursery
- Place the germinated nut in a bag half-filled with soil, with the sprout upright in the centre of the bag, then top the bag up with soil.
- Lay out the polybag nursery to enable equal setting of the seedlings at optimum distance, following a triangular system with equal spacing of 60cm (see photo).
- Set out the polybagged seedlings in the same order as they germinated. Place the earliest germinating seedlings in the first row in the eastern side of the area and the later germinating seedlings on the western side to reduce competition for sunlight.
- Apply fertilizer 2 months after germination (20g (NH4)2SO4 + 30 g KCl or NaCl per seedling) and 5 months after germination (40g (NH4)2SO4 + 60g KCl per seedling).
- The seedlings are transplanted to the field after 8–10 months, when leaf splitting occurs.
Land preparation
- Cut down thick vegetation, clear debris, then plough and harrow to improve soil tilth.
Planting layout, density and distance
- To facilitate the identification of palm pedigrees, prepare a planting map where the plots are identified to show the spots where specific palms are to be planted.
- Density of palms depends on the type of accession. Talls should be planted at a density of 143 palms/ha with a spacing of 9m between palms and 7.5m between rows. Dwarfs should be planted at a density of 205 palms/ha with a spacing of 6.5m between palms and 5.6 m between rows.
Planting method
- Select normal looking, pest- and disease-free, vigorous seedlings.
- Dig holes of 50 x 50 x 50 cm and allow about 2 months for weathering of the soil before planting in order to encourage early root–soil contact.
- Apply fertilizer mixed with soil to each hole before transplanting.
- Cover the base of the crown with loose topsoil, slightly firmed at the base of the crown.
- The top of the nut must be about 5–8 cm below the ground level. Make a slight depression towards the base of the crown to trap rainwater.
- After planting, record the pollination numbers in a plot map and check again by verifying the male and female parent of each palm in the field to ensure that the correct pedigree is planted. The palms with the wrong or uncertain pedigree should be replaced by a correct pedigree. This field check also allows calculation of the number of female and male parents that were used to rejuvenate the accession. This is important because information on the number of female and male parents initially used in the controlled pollination program is not sufficient; some of these parent palms may not have living progeny in the field.
Crop management
Weed management
- Weed every 4 months when there is a cover crop like Pueraria javanica. Otherwise, weed every 3 months or when necessary depending on the speed of weed growth.
Irrigation
- Provide irrigation when rainfall is limiting or during the dry season when the water deficit is over 50 mm for the month.
Fertilization
- Apply fertilizer (NPK + Mg) 1 year after planting based on the results of leaf analyses, and every year after that.
- Apply fertilizer at the onset of the rainy season.
- If using organic matter instead of mineral fertilizer, determine its mineral content before use to ensure that the palms are adequately fertilized.
Pest and disease control
- Visit the field twice a week (young plantation) or once a month (adult plantation) to monitor and control pests or diseases. Apply mechanical, chemical or biological treatment depending on the pest on advice by your plant health expert.
Harvesting
- Harvest seed nuts monthly, 11 months after pollination. All the nuts collected per pollination and per inflorescence should be grouped together to avoid mixing of the seed nuts.
- Take fruit to the nursery straight away and store in the shade to complete the maturation process. Never leave them in the plantation overnight in case of accidental mixing or loss.
- When colour coding and collection of hybrid seed nuts are complete, prepare a report of the harvest. State the number of nuts harvested per pollination number, the female palm numbers, and the respective colour codes used per crossing plan.
Monitoring accession identity
Many errors can occur with crosses from controlled pollinations and so the following controls should be put in place:
- Carefully record pollinations and harvesting. Record the unique number, given to each pollination and representing the exact pedigree of each seed nut, in a register or computer file.
- Using the Coconut Data Management (CDM) software and a planting map (see section on planting layout) can also help identify palm pedigrees.
- Replace plants which have lost their pollination numbers during transfer to the field with others of known pedigree.
- Detect off-types by their special traits, e.g. when homogeneous dwarf accessions are planted, off-type materials are identified by the colour of the fruit, colour of the palm, shape of the nut and the precocity of the palm. For tall accessions, special traits are the shape of the nut and vegetative characters (size of leaf, inflorescence, bunch and speed of growth), different colours of the root tips, the purplish colour of the mesocarp of some varieties or the sweet husk of immature nuts. When off-types are suspected, molecular markers can be used to check.
- Identify off-type materials at the nursery level by distinguishing features such as speed of germination and the colour of the palm. After planting in the field, mark the palm by painting the trunk to avoid any error during the observation. If the off-type is identified during the first two years after planting, replace it with legitimate material.
References and further reading
Batugal PA, Ramanatha RV, Oliver J, editors. 2005. Coconut Genetic Resources. IPGRI–Regional Office for Asia, the Pacific and Oceania (IPGRI-APO), Serdang, Selangor DE, Malaysia. Available here (4.4 MB).
Bioversity International, CIRAD. 2009. Key access and utilization descriptors for coconut genetic resources. Bioversity International, Rome, Italy; French Agricultural Research Centre for International Development, Montpellier, France. Available here.
CIRAD, COGENT, IPGRI. 2000. Coconut Data Management (CDM) manual, version 3.
Konan J-L, Bourdeix R, Batugal P. 2005. Production and provision of hybrid seednuts. Coconut hybrids for smallholders. CFC Technical Paper No. 42. pp. 12–25.
Nuce de Lamothe M de, Rognon F. 1975. Pollinisation assistée et contamination par des pollens indésirables [Assisted pollination and contamination by undesirable pollen]. Oléagineux 30:8–9, 359–364.
Nuce de Lamothe M de, Wuidart W, Rognon F, Sangare A. 1980. La fécondation artificielle du cocotier [The controlled pollination of coconut]. Oléagineux 35:193–205.
Rognon F. 1976. Biologie florale du cocotier. Durée et succession des phases mâles et femelles chez divers types de cocotiers. Oléagineux 31:13–18.
Sangare A, Rognon F, Nuce de Lamothe M de. 1978. Les phases mâles et femelles de l’inflorescence du cocotier. Influence sur le mode de reproduction [The male and female phases of the coconut inflorescence. Influence of the reproduction system]. Oléagineux 33:609–617.
Santos GA, Batugal PA, Othman A, Baudouin L, Labouisse JP, editors. 1996. Manual on Standardized Research Techniques in Coconut Breeding. IPGRI, Rome, Italy. The web version is available from: URL: www2.bioversityinternational.org/publications/Web_version/108/. Date accessed: 20 July 2010.
Acknowledgement
These guidelines have been peer reviewed by V. Ramanatha Rao, India, and Gerardo A. Santos, Philippines.
More Articles...
- Regeneration guidelines for cowpea
- Regeneration guidelines for faba bean
- Regeneration guidelines for finger millet
- Regeneration guidelines for grasspea
- Regeneration guidelines for lentil
- Regeneration guidelines for major aroids
- Regeneration guidelines for pearl millet
- Regeneration guidelines for pigeonpea
- Regeneration guidelines for wild potato
- Regeneration guidelines for sorghum
Subcategories
-
main
- Article Count:
- 17