Articles
Cultural practices for regeneration of cultivated rice

|
View regeneration guidelines in full (in PDF) Also available in the following languages: |
This information was extracted from: Reano R, Sackville Hamilton R, Romero G. 2008. Regeneration guidelines: rice. In: Dulloo ME, Thormann I, Jorge MA, Hanson J. (editors). Crop specific regeneration guidelines [CD-ROM]. CGIAR System-wide Genetic Resource Programme, Rome, Italy. 11 pp.
Before reading the regeneration details for this crop, read the general introduction that gives general guidelines to follow by clicking here.
Cultural practices
Climatic conditions
Rice has a tropical to warm-temperate distribution and is widely grown in every continent except Antarctica.
- It can be grown from the equator to about 53°N in China and 30–40°S over 3.5 to 6 months.
- Some relatively cold-tolerant varieties can grow at altitudes up to 3000 m.
- O. glaberrima , which is normally grown under upland or dry conditions and directly sown in the field, can normally be successfully regenerated under lowland conditions similar to those of O. sativa.
Planting season
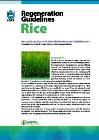
 Regenerating rice accessions at IRRI, Philippines. Note diversity in maturity and plant architecture (photo: Renato Reaño/IRRI) |
- Regenerate plants in the dry season.
- The dry conditions, short day-length and low (25–26°C) temperatures during grain filling allow for optimal seed production of tropical indicas and temperate japonicas, and pest and disease incidence is relatively low as well.
- The crop is ready for harvest during the period of lowest ambient relative humidity and rainfall.
- For specific groups, such as photoperiod sensitive materials, adjust planting so that plants are at maximum vegetative growth when short day-length occurs.
- Recalcitrant temperate japonicas, upland varieties and accessions with critically low seed quantities or poor viability, which are too risky for field planting, should be regenerated under mesh screens, in growth chambers maintained at cooler temperatures or at a cooler location.
Preparation for regeneration
When to regenerate
- When stocks are below 60g in the active collection and below 120g in the base collection.
- When germination rates during storage fall from 85–100% to 72–85% (85% of initial rates).
Pre-treatments
- Adjust seeds to ambient temperature, then place in ovens set at 50ºC for 48–72 hours to break dormancy, followed by equilibration at ambient temperature for 24 hours before seeding.
- For old seeds, soak in 1000ppm gibberellic acid for 20 hours or dehull to break dormancy.
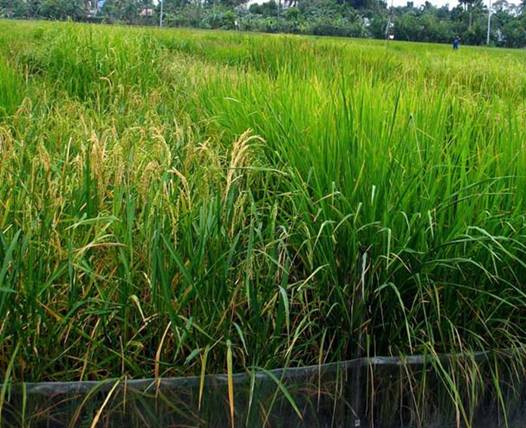
 Preparing furrows in a raised seedbed using an improvised wooden implement (photo: Roel C. Rabara/PhilRice) |
Field selection and preparation
- Loamy-clay soil is ideal and good irrigation and drainage facilities are necessary to provide appropriate water management for diverse germplasm with different moisture adaptations.
- Prepare land by ploughing the field once, harrowing two or three times, and levelling.
- Prepare a modified wet bed or a dry bed for sowing.
- Form beds of 5–10m long and 0.8m wide, raised by about 15cm for the dry bed or 10cm for the modified wet bed, and make furrows 10cm apart (see photo).
- Construct the dry bed in a dry area after thorough land preparation. Form the modified wet bed from paddied soil without standing water 2–3 days after cultivation.
Method of regeneration
Planting layout, density and distance (see photo below)
- Depending on the percentage germination and the required amount of seeds, 20–30g will be enough for a standard plot.
- Plant at least 100 seedlings per plot to produce between 2000 and 35 000 healthy and highly viable seeds (equivalent to 50–700g).
- Planting in larger plots is recommended for frequently requested accessions.
- Number field plots from left to right and right to left in alternating rows (see figure).
- Each plot should have eight 5-m long rows spaced 25cm apart.
- Transplant single seedlings 25cm apart, filling 21 hills per row.
- Leave two rows vacant between plots.
 |
 |
|
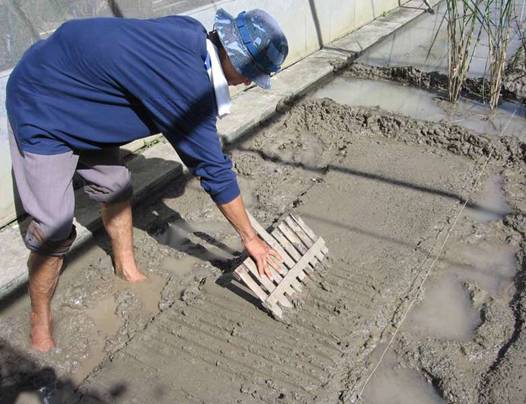
Rice accessions growing in the field (photo: Roel C. Rabara/PhilRice) |
Schema for numbering field plots. (photo: Renato Reaño/IRRI) |
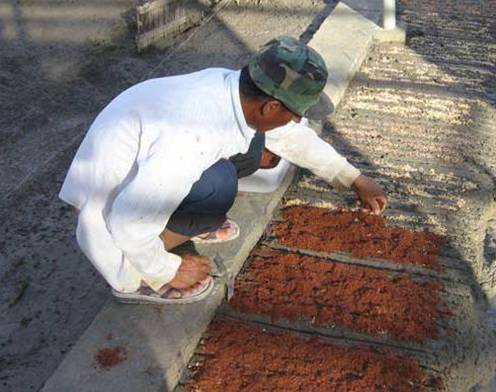
Sowing method
- Irrigated rice is generally transplanted while O. glaberrima and upland rice are direct seeded, but for seed regeneration for genebanks, transplant all accessions to facilitate field management.
- Sow seeds in seedbeds evenly along the rows and cover with garden soil or top-soil (see photo), then transplant seedlings by hand into the field plots in straight lines 18–30 days after sowing (see photo).
 |
 |
|
After sowing, seeds are covered with soil (photo: Roel C. Rabara/PhilRice) |
Bundled seedlings are distributed in |
- Compared with direct seeding, transplanting gives better seedling establishment, superior control over spacing and allows easier identification of volunteer plants.
Seedbed management
- Apply 10kg N per hectare.
- Apply granular insecticide to control ants, crickets and nematodes.
- Intermittently irrigate dry beds with an overhead sprinkler and modified wet beds by flooding, taking care not to submerge the bed so as to avoid mixing seeds between rows.
- Monitor and control any seedling pests.
Isolation (method)
The following procedures are recommended for isolating plants:
- Establish regeneration plots 2 weeks earlier than surrounding crops.
- Leave a space equivalent to 2 rows of rice between adjacent plots as fallow.
- Harvest only the inner rows, leaving one border row on each side.
- Arrange plots so that adjacent varieties have projected flowering dates separated by at least 10 days.
- Regenerate post-quarantine, original incoming samples in one of the following:
- In an isolated field at least 150–200m from other rice fields.
- In a field surrounded by a physical barrier to movement of disease and pest organisms, such as shrubs or trees to act as a windbreak.
- In a screenhouse.
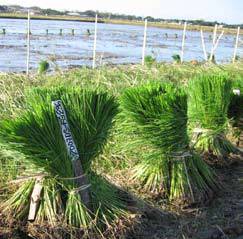
Label of the accession attached to the bunch of seedlings (photo: Roel C. Rabara/PhilRice) |
Labelling
- Generate a seedlist containing plot numbers and accession numbers.
- Mark envelopes or seed packets for planting with the corresponding plot number.
- Mark the entries on the seedbed with 20cm wooden labels (or equivalent) bearing plot numbers printed in indelible ink.
- Attach the relevant tags to the bunches of seedlings for planting (see photo).
- After planting out the seedlings attach the tags to bamboo stakes (or equivalent) to serve as field plot labels.
Crop management
Weed management
- Effective weed management in transplanted rice begins with a good irrigation system and good land preparation.
- Apply pre-emergent herbicides immediately after transplanting or before the weed seeds start to germinate, complemented with good irrigation within 5 days after transplanting.
- Hand weed at 21 to 30 days after transplanting before applying fertilizer. Spot-weed when necessary.
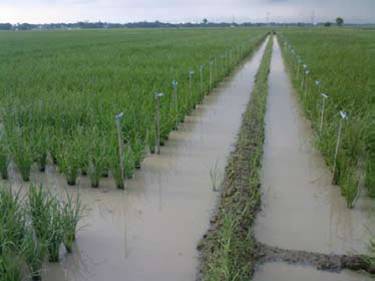
Irrigation and flooding
- Transplanted rice requires irrigation or standing water (2–3cm) in the first 5 days for efficient weed control.
- An alternating irrigation and drainage system may be needed, especially if there are entries of upland types and O. glaberrima.
- Ensure sufficient water is available at flowering to enhance seed set and avoid any reduction in fertility.
Fertilization
- Adequate fertilization is necessary to grow vigorous rice plants and produce a good yield.
- Determine the rate and type of fertilizer to use either from soil analysis or by using the Spad meter.
- At IRRI Experimental Station, the recommended fertilizer rate for dry season cropping is 90-30-30kg N-P-K per hectare. Split application of nitrogen is made, with basal at planting, first top dressing after first weeding at about 21–30 days after transplanting or at maximum tillering, and second top dressing at panicle initiation by spot application. All the phosphorus and potassium are applied at planting.
- Nutrient supplementation may be applied by root dipping seedlings in 4% zinc oxide prior to transplanting.
Common pests and diseases
Contact plant health experts to identify pests and diseases and appropriate control measures. Some of the major pest and diseases of rice are as follows:
Viruses
- Tungro (rice tungro bacilliform virus (RTBV) and spherical virus (RTSV))
- Grassy stunt (rice grassy stunt virus) (RGSV)
- Ragged stunt (rice ragged stunt virus) (RRSV)
- Rice streak virus (RSV)
Fungi
- Rice blast, Pyricularia grisea (Cooke) Sacc.
- Sheath blight, Rhizoctonia solani (Kuhn)
- Brown spot, Bipolaris oryzae (Breda de Haan) Shoemaker
- Bakanae disease, Gibberella fugikuroi
- Seedborne: Stackburn disease, Alternaria padwickii; Curvularia spp.
Bacteria
- Bacterial leaf blight, Xanthomonas oryzae pv. Oryzae (Ishiyama) Swing et al.
- Bacterial leaf streak, Xanthomonas oryzae pv. Oryzicola (Fang et al.) Swing et al.
- Bacterial grain rot, Pseudomonas glumae
Nematodes
- Ufra or stem nematode, Ditylenchus angustus Butler
- White tip, Aphelenchoides besseyi Christie
- Root knot, Meloidogyne graminicola Golden & Birchfield
- Rice root nematode (Hirschmanniella imauri , Hirschmanniella oryzae)
Insects
- Green leafhopper (Nephotettix malayanus; N. virescens)
- Planthopper: brown planthopper, Nilaparvata lugens (Stal); whitebacked lanthopper, Sogatella furcifera (Horvath)
- Rice bug, Leptocorisa oratorius (Fabricius); L. chinensis (Dallas); L. acuta (Thunberg)
- Stem borer: yellow stem borer, Scirpophaga incertulas (Walker); white stem borer, S. innotata (Walker)
- Rice black bug, Scotinophara coarctata (F.)
- Golden apple snail, Pomacea canaliculata Lamarck
Pest and disease control
Preventive
- The cheapest and most practical way for preventing attacks of insect pests, rodents and diseases is field sanitation.
- An active barrier system also helps prevent rodent attacks.
- Apply preventive insecticides to assure early protection.
- A systemic insecticide such as Carbofuran 3G can prevent early attacks from leaf cutting insects and maggots.
- Snails are present in standing water.
- After the final land preparation, construct small canals to facilitate drainage.
- During the first 2 weeks of crop establishment, drain and flash-flood the field several times to flush out golden snails.
Non-preventive
- Apply other pesticides during the vegetative stage against hoppers and borers.
- Apply knock-down insecticide at flowering and reproductive stage against stem borer and rice bugs.
- For fields with standing water, control golden snail by picking up snails and applying molluscicide.
Special care
- Remove rogue plants throughout the growing period.
- When regenerating a diverse or mixed accession, consult the seed file, original seed sample and remnant seed samples in order to avoid excessive roguing and associated genetic drift.
- Always note when mixed samples are planted and take care not to weed out types which are contained within the accession.
- After rounds of harvesting in a certain area, carry out flash flooding to moisten the soil for late maturing entries.
- Put net bags over panicles of accessions that are prone to rachis shattering to catch the seeds.
Harvesting
- Harvest about 28 to 35 days after flowering or at 80% maturity of the spikelets.
- Cut panicles and place them in clean cloth bags with tags indicating plot number and date.
- Harvest O. glaberrima and other shattering germplasm earlier, with each panicle harvested at the stage just before the time of shattering.
- Some other accessions may also need to be harvested by individual panicle, due to variation in maturity within the accession.
- This will avoid pre-harvest sprouting for nondormant entries as well as deterioration to early maturing in the population (i.e. genetic drift).
Post-harvest management
Seed cleaning
- Hand thresh or process harvested panicles with a self-cleaning thresher (Vogel type).
- Clean grains initially by blowing off inert matter, weed seed and half-filled grains and then transfer to net bags along with two shipping tags marked with the plot number and date of harvest.
- Clean and select seed manually at 40–50% RH and 22°C to eliminate poor quality seeds and off-types.
Seed drying
- Place seeds in the drying facility at 15°C and 15% RH for about 1 week to bring them to 8–10% moisture content. Alternatively, air-dry them for 3–4 weeks in a well-ventilated room, preferably with electric fans and dehumidifiers under 15–25°C to bring them to 11–13% moisture content.
- Transfer dry seeds to paper bags for another round of seed blowing.
- Verify harvest against the seed file and discard if unmatched.
- Place seeds in the drying facility for another week to achieve 5–8% moisture content while awaiting viability and seed-health test results. Alternatively, incubate seeds over 4–8 weeks under 20–25°C in a glass jar with an equal amount of activated silica gel or appropriate desiccant that is changed two or three times during the drying period upon colour change of indicator.
Seed testing
- Perform a viability test on 100 seeds (pre-incubated at 50°C for 5 days and room temperature for 2 to 3 days to break dormancy) with two replicates on moist paper towels under ambient temperature and 12/12 hour light/dark condition. Score viability after 7 and 14 days following ISTA rules.
- Test seed health following standard procedures and discard infected seeds.
- Determine moisture content by oven-method (130°C for 2 hours) on a 5g sample following ISTA rules.
Seed packaging
- Select seeds that are at 5–8% moisture content, clean, free from pests and with >85% viability and divide into base, active and/or duplication collections for conservation in aluminium foil or paper envelopes.
- Place seeds in paper envelopes in jars containing 30% silica gel.
- At IRRI, each accession is stored in: 1) Base collection with up to two 60-g samples in an aluminium can; 2) Active collection with two to five 10-g samples and one 500-g sample in aluminium foil; and 3) Duplicate set with two 15-g samples in aluminium foil.
- Store the base collection in long-term conditions at -20 to -18°C, and the active collection in a medium-term room at +5 to +25°C.
For information about monitoring accession identity and documentation of information during regeneration, click here.
References and further reading
Hanson J. 1985. Practical Manuals for Genebanks: Procedures for handling seeds in genebanks. IBPGR, Rome, Italy. HTML version available from: URL: http://www2.bioversityinternational.org/publications/Web_version/188/. Date accessed: 10 June 2010.
Rao NK, Jackson MT. 1996a. Seed longevity of rice cultivars and strategies for their conservation in genebanks. Annals of Botany 77:251–260.
Rao NK, Jackson MT. 1996b. Seed production environment and storage longevity of japonica rices (Oryza sativa L.). Seed Science Research 6:17–21.
Rao NK, Jackson MT. 1996c. Effect of sowing date and harvest time on longevity of rice seeds. Seed Science Research 7:13–20.
Rao NK, Hanson J, Dulloo ME, Ghosh K, Nowel D, Larinde M. 2006. Manual of seed handling in genebanks. Handbooks for Genebanks No. 8. Bioversity International, Rome, Italy. Available in English (1.5 MB), Spanish (1.4 MB) and French (1.9 MB).
Reaño R, Pham JL. 1998. Does cross-pollination between accessions occur during seed regeneration at the International Rice Genebank. International Rice Research Notes 23(3):5–6.
Reed BM, Engelmann F, Dulloo ME, Engels JMM. 2004. Technical guidelines for the management of field and in vitro germplasm collections. Handbook for Genebanks No. 7. IPGRI, Rome, Italy. Available here.
Sackville-Hamilton NRS, Chorlton KH. 1997. Regeneration of accessions in seed collections: a decision guide. Handbook for Genebanks No. 5. IPGRI, Rome, Italy. Available here.
Van Soest LJM. 1990. Plant Genetic Resources: Safe for the future in genebanks. Impact of Science on Society 158: 107-120.
Acknowledgement
These guidelines have been peer reviewed by Teresita Borromeo and Sancho G Bon, University of the Philippines Los Baños, Philippines; Tiur Sudiati Silitonga, Indonesian Centre for Agricultural Biotechnology and Genetic Resources Research and Development (ICABIOGRRAD), Indonesia; and Kim Taesan, RDA Genebank, Korea.
Comments
- No comments found
Leave your comments
Post comment as a guest